Feed on
Posts
Comments

A quick note that our Black Friday / Cyber Monday sales are on now: all OpenSprinkler products are shown in discounted prices right now, and the deal only lasts till Monday Nov 28. This is the only time of the year that we offer discounted pricing, so if you are interested in buying OpenSprinkler, grasp this chance and don’t let it slip away!

If you are wondering whether you need to apply any coupon code. The answer is NO: the price you see is the discounted price. In the past when we used to have coupons, many customers forgot to apply the coupon in the end. To save you the trouble of having to enter coupon code, we directly discount the price, so you will definitely not miss it.

Last Thursday I had a lot of fun doing a workshop at my college (UMass Amherst) where I taught students to use a WiFi-enabled Color LED matrix combined with Javascript programs to create animations displayed onto the LED matrix. The matrix is made of 5×7 WS2812 (NeoPixel) LEDs. I’ve actually designed it two years ago and wrote a blog post about it. Back then I was using an Arduino-compatible SquareWear Mini to control the display patterns. It was fun to play with, but changing the display patterns require modifying the Arduino sketch and upload it over and over again, which took a lot of time.

This time, I improved the design by simply using a ESP8266 WiFi chip mounted at the back of the LED matrix. I wrote a firmware with a minimal set of HTTP GET API, with which you can set all pixels colors, set the brightness, or tell it to scroll a line of text. What’s cool about it is that you can now use Javascripts to send animation frames to it on the fly, which is a lot easier compared to re-writing and uploading an Arduino sketch. In addition, you can take the LED matrix on the go and use your mobile phone to control it, which is nice for wearable electronics.

img_20161029_234314

The video below goes through the details. Take a look at it first. Essentially, combining ESP8266 with the LED matrix makes a little wireless display. The next thing I should work on is to figure out how to stream video to it. It’s going to be very very low resolution for sure, but it’s gonna be fun, and I can always daisy chain multiple matrices to make a larger display.


Workshop Materials

Below you can download the materials I prepared for the workshop, including the Arduino firmware code (compilable in Arduino using ESP8266 core with NeoPixel library), the Javascript programs I wrote, and the powerpoint slides with lots of details and can be used as a 1-2 hour tutorial.

Also, the LED matrix and ESP8266 development board that I used in the demo are both designed by myself. They are attached together by double-sided tape and three soldered wires. The hardware design files are available in my Github repository below:


I just discovered something exciting recently and want to share with you: it’s now possible to use IFTTT with OpenSprinkler and OpenGarage; and because IFTTT support Amazon Echo (Alexa), you can now speak voice command to trigger sprinkler actions. For example, say ‘Alexa, trigger open sprinkler zone 1‘, or ‘Alexa, trigger my garage door‘. I will briefly walk you through the setup process. We will be building support for IFTTT into the firmware soon, to allow for additional features like push notification. For now, the guide below will allow you to trigger actions on OpenSprinkler and OpenGarage with your existing firmware.

Before I proceed, I should give credits to Mike Szelong, who has purchased both OpenSprinkler and OpenGarage, and made both work with Alexa through IFTTT. Thanks to Mike for sending me this tip in the first place. Below let me first explain how IFTTT works.

What is IFTTT?
If you’ve never heard of IFTTT, it stands for If This Then That. With IFTTT, you can set up what’s called ‘recipes’, which hook up ‘triggers’ with ‘actions’. There are many triggers, for example, weather changes, sensor value changes, a new text message, a new twitter message, a new photo upload, or in our case, an Alexa phrase. There are also many actions, for example, send a text message, send an email, post a message on facebook, or in our case, send an web request to OpenSprinkler. With IFTTT, you can easily set up recipes like: ‘if temperature drops below xx degrees, send me a text message’, ‘if there is a new post on my facebook, send me a push notification’, or in our case ‘if Alexa receives a specific phrase, trigger a sprinkler action’. Because it’s so convenient, it has become very popular among Internet of Things.

How does IFTTT send or receive web requests?
IFTTT provides support to what’s called a ‘Maker Channel’, allowing you to use generic web requests (i.e. HTTP commands) as triggers and/or actions. This makes it possible to extend IFTTT support to your own DIY hardware gadgets. For example, to use a Maker trigger, just have your gadget send a web request to IFTTT, and hook it up with an action, such as text message, to enable push notification. This way, when OpenSprinkler starts to run any program, or receives weather changes, it can send a web request to IFTTT, which further triggers a text message or push notification to your phone. Conversely, to use a Maker action, you can set IFTTT to send a web request to your gadget. This way, when it receives an associated trigger, it can send a command to OpenSprinkler to start an action. As both OpenSprinkler and OpenGarage implement HTTP GET commands, they can naturally work with IFTTT through the Maker channel.

Wait, what’s the catch?
There are two. First, to use the device as a trigger, the firmware needs to connect to IFTTT. Neither OpenSprinkler nor OpenGarage has firmware support currently to send web requests to IFTTT, you can’t use them as a trigger yet, but work is underway to add such support to the firmware. Second, to use the devices for action, IFTTT needs to reach the device from the Internet. This requires you to set up port forwarding so that IFTTT can use the public IP address to reach the device. I know that port forwarding is gradually phasing out in favor of cloud-connected devices, but for now we will have to stick with port forwarding.


Now I have explained how IFTTT works, let’s go ahead and create some recipes.

Step 1. Sign up for an IFTTT account
Go to ifttt.com, click on ‘Sign up’ to register an account. You will walk through a simple tutorial to learn the basics of IFTTT.

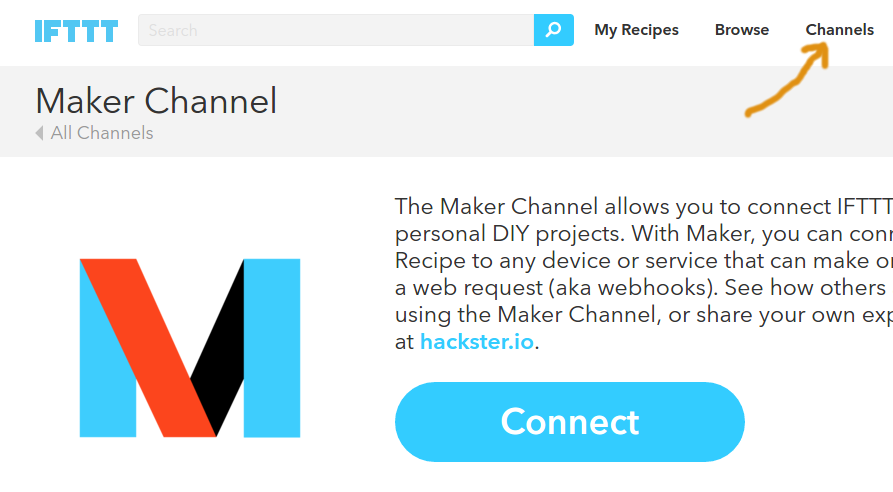
Step 2. Enable Maker channel
Click on ‘Channels’ at the top, then search for ‘Maker’ and under ‘Developer Tools’ select the Maker channel, and click on ‘Connect’. You will be assigned a ‘key. At the moment you don’t need the key, so you can ignore that for now.

ifttt1

Step 3. Set up a recipe
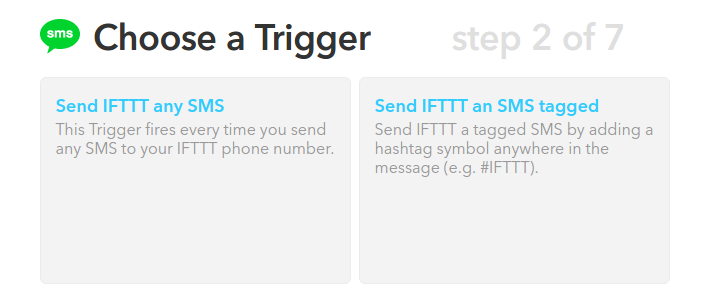
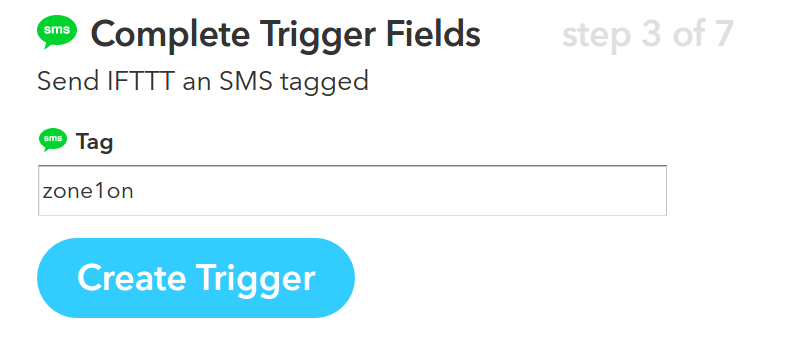
Click on ‘My Recipes’ at the top and then ‘Create a Recipe’. Select a trigger (i.e. this) — for example, search ‘sms’ and select SMS as a trigger. Input your phone number and a verification pin. Then select a trigger method, such as ‘Send IFTTT an SMS tagged’. Then input the tag phrase, such as zone1on. This means every time IFTTT receives a text message with that particular phrase, it will trigger an action.

ifttt2ifttt33

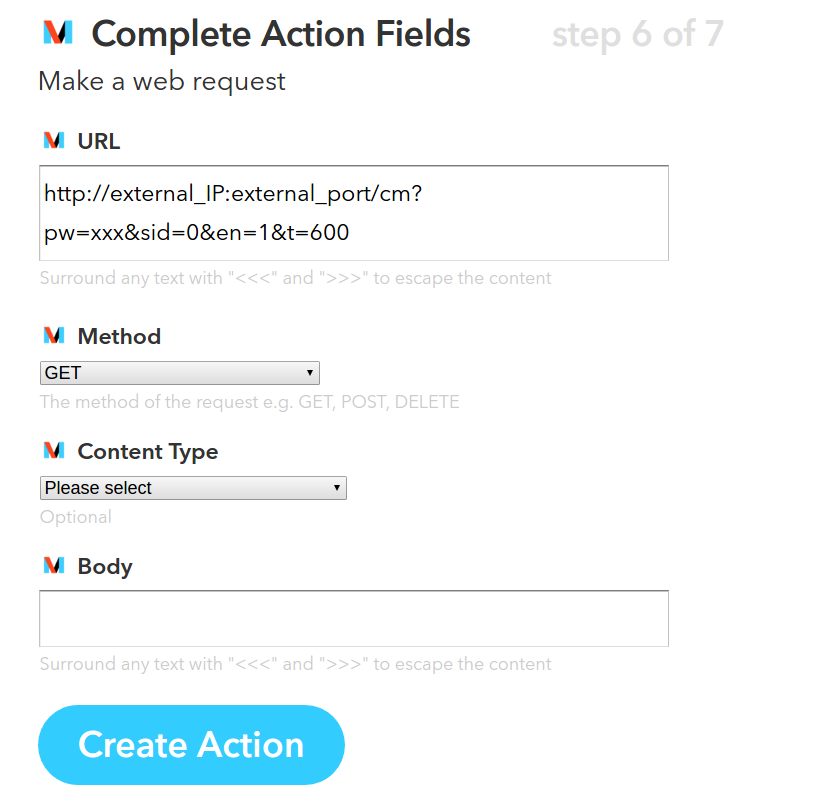
Next, to choose an action (i.e. that), search for ‘Maker’, and click on ‘Make a Web Request’. This is where you need to input the HTTP command. You will need to type in your home network’s external IP address, external port number (that maps to OpenSprinkler through port forwarding), followed by a supported HTTP command (check API document listed below), device password, and required parameters. The example below turns on zone 1 (i.e. sid=0) for 10 minutes (i.e. 600 seconds). For ‘Method’, select ‘GET’, and you can leave Content Type and Body empty. If you are not sure whether the command works or not, simply copy and paste the URL you constructed to a browser, and if the returned message has {‘result’:1} that means it has succeeded.

ifttt5
Click on ‘Create Action’ to finish.

In case you’ve got lost, here are some useful links that you may need to refer to:

Step 4. Test the recipe
To test the above example recipe, send a text message #zone1on (don’t forget the pound sign!) to the IFTTT phone number (this is the same phone number you received a text from when you verified your phone with IFTTT). If everything is set up correctly, your sprinkler zone 1 will start watering for 10 minutes!

Step 5. Use Alexa to enable voice command
Now that I’ve walked you through a basic example, you can experiment with using Alexa to enable voice command. You obviously need to have an Alexa (Amazon Echo) for this to work. The recipe is largely the same as the above text message example, except that for trigger (i.e. this) you will select Alexa, and give it a phrase. Now when you speak that phrase to Alexa, it will trigger the action. How exciting! Don’t forget that you need to say ‘Alexa, trigger xxx’ where xxx is the phrase. The ‘trigger’ keyword is kind of like the pound sign in the text message.

If you have an OpenGarage, you can also follow the OpenGarage API to set up web requests and get Alexa to open / close the garage door for you.

Currently as the phrase is fixed / static, there is no easy way to parametrize the phrase. For example, you can’t say ‘trigger open zone 1 for blah minutes’ where ‘blah’ is a variable like 10, 20 or any positive integer you want. I am sure this would be possible in the future though.

Next Step: Notifications
As I said, another popular use of IFTTT is for email / text / push notifications. For doing so, the device needs to send HTTP commands to IFTTT. Upon receiving the request, it can trigger an action such as sending you an email or text message. Work is under way to add this support to both OpenSprinkler and OpenGarage firmware, and hopefully they will be ready soon!

A few years ago I purchased a NeoDen TM-240A desktop pick and place machine, and wrote two blog posts about it. It was one of the most popular desktop pick and place machines on the market back then, and has served me well for the past three years. It does small boards pretty well, but without a computer vision system, it requires a fair amount of manual placement of fine-pitched components; and it only has a fixed set of 27 feeders, which are not entirely sufficient for me.

Recently NeoDen released a new model called NeoDen 4 — it’s their first desktop model that has built-in computer vision system. The vision-based alignment makes it possible to place fine-pitched components with minimal manual work. It has four pick and place heads, which means if can simultaneously pick up to four components at a time. It can fit a lot more feeders, and can handle a variety of component types, including matrix tray components, and any special components that you can lay out in a 3D printed tray. It has a vibration feeder for components in tube packaging. Although I rarely use tube packaging, one notable exception is the CH340G USB-serial chip, which is used in almost all my products, and so far it only comes in tubes. On top of these exciting new features, the machine I ordered comes with a PCB conveyor belt that can automatically feed PCBs into the system. This is really convenient for starting a pick and place job.

img_20160916_162204img_094454

Well, a picture is worth a thousand words, and a video is worth a thousand pictures! Without further ado, here is my video review of this machine:

So far I am pretty happy with the machine. Pricing-wise, it’s surely more expensive than TM-240A, but not significantly. I paid around 9K in total, including DHL shipping and all the feeders (for TM-240A I paid 5.5K). It’s not all perfect so you’ve got to learn the quirks. For example, I learned that the component height is often quite important — without providing the proper component height, the placing may give you a lot of troubles. Also, for components that need better placement accuracy, reducing the placing speed (say, to 50%) helps a lot to improve the accuracy and reliability.

Overall the machine operation is fairly intuitive, and it works in a predictable manner, much better than some of the comparable products I’ve seen on the market. No matter how powerful the machine is, you can’t afford to spend forever learning how to use it. It took me just two days of looking through the user manual, video tutorials, and doing my own trial and error to learn to successfully produce the first board using this machine. I would say it’s pretty good.

Disclaimer
I am not associated with NeoDen in any way. I am just a standard user. Please do NOT contact me for purchasing or sales questions. Go to their company website (either their USA distributor http://neodenusa.com/ or the Chinese headquarter www.neodentech.com) for details.


EagleCAD ULP Script

One difficulty I had initially was how to export a PCB design to a format acceptable by the machine. Without this I would have to manually locate the x-y coordinates of each component using the down-facing camera, which would be a huge pain. The user manual and video tutorial had no descriptions about the format of the spreadsheet. After banging my head on the wall for a while, I found one example spreadsheet somewhere in the flash drive that came with the machine, and that seems to work. Then I went ahead and modified an existing EagleCAD script (designed for TM-240A) to match the example spreadsheet. The script can be downloaded from the link below. Please take a look at the README file as it explains how to use the script.


For a long time, OpenSprinkler Pi (OSPi) has been using the OpenSprinkler injection molded enclosure. While this has worked fine, the enclosure is not particularly designed for OSPi, leaving some cutouts not aligned with Raspberry Pi. Recently I have started learning to design enclosures using laser cut acrylic pieces. This is a great way to design fully customized enclosures for circuits. Today the first batch of laser cut enclosures for OSPi has arrived, and we will be shipping these with OSPi kit right away.

Here is a picture of the enclosure pieces and screw bag:
img_1262

And here is a picture of the enclosure after it’s fully assembled. After removing all the protective papers from the acrylic pieces, it produces a fully transparent look of OSPi, which is pretty cool.
img_1261

It’s not necessary to remove all the protective papers. I would recommend leaving the papers on except the top panel. This way it gives a kind of wooden texture of the enclosure, and adds more protection to the enclosure.

Below is an instructional video that walks you through the assembly steps:

I will make a separate post shortly that explains how to automate the design of such laser cut enclosures.

« Newer Posts - Older Posts »