Feed on
Posts
Comments

In this and the next two three blog posts (Part 2, Part 3, and Part 4), I will describe how I reverse engineered a few off-the-shelf wireless temperature, humidity, and rain sensors, and used an Arduino (Update: RPi is also supported now!) to listen to and decode the sensor data. This has been a really fun journey and I will document the process as thoroughly as I can. Because there are lots of details, I don’t want to jam everything into a single post, so I have split the whole story into three posts. The Arduino and RPi programs are provided at the end of each post.

Introduction

The first question to ask is always: why am I doing this? Well, for good reasons: these off-the-shelf sensors are cheap, well-built, outdoor-proof, battery-driven and power efficient. If your project needs local weather data and you don’t want to spend time building your own transmitter units (which would bring up a whole bunch of engineering issues), these cheap sensors are the way to go. My original plan was to make use of the sensor data for sprinkler control systems. I actually set this as my next challenge to tackle in a blog post I wrote two years ago. It’s a shame that I lost track of it since then. But hey, two years later, I finally finished it. Better late than never!

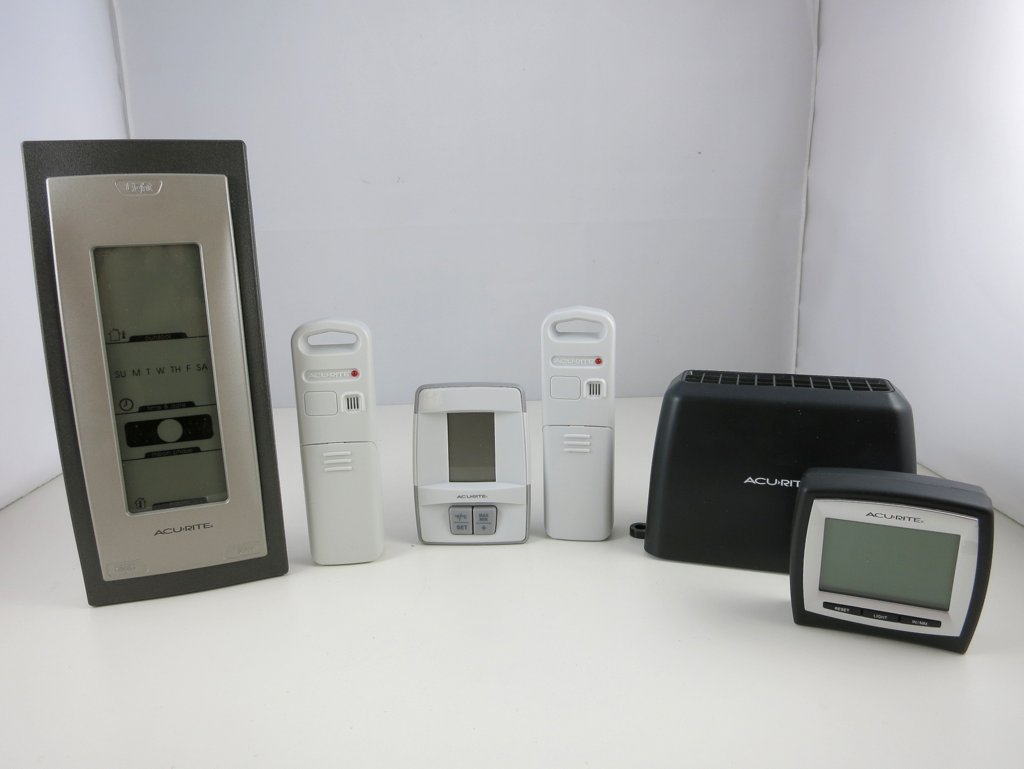
Here are the three sensors that I gathered and will use as examples in the following. They all work in the 433MHz frequency band.

Disclaimer: I am not associated with Acu-Rite in any ways, I just picked these sensors because they are common in retail stores.

IMG_0040IMG_0041

Preparation

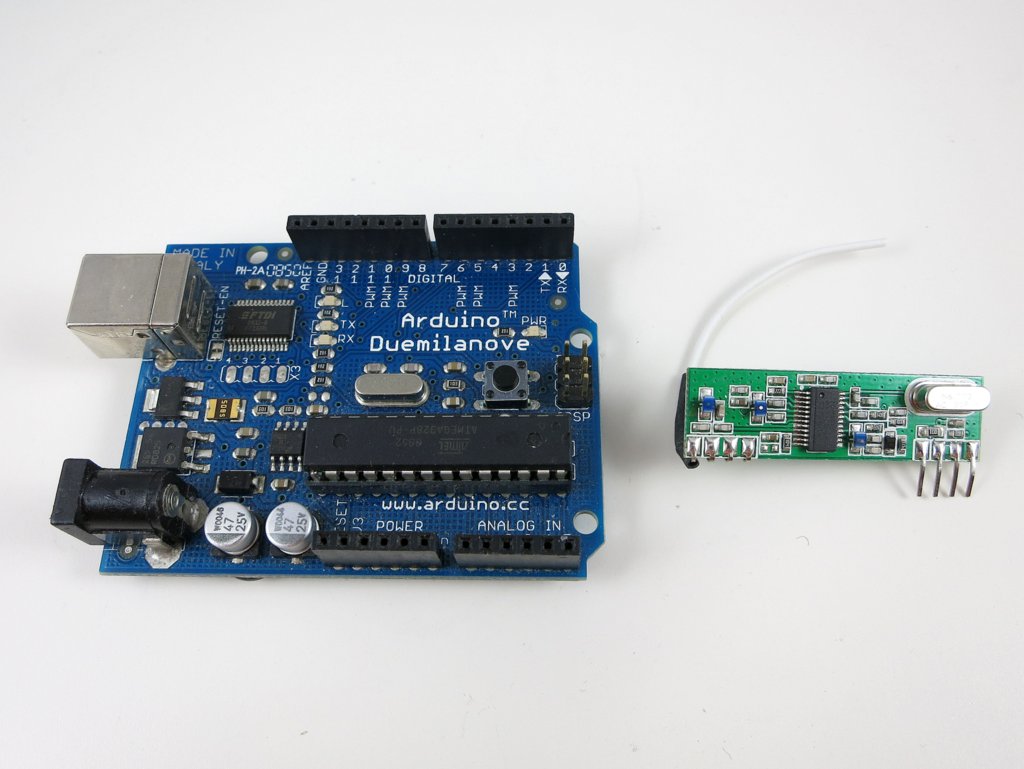
The tools involved are quite simple: I used an Arduino and a 433MHz receiver. You should use the superheterodyne type of receiver as it has very good signal-to-noise-ratio. The super-regenerative type is too noisy and will only work in short range.

Also, to obtain an initial waveform in order to bootstrap the process, I used a RF sniffing circuit from my previous blog post (about interfacing with remote power sockets), a PC with line-in port, a 3.5mm audio cable, and the free Audacity software. If you don’t have a PC with line-in port (most laptops these days don’t have), you can buy a USB sound card which has line-in port.

IMG_0052IMG_0051


Wireless Temperature Sensor

Raw Waveform. The temperature sensor is the simplest, so let’s take it down first. What I have at hand is an Acu-Rite 00782W3 indoor/outdoor temperature sensor. The package includes a receiver display unit, and a transmitter which sends a temperature reading every 1 to 2 minutes. Pop in the battery, power on the RF sniffing circuit, and launch the Audacity recording software, I got a waveform like the one shown on the right image below.

IMG_0043temp_sensor_waveform

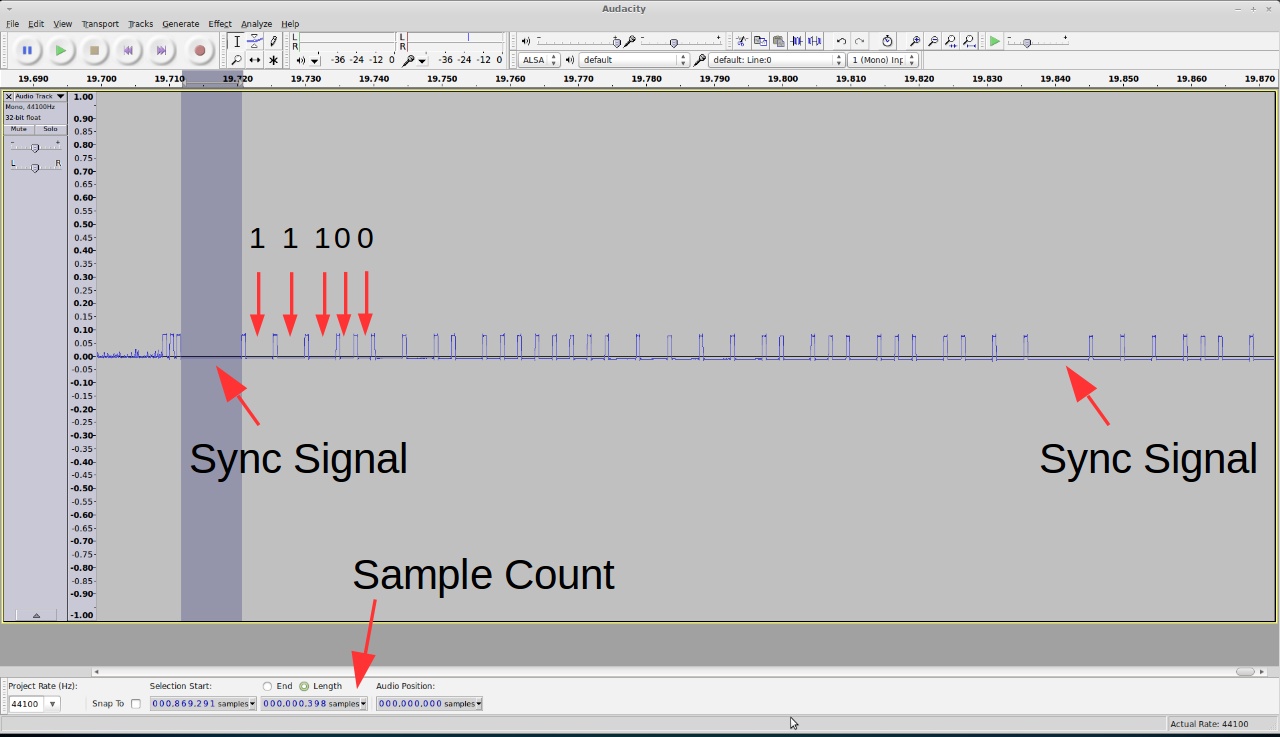
By carefully looking at the waveform, I found the following patterns:

  • Each transmission consists of 8 repetitions of the same signal.
  • Every two repetitions are separated by a constant low sync signal that’s roughly 400 samples (in Audacity you can select a region and see the sample count). Given that the sampling rate is 44.1kHz, this is roughly 9.0ms (400 / 44.1 = 9.07).
  • The bit patterns are pretty clear: logic 1 is a constant low of about 180 samples (4.1ms), and logic 0 is a constant low of about 95 samples (2.1ms). Every two bit is separated by a constant high of about 24 samples (0.54ms).

arduino
Given the patterns, I then manually wrote down entire sequence of bits. For example, the image above shows a signal that’s:

11100110 10000000 11111010 01001011

I grouped them into bits of 8 so it’s easy to see the byte values. I also recorded the reference temperature displayed on the receiver unit at the time of capture, which is 77 degree Fahrenheit. At this point we don’t know yet how the bits are encoded (i.e. how they translate to 77). None of the bytes is directly equal to 77. But this is ok — if it was that easy, it wouldn’t have been fun any more 🙂

Create Temperature Variations. In the next step, I will create temperature variations so I can get a lot of different signals and reference readings. By checking how the signal changes, hopefully I can decipher the coding pattern. How do I vary the temperature? Simple: use a hair blower to increase the temperature, and throw the sensor into a fridge to decrease the temperature.

But I am not in a hurry to do that just yet — manually translating the waveform into bits is very tedious, and I worry that if I make a mistake that can compromise the analysis. So I need a way to automate the signal capturing process. Since I already know the signal timings, I can create an Arduino program to automatically translate the waveform into bits. This will make the capturing process a lot faster.

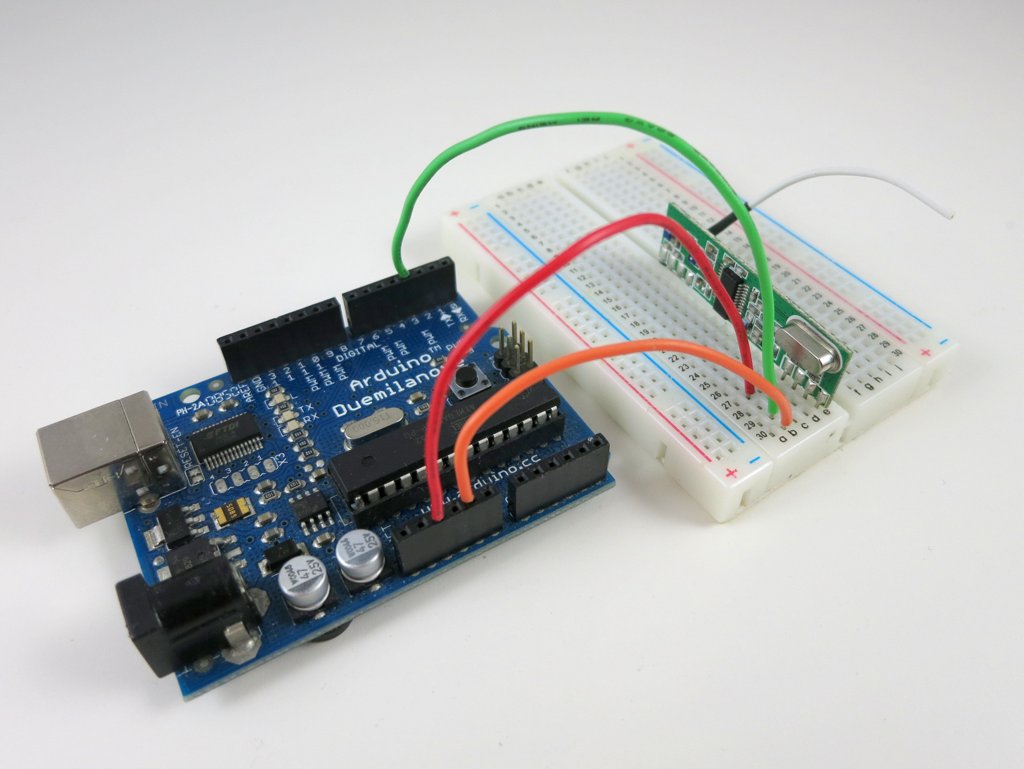
An Arduino Program for Bits Conversion. To get started, I connected the VCC, GND, and DATA pins of the RF receiver to Arduino’s 5V, GND, and D3 (interrupt 1). Then I wrote an interrupt handler to process the captured signal and convert it to bits. Earlier I’ve studied the RCSwitch library, which gave me a good idea of implementation.

Technically, the interrupt function is triggered every time the signal changes from high to low (falling edge) or low to high (rising edge). A ring buffer is used to track the timing between every two triggers. It then checks the timing to see if a sync signal (roughly 9.0ms) is present. Because the signal may still be noisy the first time the sync signal is received, we will wait till the second or third time it’s received to actually do the bits conversion.

Collect and Analyze Data. Now let the fun begin. With the Arduino program, I gathered a lot of data under various temperatures. Make sure to also gather some low temperature reading by putting the sensor in a fridge: I was surprised that the signal can actually go through a fridge door! Here is a selected list. The number at the end of each line is the reference temperature value shown on the display receiver.

10001011 10000001 00111110 00111101 (89°F)
10001011 10000000 11100100 01010001 (73°F)
10001011 10000000 10101101 00011011 (63°F)
10001011 10000000 00000111 00001010 (33°F)
10001011 10000000 00000001 01010000 (32°F)
10001011 10001111 11111011 00010111 (31°F)
10001011 10001111 11100010 10111010 (26°F)
10001011 10001111 11001011 10100101 (22°F)
10001011 10001111 01111100 10011010 ( 8°F)

Now the coding pattern is a lot more clear. The first byte is always the same, so it’s probably a signature or channel byte. This is used to avoid interference among multiple transmitters. Note that this byte is different from the one I manually wrote down, so I suspect the transmitter changes the signature every time it’s powered on. The second and third bytes show a clear trend as the temperature goes down. The last byte has no clear trend. It’s possibly some sort of CRC checking byte.

So how do the middle two bytes translate to the temperature values? Well, if you look at the 32°F line: the middle two bytes are very close to 0 (ignoring the leading 1). Since 32°F is roughly 0°C (Celsius), is it possible that the middle two bytes give the temperature in Celsius? After converting the reference temperature values to Celsius, the puzzle is instantly solved (the arrow below points to the decimal value of 12 bits shown in blue):

10001011 10000001 00111110 00111101 (32°C) -> 318
10001011 10000000 11100100 01010001 (23°C) -> 228
10001011 10000000 10101101 00011011 (17°C) -> 173
10001011 10000000 00000111 00001010 ( 1°C) -> 7
10001011 10000000 00000001 01010000 ( 0°C) -> 1
10001011 10001111 11111011 00010111 (-1°C) -> -5 (two's complement)
10001011 10001111 11100010 10111010 (-3°C) -> -30 (two's complement)
10001011 10001111 11001011 10100101 (-5°C) -> -53 (two's complement)
10001011 10001111 01111100 10011010(-13°F) ->-132 (two's complement)

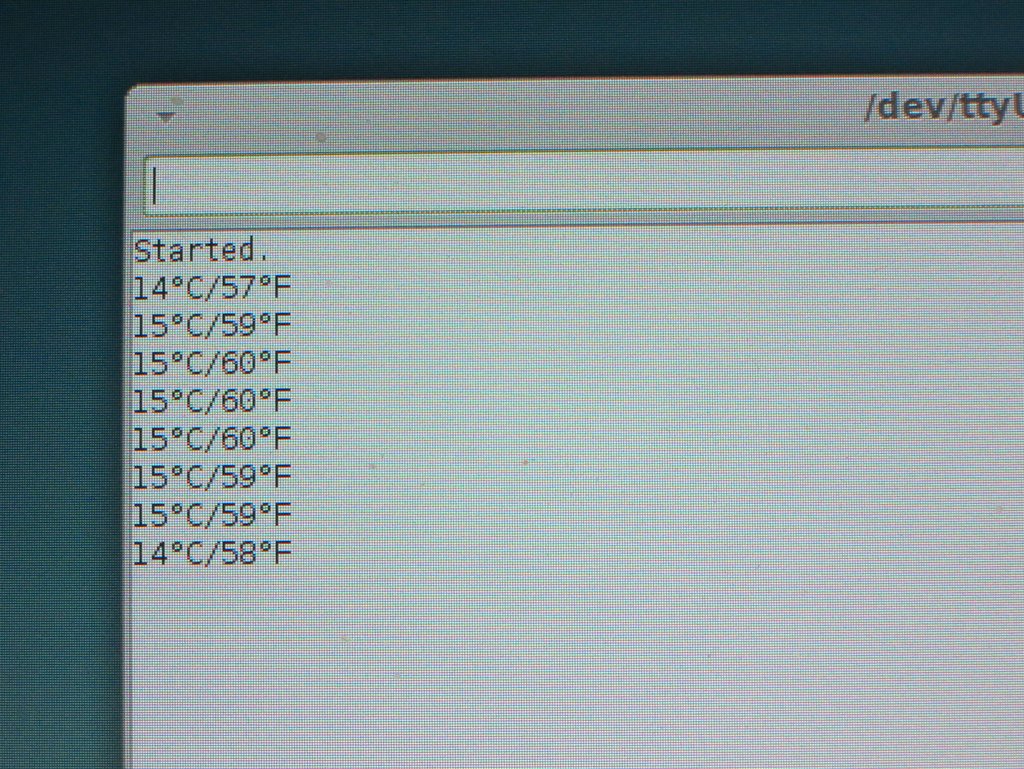
So the temperature, in Celsius, is given by the 12 bits (shown in blue), divided by 10, and rounded to the nearest integer. Aha, that’s it! Now I can modify the Arduino program to not only print out the bits, but also decode the signal and get the real temperature values displayed onto the serial monitor.

Update: the code is adapted to RPi as well, using wiringPi. The code below uses wiringPi GPIO 2 (P1.13) for data pin.

Note that the program uses pretty tight margins (1ms to 2ms) for screening the signal timings. Depending on the quality of your 433MHz RF receiver, you may have to increase the margin to improve error tolerance.

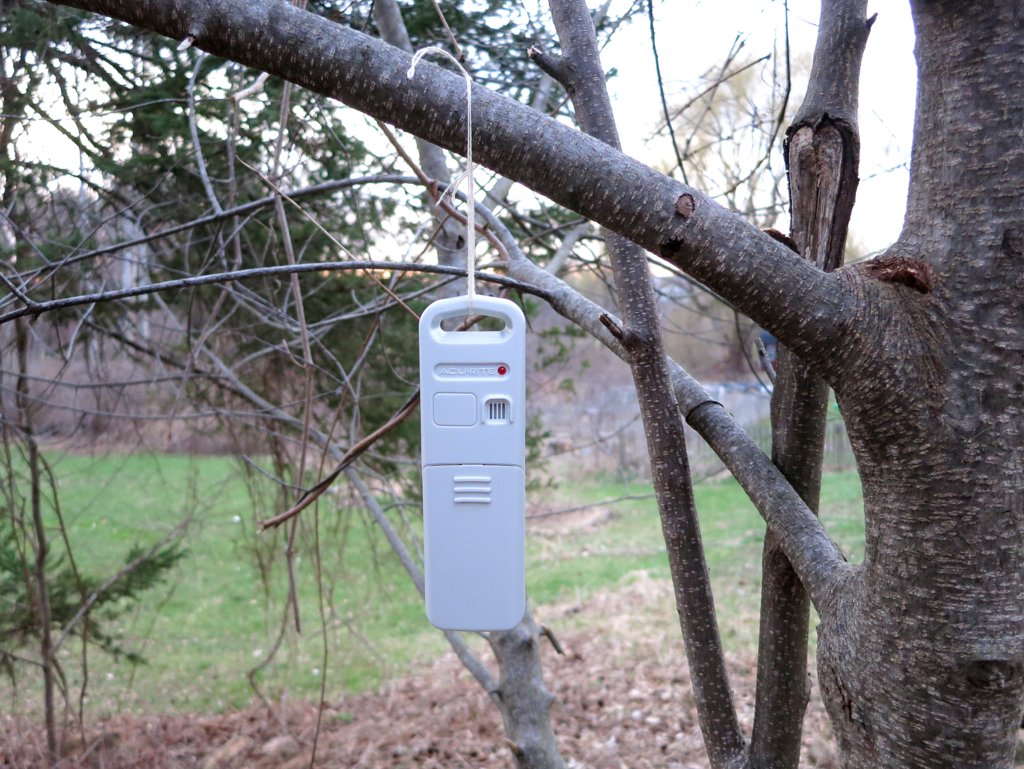
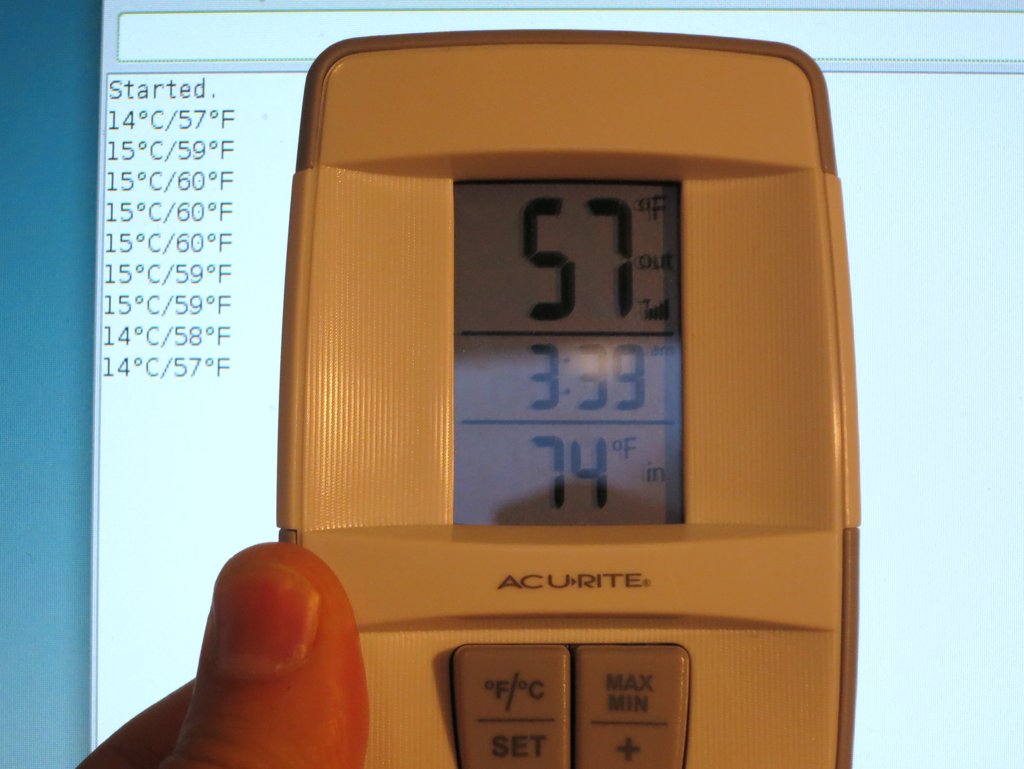
I did some quick testing by hanging the temperature sensor outside on a tree. Then I compared the temperature value reported on the serial monitor and the reference temperature displayed on the receiver unit. The two matches very well. Cool, mission accomplished! 🙂

IMG_0045IMG_0047IMG_0049

Summary of the Process
  • Use the RF sniffing circuit and Audacity to capture an example signal; examine the signal and estimate timing information.
  • Write an Arduino program to automatically capture signals and convert them into bits.
  • Collect a lot of data, record the bits and write down the reference temperatures.
  • Examine the changes in the bits as the reference temperature changes, identify those bits that matter, and reason about how they translate to the reference value.
  • Modify the Arduino program to decode the bits into temperature value.

Continue to Part 2, Part 3, and Part 4.


51 Responses to “Reverse Engineer Wireless Temperature / Humidity / Rain Sensors — Part 1”

  1. Lamby says:

    This looks like the sensor to use!:
    http://www.acurite.com/acurite-5-in-1-sensor

    I started reading where you assumed the measurements would be in Fahrenheit and knew that was not going to end well 🙂 The rest of us use metric.

    Great post by the way.

    • HB says:

      It’s actually not a terrible assumption with Acurite hardware. The protocol between their smartHub and myacurite.com is derived from the weatherunderground.com PWS protocol which uses all Fahrenheit.

  2. […] wireless power socket and playback to simulate the remote. It’s the same guy that has written about using Arduino to interface with off-the-shelf wireless temperature, humidity, rain, and soil m…. I think this gadget can be very useful for me while experimenting with remote sensors for my […]

  3. vpspr says:

    Is it possible to have multiple 433 temp sensors and one rpi receiver? I looking to have 6-8 temp sensors around the house.

    Thanks

  4. Terence says:

    Hi Ray,

    I bought a RFtoy from you recently but i’m new to arduino and trying to understand more by reading a lot of infos.

    Would like to ask if I could sniff 2.4G signals instead of 433mhz?

    I found a LED down light which can change from cool white to warm white and can be dimmed as well. It response to a 2.4G remote.

    I am thinking if I could use send out the 2.4G codes then it will allow me to interface it into my Vera HA controller.

    What i want to achieve is to use nRF24L01 to sniff the remote codes then use Vera + (Arduino+nRF24L01) to control my down lights to change from cool to warm whites and also to dim the lights using the learned remote codes.

    Could you give me some advice on how to achieve the above?

    Thank you

    • ray says:

      To sniff 2.4G signal, you need a 2.4G transceiver, such as the nRF24L01. But keep in mind that how feasible it is to sniff the signal depends on the encoding scheme — if the signal is encrypted, it will be very difficult to reverse engineer the data. If your LED light has an open API, it may be easier to direct use the open API to operate it.

  5. Brett says:

    With reference to my previous comment I can confirm that 24vac electrothermic actuators (as used on radiator valves and underfloor heating manifolds etc) work remakably well when driven directly from Opensprinklers 9vdc station outputs. You don’t even need the boost. The only measurable difference in performance is an increase in the response time (specifically the dead period) when exciting from cold. However when controlling around a setpoint I can achieve an almost instant response with full valve travel complete in around 1.5 mins (exceeding the standard specification of 3mins). Ok now to decode a few RF sensors with the RFToy…

  6. RoSchmi says:

    Very helpful, thank you.

  7. Maxzillian says:

    Just thought I’d lend some recent experience with this. I bought a temperature/humidity sensor (https://www.acurite.com/digital-indoor-outdoor-temperature-humidity-monitor-00611a2.html) from the local Menards and you’re work was a tremendous help in getting data from the sensor!

    That said, I found that it oddly followed the communication protocol as you have documented here in part 1 instead of what you found in part 2. The only real difference is there being 5 bytes sent instead of 4, the 4th byte containing the humidity. As was pointed out in comments in your later work, the checksum is just a simple additive check; I found the easiest way to calculate it was to add bytes 1-4 (or 1-3 in the case of temperature only) to a byte variable. This automatically keeps it truncated to one byte and makes for a very quick and simple check.

    I did try using the receiver that came within the display, finding it was a separate module, but ended up changing to a SparkFun unit as the acu-rite one received too much noise; especially from one of my monitors.

    I did deviate in the code a bit using the Timer1 module to measure pulse widths, running it at a prescaler of 256. Oddly the temp/humidity sensor had the same sync period, but the high pulses and data bits ran at twice the speed. Ultimately I found good timings at:

    high-pulse: 20-40 cycles
    Sync: 550-556
    Bit 1: 115-126
    Bit 0: 53-63

    Once again, thanks for all the work you did on this as it definitely made development a lot faster!

  8. Jorginho says:

    Hi,
    Interesting subject. May be to take it a step further: is it possible to actually build your own wireless sensors. So say you buy a sensirion sensor, put it in the field and make it work like the wirelesss sensors you now use? I would like to do that…

    What I would like to do in fact is this:
    – SHT31 sensor in the field with 3V LiIon recharegable battery, small solar panel and send data to a reciver hooked to an Arduino. Send data every 12 s. Averages of 1 minute are the real temperature
    – Anemometer: send data every 0,25 s. 3 s average are gusts, 10 minute averages the averae windspeed.
    You get the picture. Can anyone tell me if this is difficult. Because just hooking up a sensor to a transceiver I think means little.The tranceiver on its own probably won’t know what to do with the signals? How do you set them to send every few seconds?? Etc?

    Thx!!!

  9. Picard0403 says:

    How can I compile the RPI version ?

    • Picard0403 says:

      I’m getting the folloing errors

      /tmp/cceeR9WV.o: In function `isSync(unsigned int)’:
      temperature_display.cpp:(.text+0x70): undefined reference to `digitalRead’
      /tmp/cceeR9WV.o: In function `handler()’:
      temperature_display.cpp:(.text+0xd4): undefined reference to `micros’
      /tmp/cceeR9WV.o: In function `main’:
      temperature_display.cpp:(.text+0x28c): undefined reference to `wiringPiSetup’
      temperature_display.cpp:(.text+0x2c8): undefined reference to `wiringPiISR’
      temperature_display.cpp:(.text+0x5b4): undefined reference to `delay’
      temperature_display.cpp:(.text+0x5c4): undefined reference to `wiringPiISR’
      collect2: error: ld returned 1 exit status

    • Picard0403 says:

      Hi, I get the programm work, but can’t read from my sensor…..
      It is a TFA Nexus 433 Mhz Sensor – Maybe with this it will not working

  10. Adrian says:

    Dear Ray,

    I did my best, but am unable to receive any data with the program for RPi.

    The receiver/transmitter is working, because I am able to receive/send signal with 433Utils (RFSniffer) from my ON/OFF RF switch.

    I build a sniffer from a cheap USB sound card, here is the result:

    https://f001.backblazeb2.com/file/mihalkodropshare/weather_sensor.wav

    If am not wrong, I red these values from Audacity:

    sync_length (selection start)20223-19823(selection end) = 400 / 44.1 = 9.07ms
    0 (or 1?) 20337-20255 = 82 / 44.1 = 1.85ms
    1 (or 0?) 20528-20360 = 168 / 44.1 = 3.80ms
    sep length 20359-20335 = 24 / 44.1 = 0.54ms

    First, I tried your default app where you have nearly same values: not working.
    Then, I modified the values to:

    #define RING_BUFFER_SIZE 256
    #define SYNC_LENGTH 9000
    #define SEP_LENGTH 500
    #define BIT0_LENGTH 3800
    #define BIT1_LENGTH 1850

    Still nothing. 🙁

    Then I fired up my RTL SDR device and rtl_433 utils, with this, I am able to receive and decode signal. The sensor is recognized as a prologue sensor, here is the source of this module:

    https://github.com/merbanan/rtl_433/blob/master/src/devices/prologue.c

    From the description in the code:

    “the sensor sends 36 bits 7 times, before the first packet there is a sync pulse
    * the packets are ppm modulated (distance coding) with a pulse of ~500 us
    * followed by a short gap of ~2000 us for a 0 bit or a long ~4000 us gap for a
    * 1 bit, the sync gap is ~9000 us.”

    …so I am working with correct values.

    But then why I am unable to receive anything with your code?

    Thank you,
    Adrian

    • ray says:

      My best suggestion is to insert debugging code to help you figure out why it’s not parsing. The easiest way is to insert printf’s in the code. This will help you figure out if the code can detect the sync signal, and each of the signals following it. There is no generally agreed protocol for wireless sensors — the code I published is written specifically for the sensor I bought, and your sensor may have a completely different protocol.

  11. Mac says:

    Using your code, my 2 606TX sensors work just fine. In order to tell them apart, I added the ability to turn the first 8 bits in to the rolling code number. Now, I know which unit is sending the temperature. Problem is, sometimes an erroneous bit stream comes in and it gets decoded with a different rolling code number. Other times, the temp is WAY off. It has been mentioned that there is a CRC number sent, but I find no one with code to decipher and my efforts so far have been for naught. Any clues on how to weed out the bad data streams?

  12. Swilson says:

    The conversion to F seems to be messed up if Celcius is a negative number. For example if Celcius is -4 then it doesn’t take the – into account and does the math for just 4C which comes out to 39F. Any thoughts, I am researching now.

    • Swilson says:

      I figured it out. Add int Celcius = 0; just under loop and in if (negative) add the following two lines.

      Celcius = ((temp+5)/10);
      Celcius *= -1;

      Thanks for the code. Looking forward to getting my Weather Station up and going.

      • ray says:

        OK, glad you figured it out.

      • drcyc says:

        Here’s a patch for fixing Celcius to Farenheit when the value is a negative number:

        — temperature_display.cpp.orig 2019-01-27 15:31:24.872121896 +0000
        +++ temperature_display.cpp 2019-01-27 15:30:40.372355113 +0000
        @@ -99,7 +99,7 @@
        }
        }
        printf(“\n”);
        – unsigned long temp = 0;
        + signed long temp = 0;
        bool negative = false;
        bool fail = false;
        for(unsigned int i =(syncIndex1+24)%RING_BUFFER_SIZE;
        @@ -125,8 +125,7 @@

        if(!fail){
        if(negative){
        – temp = 4096 – temp;
        – printf(“-“);
        + temp = (4096 – temp)*-1;
        }
        printf(“%d C %d F\n”,(temp+5)/10,(temp*9/5+325)/10);
        } else {

    • ray says:

      The code takes into account negative values — search ‘negative’ in the source code and you will find how it’s handling it. Not all wireless sensors use the same encoding, so you have to look at your specific sensor to see how it encodes negative values.

  13. Hanz_Grau says:

    Many many many thanks for this tutorial. Without You I would not come at it. Have a nice day.

  14. Simon Baxter says:

    Hello
    This is a great tutorial.
    Question for you, which WiringPi libraries are you using? I’ve just compiled with the libraries out of git://git.drogon.net/wiringPi and then compiled your Pi C with:
    gcc -L/usr/lib -lwiringPi temperature_display.cpp -o temperature_display

    And I’m getting:
    gpio: Symbol `piModelNames’ has different size in shared object, consider re-linking
    gpio: Symbol `piRevisionNames’ has different size in shared object, consider re-linking
    gpio: Symbol `piMakerNames’ has different size in shared object, consider re-linking

    Thanks

  15. […] beim decodieren decodieren von 433MHz Daten forum.arduino.cc: Read 433 MHz weather sensor241392 Reverse engineer wireless sensors Analyzer (für PC und […]

  16. […] dedicated to each sensor since the loggers are less than the cost of the sensors anyway.  The wireless data transmission that most weather stations focus on is not as important to this project as battery operated […]

  17. […] a lot of searching, I came across a great post on reverse engineering temperature sensors. The code in this article helped tremendously. I was able to get the temperature readings for the […]

  18. Adam says:

    Hello!
    Thanks for the great tutorial.
    Using the above way, i tried recording, with Audacity the signal from the data output pin of a 868Mhz receiver module, hoping to obtain the data bits. But instead i obtained a signal that almost looks like squares, but problem is the signal also has negative values, i mean under the zero line. Besides the squares, ocassionaly the signal also contains one or two saw tooths. Please advice how can i get positive only values for the signal, and how can i convert the signal to bits.
    Thanks, and much appreciated.

  19. woyrek says:

    Hello.
    Thanks for a great guide. According to the instructions, I managed to receive and read the temperature signal from the weather station sensor. I measured signal parameters in Audiocity. Each transmission between the flashing of the diode on the sensor contains 11 repetitions of the same signal.
    Every two repetitions are separated by a constant low sync signal that’s roughly 173 samples (173 / 44.1 = 3.92 ms). The bit patterns are quite clear: logic 1 is a constant of 84 samples (1.9ms), and logic 0 is a constant low of about 44 samples (0.97ms). Every two bit is separated by 24 samples (0.54ms).
    I read the signal code:
    00100011 10000000 11110111 11110110 0010
    The third bit gave a temperature of 24.7 C, which is consistent with the reading on the station’s display.
    Then I changed the data in the An Arduino Program for Bits Conversion as follows:
    #define SYNC_LENGTH 3920
    #define SEP_LENGTH 500
    #define BIT1_LENGTH 1900
    #define BIT0_LENGTH 970
    Unfortunately, the program does not work. Nothing is read.
    Please help. I’ve been sitting here for a week or so. It frustrates me that I can not use such a great tutorial.
    Best regards
    Woyrek

    • Art Weaver says:

      You will also have to change the transmitter ID code in the program to match that of your transmitter.
      It’s probably the first 8 bits of the signal.
      But you’ve also shown four extra bits so I’m assuming that there is far more data coming from this transmitter.
      Temp
      Humidity
      Wind speed
      Wind direction
      Rain gauge
      I suspect that the last four bits are the ID for the sensor being transported. I don’t know this, it’s just conjecture.

      Good luck.

  20. jafatz says:

    Looking to build a variation on this to locate a lost 433 MHz weather station remote transmitter that is still sending data to the receiver unit. Is there any way to measure signal strength so that if you walked the house and property the signal got stronger as you homed in on it?

  21. mike zemeirng says:

    Thanks for the great work. My sensor worked more reliably by changing the SEP_LENGTH to 600 from 500. I also made a change in the serial.print section to make the Fahrenheit reading a little more readable when the temperature is below 0 deg C. I added 2 more — if(negative){

    this is the changed code:

    int tempC = temp;
    if (negative) {
    temp = 4096 – temp;

    }
    if (negative){
    tempC = -temp;
    }
    Serial.print((tempC+5)/10); // round to the nearest integer
    Serial.print(“C / “);
    int degF = ((temp+5)/10);
    if (negative){
    degF = -degF;
    }
    Serial.print((degF*9/5)+32);
    Serial.println(“F”);
    } else {
    Serial.println(“Decoding error.”);

  22. reg says:

    I’m new to this so this is probably a novice question; I’m using a wemos d1 mini rather than an uno and the code is throwing an “ISR not in IRAM!” error. I have the 433 data pin on D2 of wemos d1 mini. Have you run this code on a Wemos (or any eps8266)?

  23. reg says:

    I made progress … I added ICACHE_RAM_ATTR to the handler function

    ICACHE_RAM_ATTR void handler() {

    now it’s not crashing/rebooting so I can make progress on debugging the rest.

    Thank you for publishing the examples. They are a good starting point for me.

    • Stephen Harris says:

      FWIW, you also need

      ICACHE_RAM_ATTR bool isSync(unsigned int idx)

      ‘cos that’s called from the handler. It mostly works without it, but there are edge cases (eg if doing OTA updates) where it causes an immediate crash otherwise.

    • ray says:

      Thanks for your contribution. There is no software license on this code, but I certainly appreciate if you can include a link to this post when you publish your code. Thanks.

  24. Stephen Harris says:

    Hi, I’ve ported this to an esp8266 and publishing data via MQTT. I want to put it on github (with attribution to you) but I’m not sure what license I should add to it!

    You wrote the original code, so you own the copyright! Do you have a preference?

    Thanks!

    • ray says:

      Thanks for your contribution. There is no software license on this code, but I certainly appreciate if you can include a link to this post when you publish your code. Thanks.

  25. Stephen Harris says:

    FWIW, you also need

    ICACHE_RAM_ATTR bool isSync(unsigned int idx)

    ‘cos that’s called from the handler. It mostly works without it, but there are edge cases (eg if doing OTA updates) where it causes an immediate crash otherwise.

    • ray says:

      Thanks for your contribution. There is no software license on this code, but I certainly appreciate if you can include a link to this post when you publish your code. Thanks.

  26. Samer Albahra says:

    Testing

  27. ray says:

    Thanks for your contribution. There is no software license on this code, but I certainly appreciate if you can include a link to this post when you publish your code. Thanks.

  28. […] the outdoor sensors to the indoor receiver (with integrated LCD display). A few years ago I wrote a series of blog posts about how I reverse engineered some of the individual wireless sensors, like temperature, humidity, […]

  29. Tedtalksalot says:

    Hey, this was asked above and not answered so just checking again. Can this code be modified to send Arduino temp sensor data back to an existing acurite station? Thanks

  30. nick says:

    This helped me decode a nexus temp and humidity controller, it was similar encoding. Thanks!

  31. DonDavidson says:

    Hi I want to Thank You for the Great Posts
    I got the 5N1 to work and decode on the Nano platform with no problem but when I tried to go to the IOT33 Platform I can’t get it to work. I would suspect it has something to do with the Clock Rate of 16KHZ to 48KHZ if I am correct could you point me in the direction to solve this.
    Thank You

  32. Joris says:

    Thank you so much! I had to change some timings, and at one point I thought the buffer was too small since my remote signal is 64 bit (so my changeCount is 132), but I simply wasn’t using the D3 input, as only 2 and 3 on the uno can be used for interrupts.

Leave a Reply