Feed on
Posts
Comments

News and Updates

  • We’ve recently found a technical issue with Blynk’s QR code scan feature that makes the Blynk app not work properly on some iOS devices. The symptom is that the app can receive push notifications but the distance value, read count, and LCD widget are not updating. Please check this forum post for solutions. This seems to only affect iOS devices.
  • OpenGarage User Manual (PDF) is available on Github.
  • OpenGarage Firmware 1.0.4 API document is available on Github.
  • Blynk connection issue: recently Blynk updated their cloud server, causing Blynk app to not be able to communicate with OpenGarage. The solution is to update OpenGarage firmware to 1.0.4.
  • Reboot cycle issue: we’ve found a few reports of ‘reboot cycle’ where the controller continuously reboots. This issue has finally been sorted out. The solution is to reflash the firmware using a microUSB cable.

Today I am very excited to introduce you to OpenGarage — an open-source, universal garage door opener built using the ESP8266 WiFi chip and the Blynk app. I’ve wanted to finish this project for a while, as there have been multiple occasions where I left the house in a hurry and forgot to close my garage door, or locked myself out of the house, or had to let a friend or handyman in while I was away. Having a WiFi-based garage door opener (which I can access remotely using my mobile phone) would be super convenient. Recently as I started learning about ESP8266, I found it to be the perfect platform to help me complete this project.

A quick note: this blog post is temporarily the main landing page of opengarage.io. A more professional-looking site is under construction and should be ready soon. Also, the first production run has been ordered, and they should be ready to ship in 2 weeks of time. If you are interested in OpenGarage, you can place your order at rayshobby.net/cart/og.

Here is a video introduction that gives you a quick walk-through:

Here are some head shots of the OpenGarage controller:

IMG_1068IMG_1069

IMG_1007IMG_1070

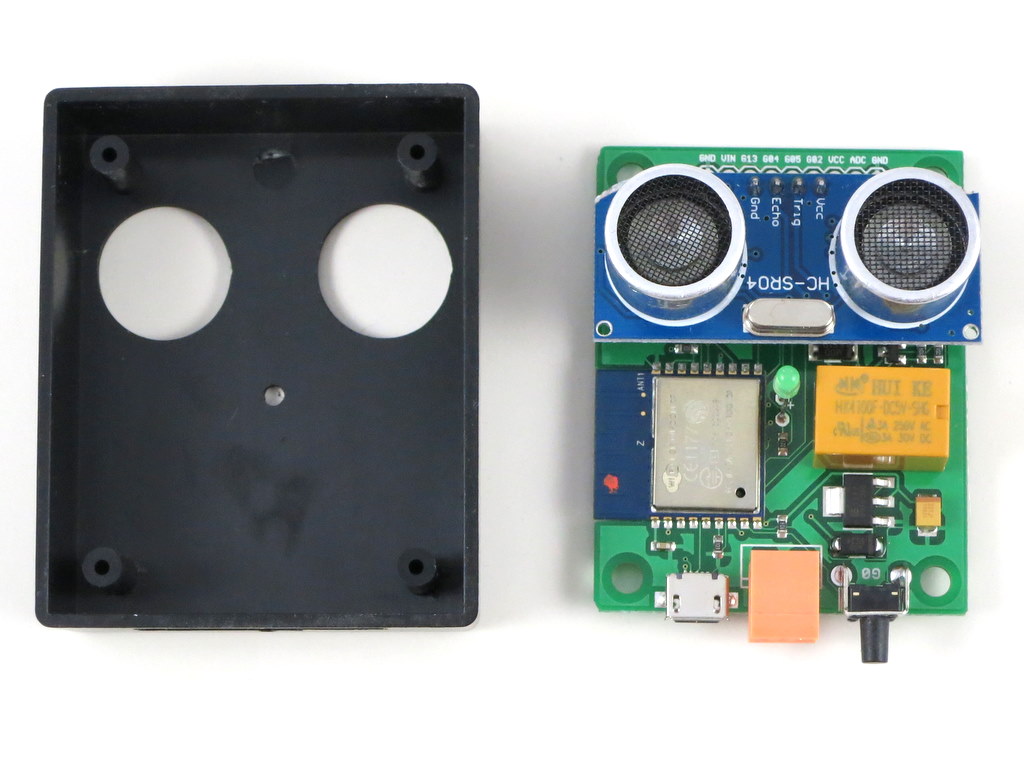
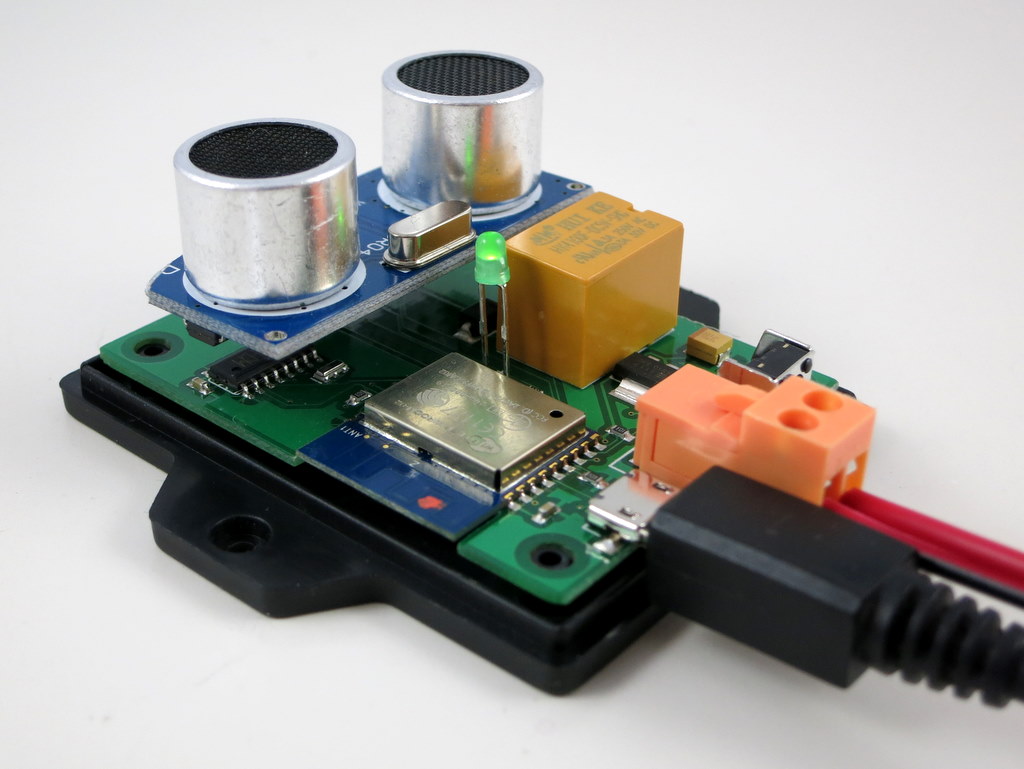
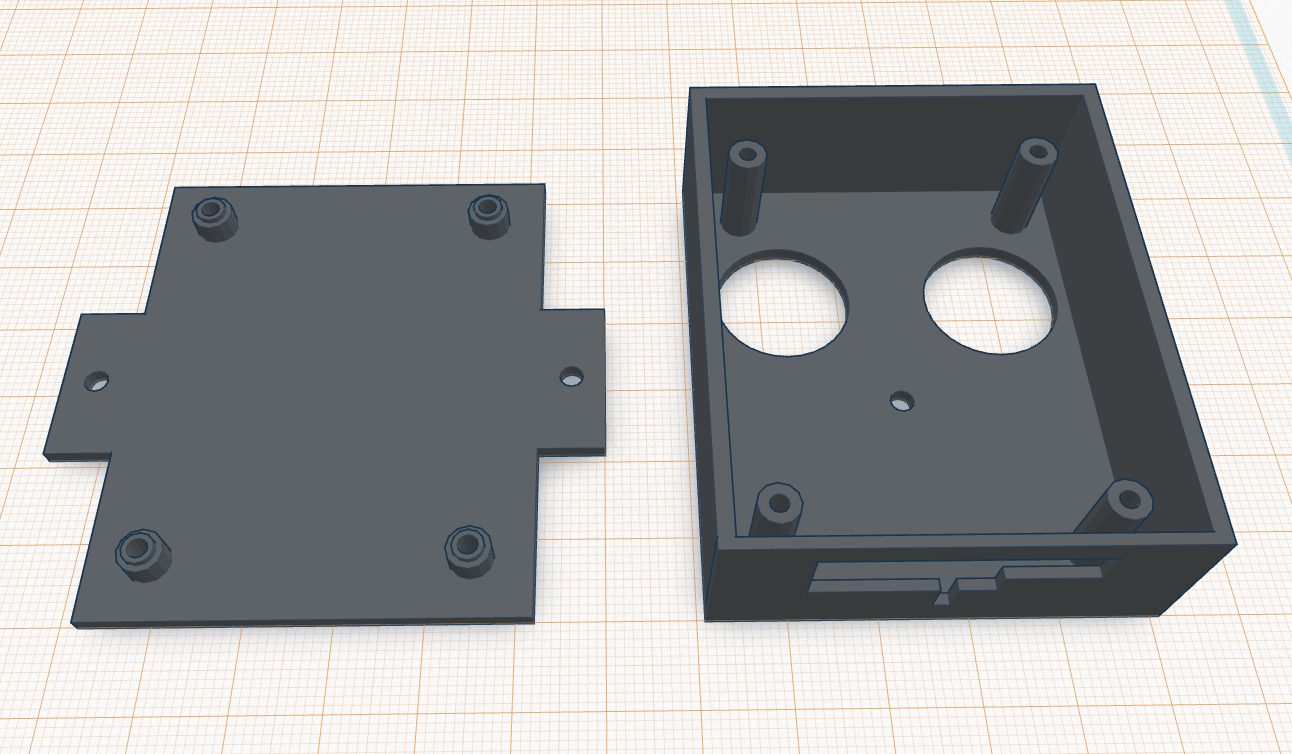
I made the prototype version using a 3D printed case, and the final version using an off-the-shelf case with custom cutouts. Two pictures of the circuit board are shown on the right above. With OpenGarage, I can now check my garage door status wherever I am, open or close the door remotely, and check the record of recent events through the log and history graph. The controller supports a built-in web interface with embedded HTMLs, and remote access through the Blynk app. The built-in interface is used for local access and changing configuration/settings, while the Blynk app is used for remote monitoring and control.

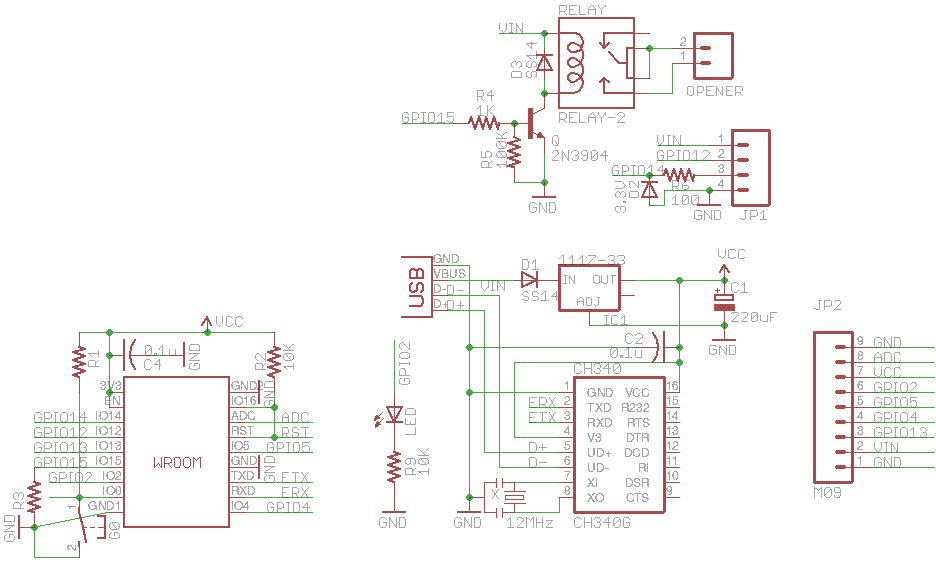
Hardware-wise, it’s really simple. It consists of:

  • an ESP8266 (WROOM-2) WiFi chip;
  • an ultrasonic distance sensor (HC-SR04);
  • a relay (for triggering garage door actions);
  • a pushbutton and indicator LED;
  • a microUSB connector and CH340G USB-serial chip.

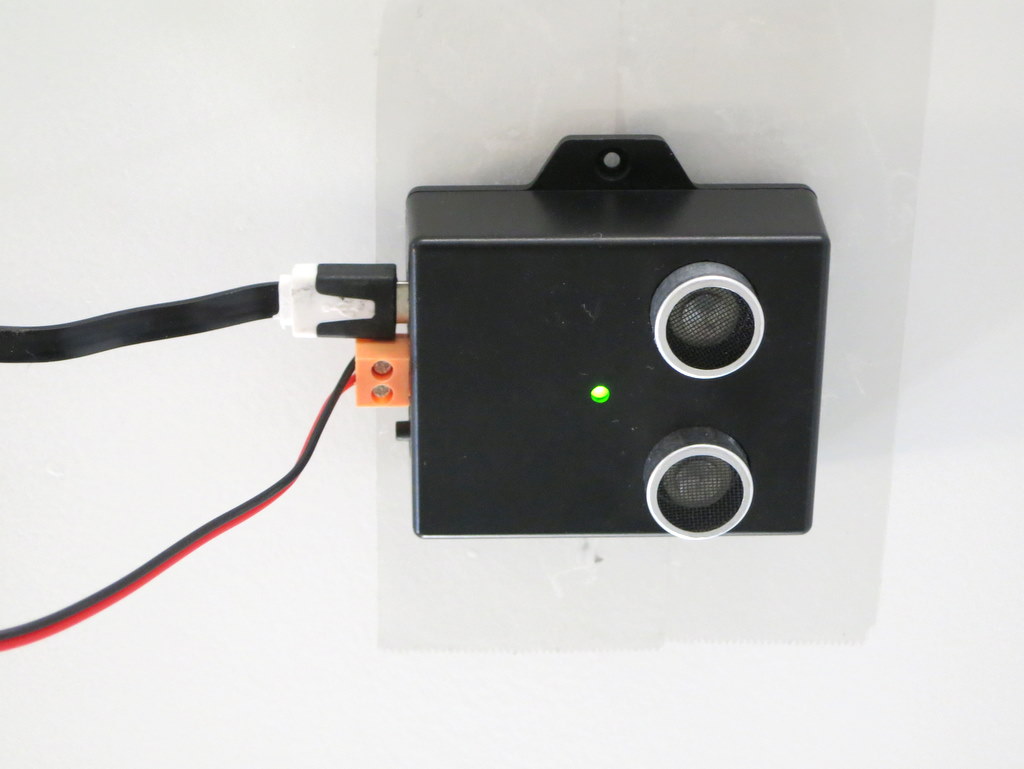
Mounting. The controller is typically mounted to the ceiling at the garage, with the distance sensor facing down. When the garage door is closed, it reads the distance to the ground, or the top of your car if you’ve parked in the garage. When the door opens and comes up, the sensor reads the distance to the door, which is a much smaller value. So by checking the distance value, it can tell if the door is open or closed. The distance value can also tell you if your car is parked in the garage or not, which is an additional benefit that can be useful at times.

For roll-up garage doors, the ceiling mount would not work. Instead, you can mount it to the side of the door, with the sensor facing the outside. This way the logic is reversed: if the distance reading is small, it means the door is closed, and vice versa.

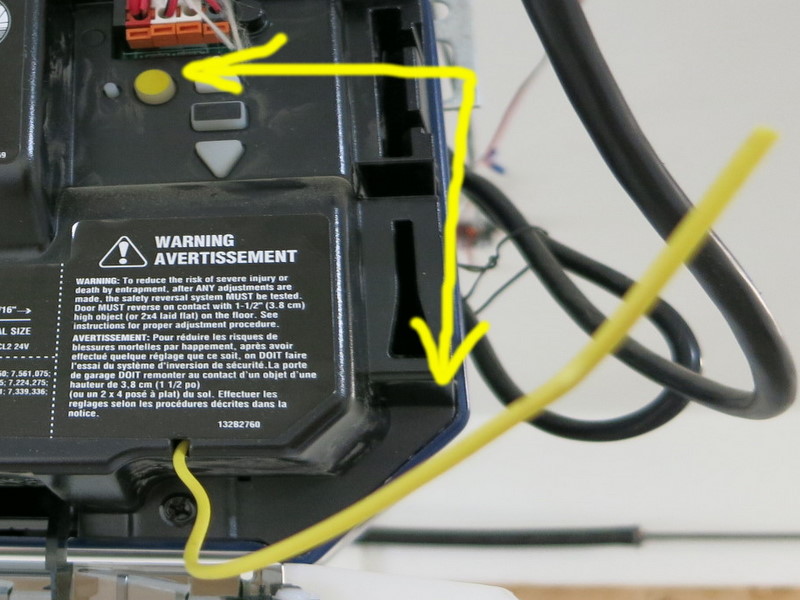
Interfacing with Garage Door System. OpenGarage uses a relay to simulate door button clicks. For most garage door systems, you can simply connect the two wires from the OpenGarage controller to where you would normally insert your door button wires into. The only exception is the most recent Security+ 2.0 systems, which come with a yellow learn button and antenna. These openers use secure door button codes, but you can still interface with them through a compatible door button.

IMG_1066IMG_1009IMG_1008IMG_1073

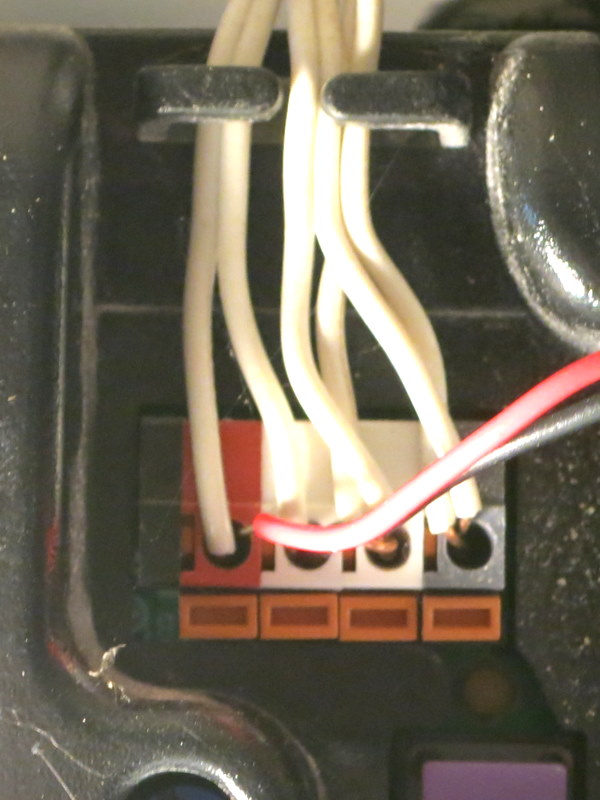
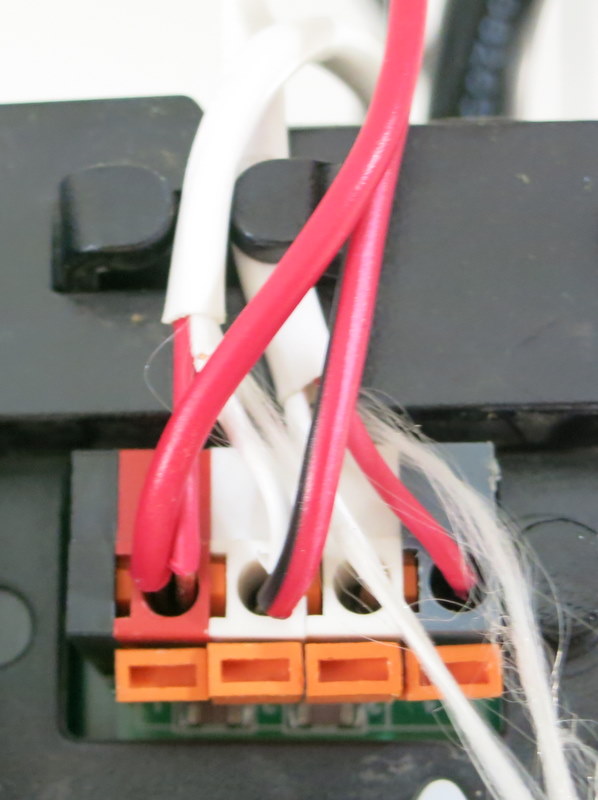
Alternatively, you can take apart an existing garage door remote, solder two wires to the button, and connect these two wires to OpenGarage. This way, the relay clicks simulate pressing the button on the remote. As long as you have a remote that works with your garage door system, this approach would always work.


Web Interface and Blynk App. The controller has a built-in web interface with embedded HTMLs, implemented using JQuery Mobile. It’s used for WiFi setup, local access (directly using IP) and changing configurations/settings. The controller also supports remote access through the Blynk app, which is a cloud-based service that’s really easy to use. Before proceeding, it’s recommended that you install the Blynk app, create an account, log in, and scan the OpenGarage app QR code to replicate the project inside Blynk. Then go to the project settings and copy the authorization token (32-digit hex code). This way, immediately after the setup step, you can use Blynk to access OpenGarage.

1_og_ap2_og_home3_og_log4_og_options6_og_blynk_app

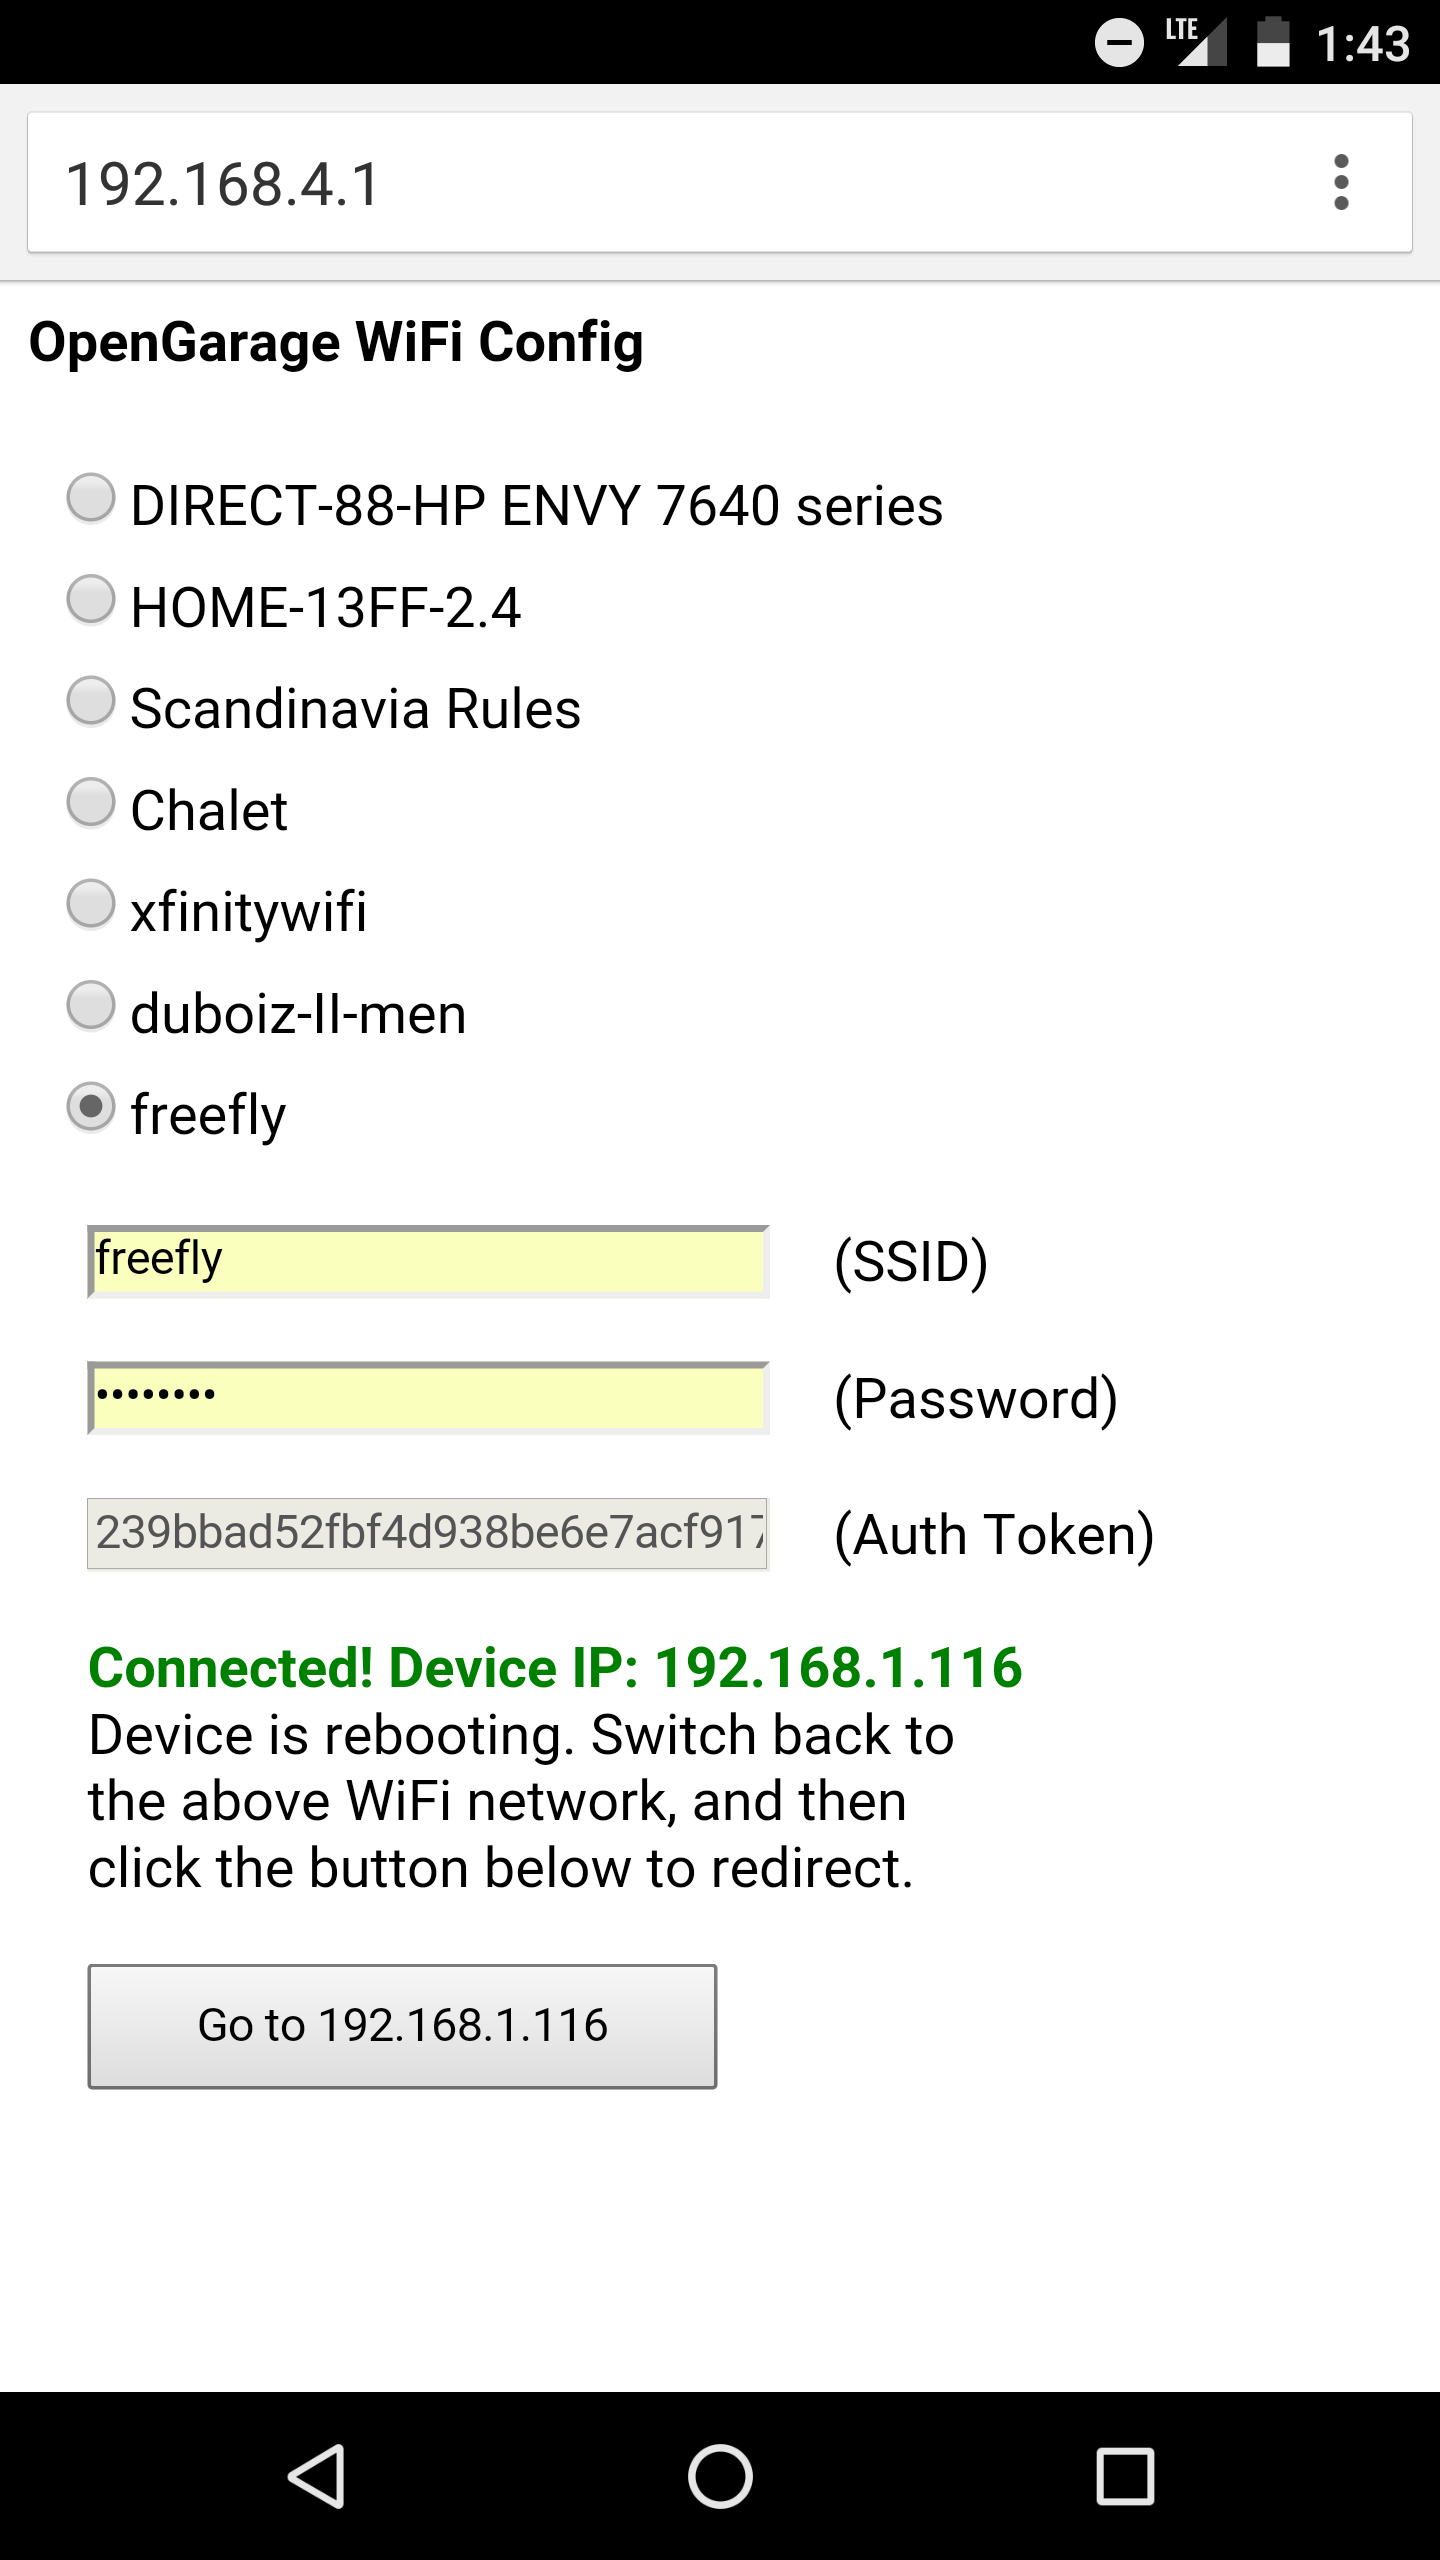
Initial Software Setup. OpenGarage is powered by a microUSB cable. At factory default settings, it boots into Access Point (AP) mode, creating an open WiFi network named OG_xxxxxx (where xxxxxx is the last 6 digits of MAC). Use your phone or a computer to connect to this network, and then open a browser and type in 192.168.4.1 to access the AP homepage. You will see a list of nearby WiFi networks scanned by the controller. Select (or manually type in) the ssid, input the password, and paste the Blynk token (if you don’t have it, just leave it empty). Then click on ‘Connect’. The controller will go into AP+STA mode, attempt to connect to your router, and report back its assigned IP address.

Once connected, it will reboot into STA-only mode. At this point, switch your phone back to your home WiFi, and click the redirect button (or manually type in the assigned IP) to access the device homepage.

LED and Button Functions. The LED serves mainly as an indicator: in AP mode, the LED blinks rapidly; and in station mode, the LED blinks briefly when the controller reads the distance sensor, which is once every few seconds (configurable). The button (connected to GPIO0) has the following functions: a short click triggers a relay click; and a long press triggers a factory reset (see below). The button can also be used to enter bootloading mode: if the button is pressed when the controller is powered on, ESP8266 will enter bootloading mode. This is useful if you want to upload a firmware through USB (instead of using OTA update).

Reset to Factory Default. At any point, you can press and hold the pushbutton for 5 seconds or more until the LED stays on, then release the button to reset the controller back to factory default.

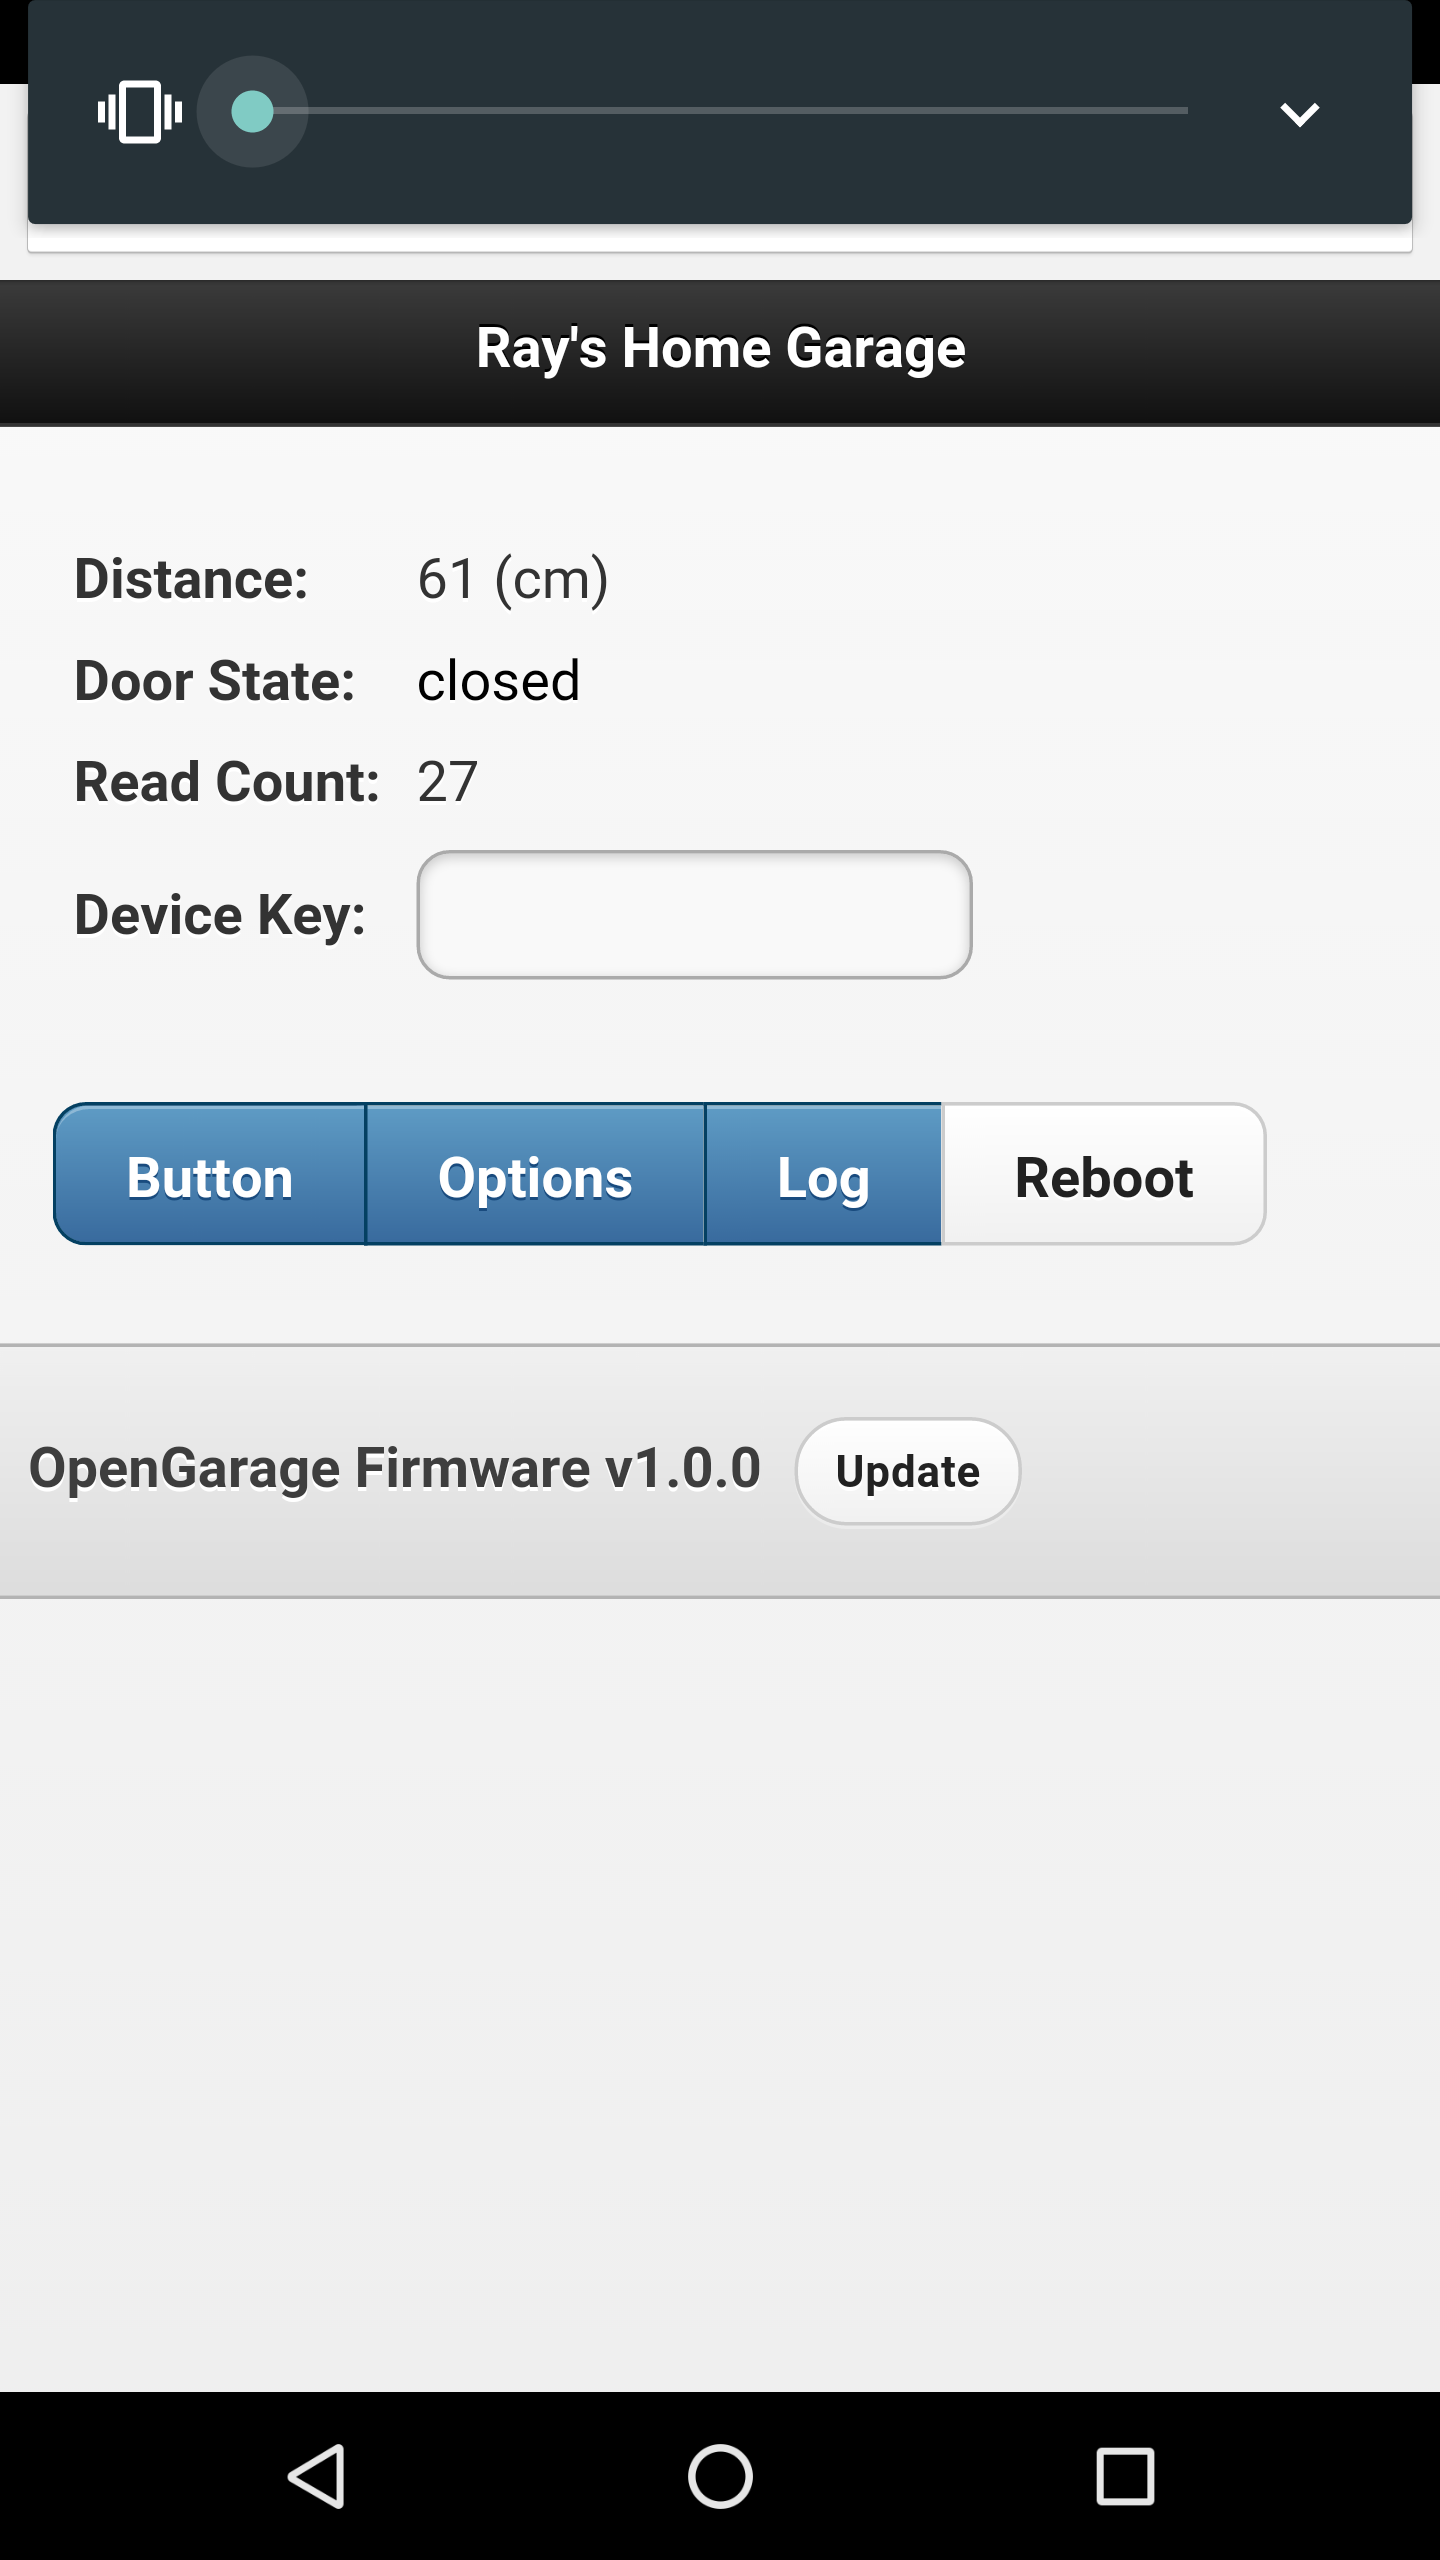
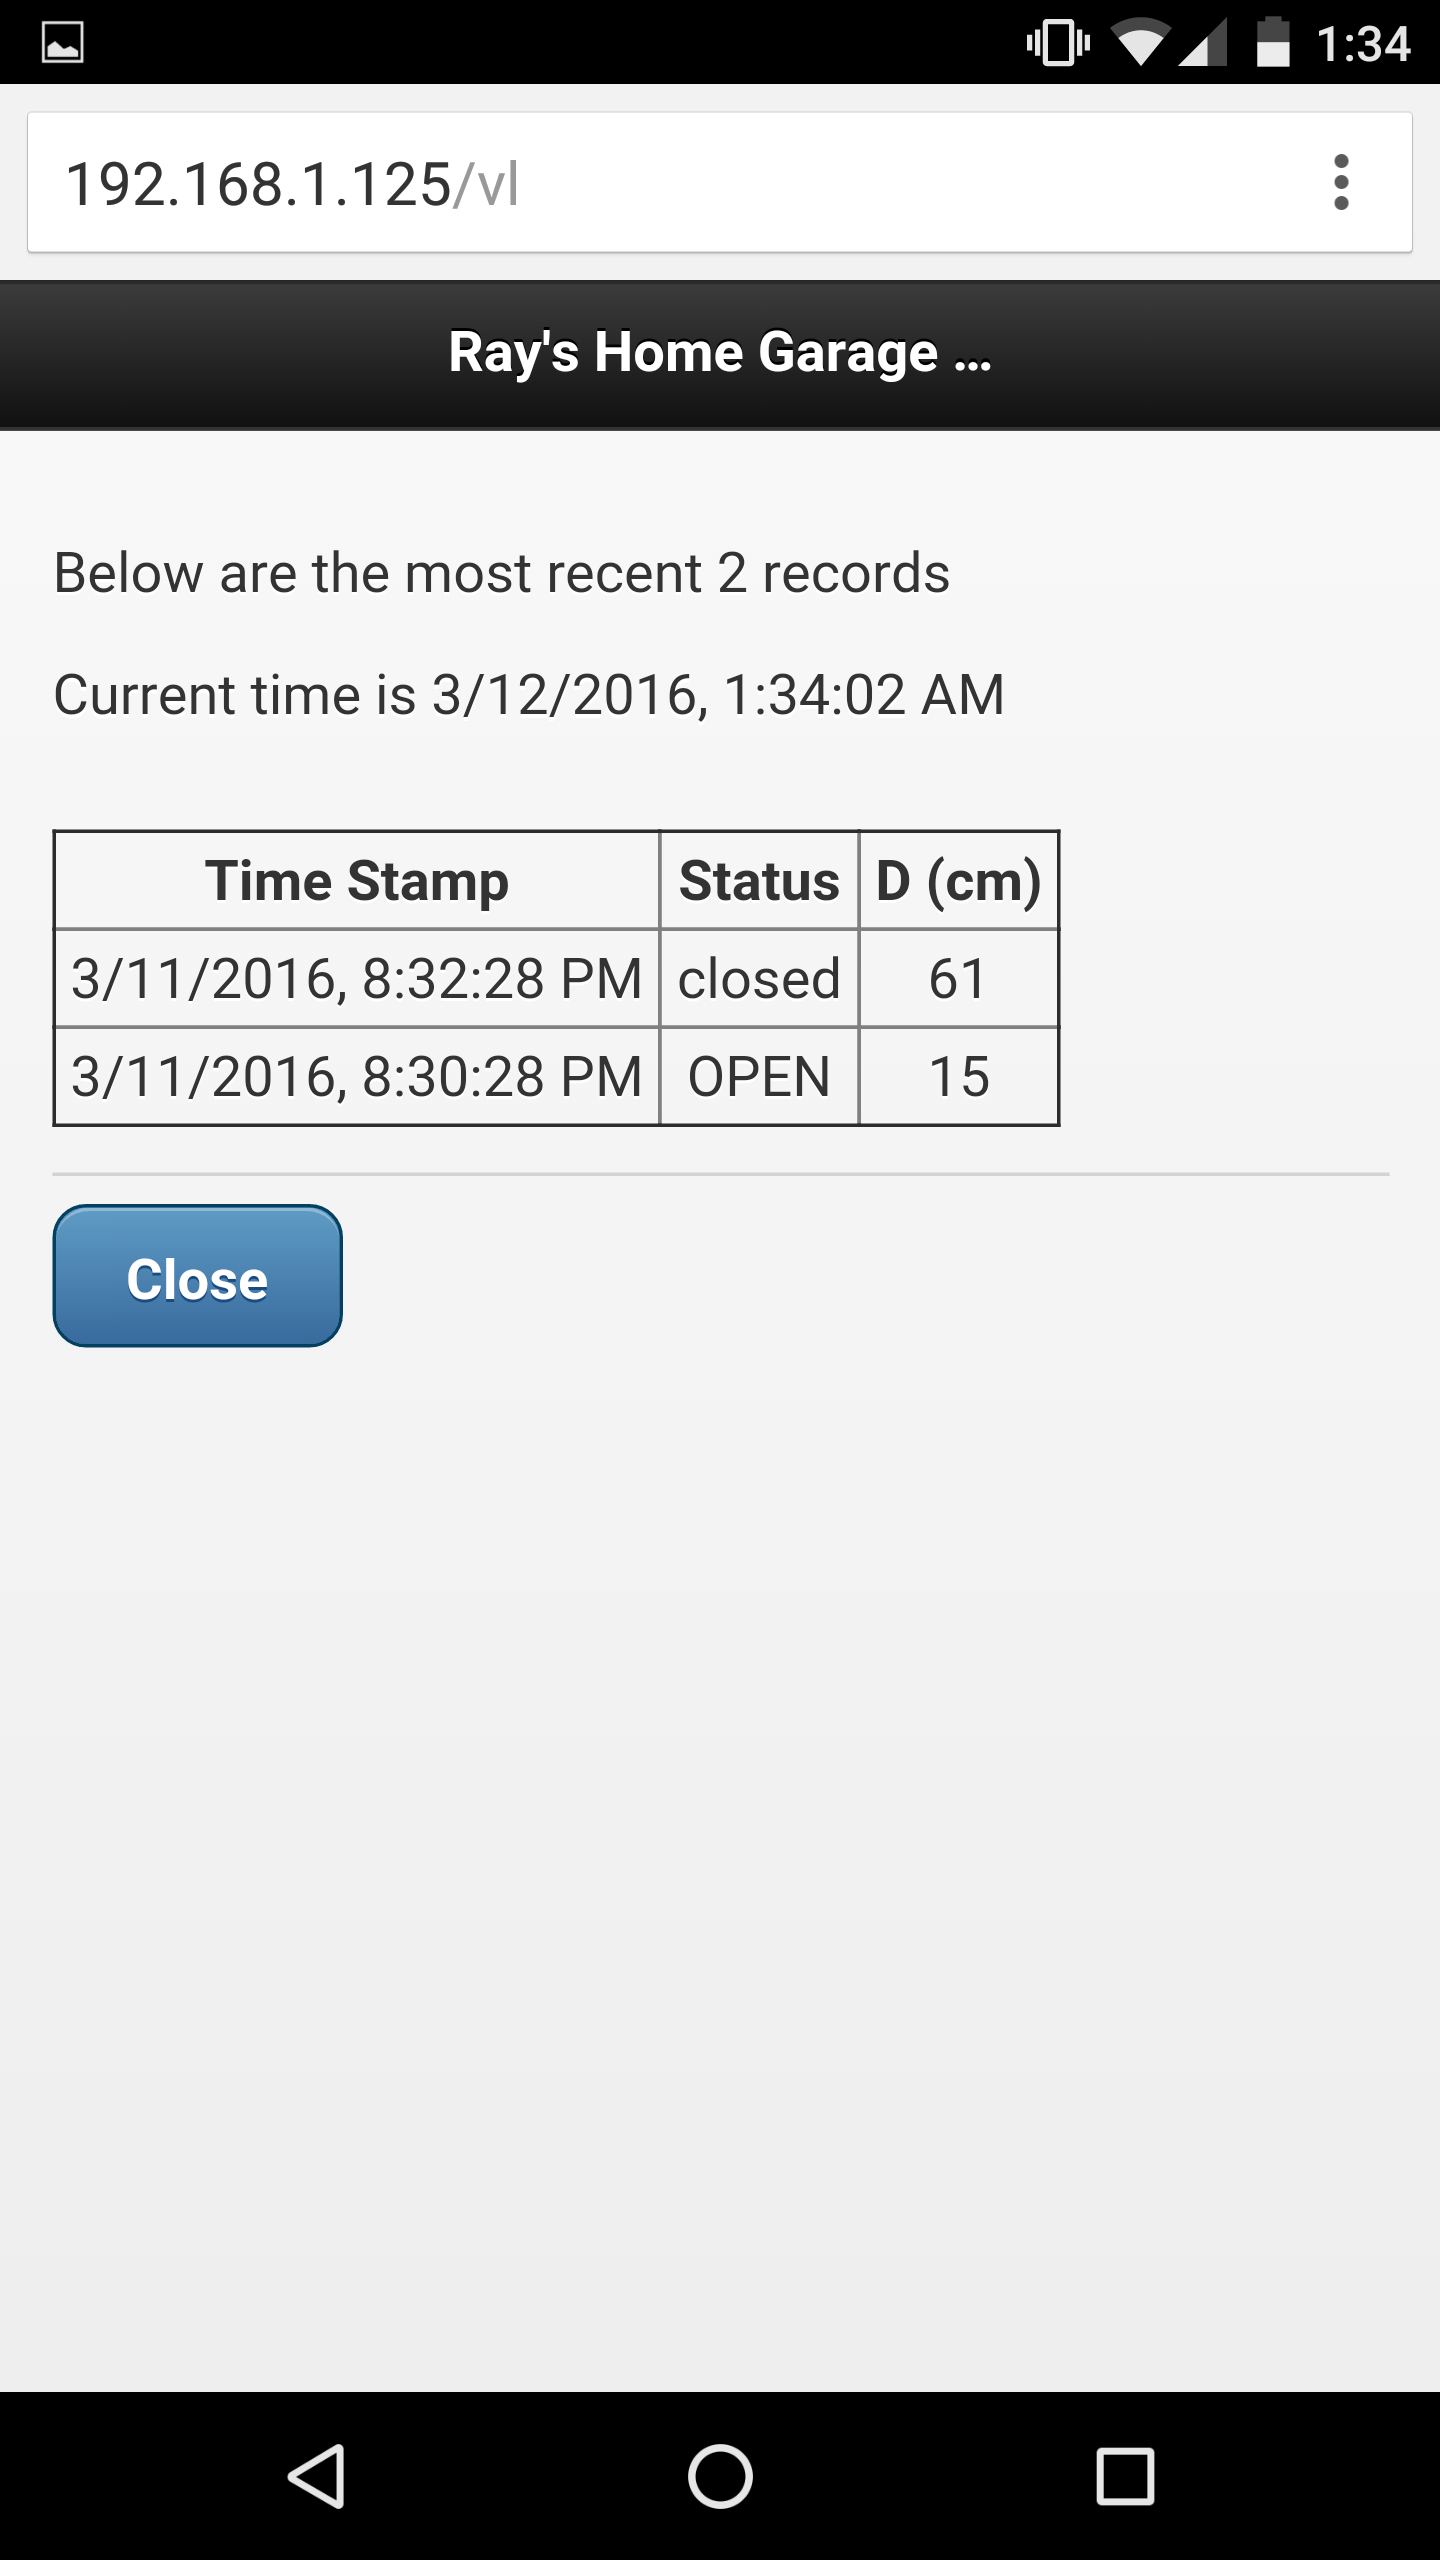
Built-in Web Interface. At the homepage you can check the distance readings, door status, and a read count value which increments every few seconds as the controller reads the distance sensor. The read count is basically a ‘heart beat’ that indicates if the controller is communicating with your browser or not. You can trigger a button click or reboot the controller. These actions are protected by a device key, which is by default opendoor.

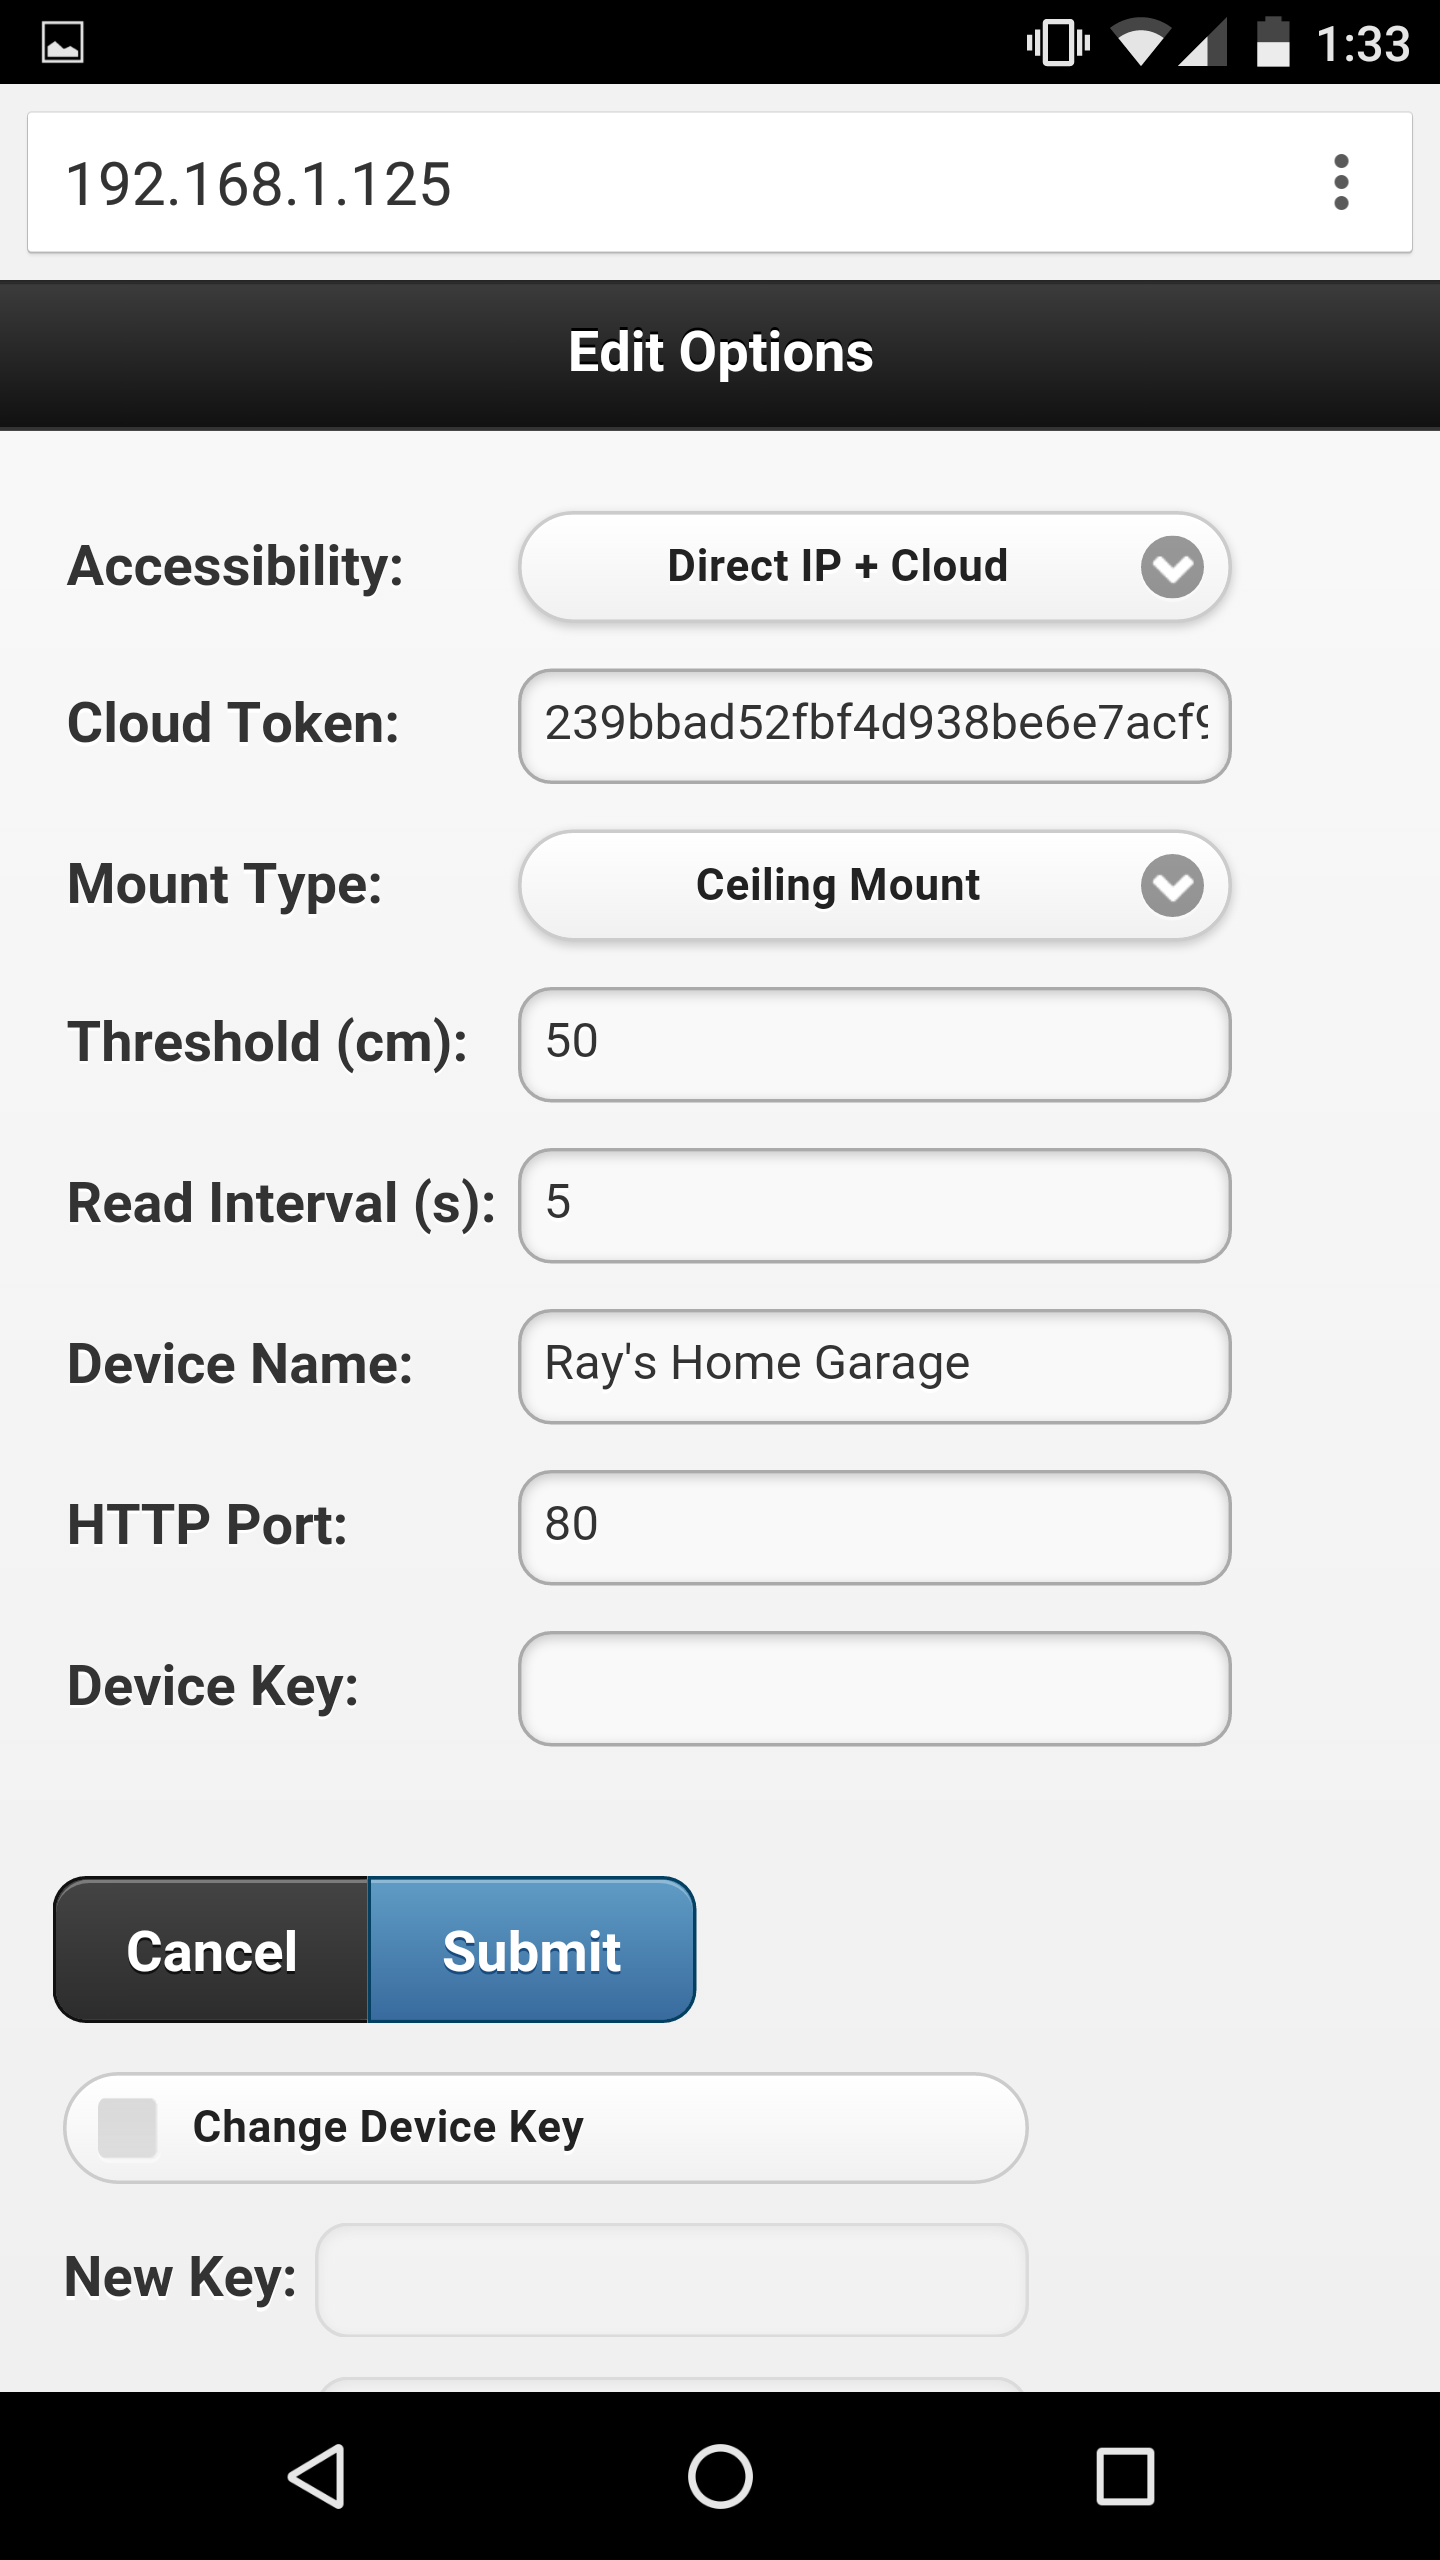
Click the Options button to open the ‘Edit Options’ page. Most of these are pretty obvious. The one you may need to tweak is the distance threshold, which the controller uses to tell if a door is open or closed. Basically, measure the distance from the sensor to the door (when it’s fully open), and that to your car, and pick a value in between the two. The settings are all saved in a configuration file in the flash memory, so they won’t get lost when the power is down.

At the homepage, click the Log button to open the log page. There you can see the list of recent events. The homepage also shows the current firmware version. Next to the version number is an ‘Update’ button, which allows you to upload a new firmware through the web interface (thanks to the OTA update feature available to ESP8266).

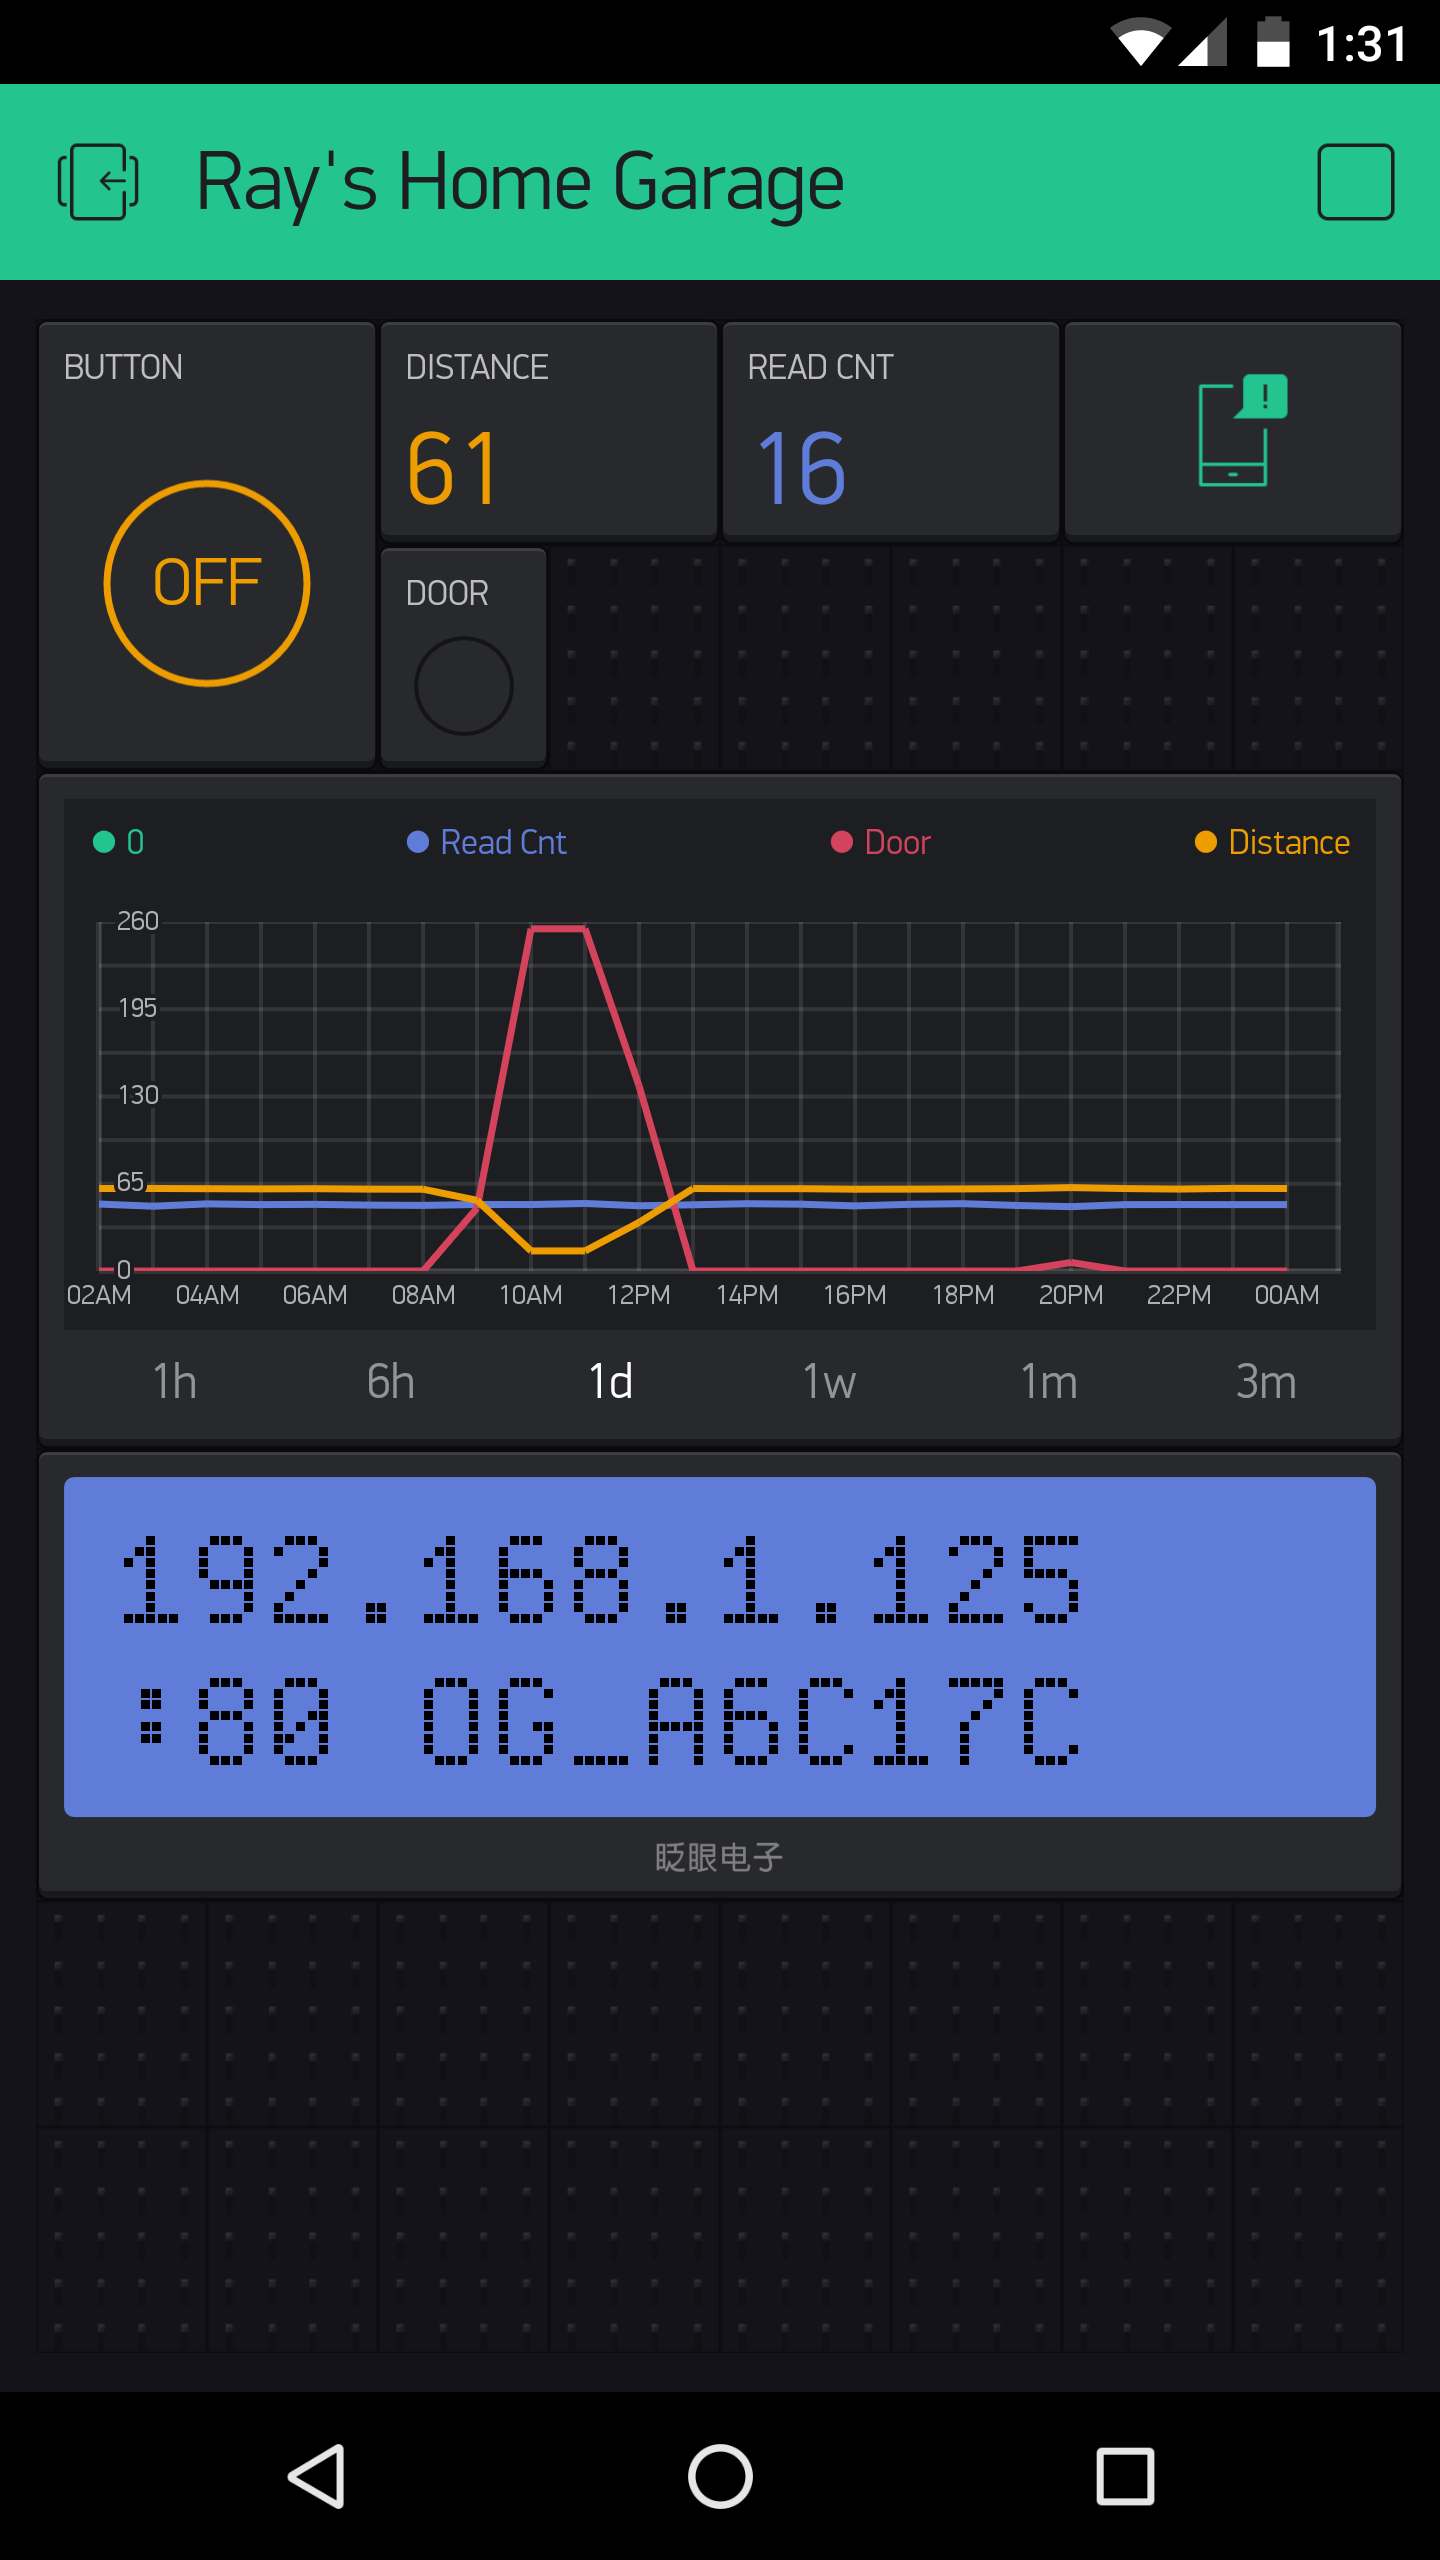
Blynk App. For remote access, the Blynk app is really easy to use. Once you’ve set a token, OpenGarage will communicate with Blynk’s cloud server and report its status. Like the built-in web interface, the app allows you to check distance readings, door status, and trigger a button click. Additionally, it provides a history graph that visualizes previous events, and push notifications when the door opens or closes (note that Blynk limits push notifications to no more than one per minute).


Resources and Technical Details

I’ve published the hardware design files and firmware code in Github. Those who are interested in the technical details can go to:

to find out all the low-level details. These include the circuit schematic and PCB (in EagleCAD format), 3D model of the enclosure, OpenGarage Arduino library, and instructions to compile the firmware. If you are interested in modifying the 3D printable enclosure, go to tinkercad.com, log in, and search for ‘OpenGarage’ and you should find the 3D model I created there.

og1.0enclosure

If you want to extend the functionalities of OpenGarage, there are several spare pins which are mapped out on the PCB for adding additional sensors etc.

Overall it has been a very pleasant experience using ESP8266 for this project. It’s inexpensive, powerful, and has active community support. I can’t think of any reason why not to use it for all my future projects 🙂

If you are interested in buying OpenGarage, you can place your order at rayshobby.net/cart/og.


FAQ

Q: How do I update OpenGarage firmware?
A: Compiled firmwares are all released on
OpenGarage github. For example, here is the direct link to firmware 1.0.4:
https://github.com/OpenGarage/OpenGarage-Firmware/raw/master/Compiled/og_1.0.4.bin
Before proceeding, note that once a new firmware is uploaded, the log will be erased, so keep a copy of the log if you need.

  • Use the web interface to update firmware (click the ‘UpdateÂ’ button at the bottom of the homepage or Options page).
  • If the built-in web interface is not responding, do a factory reset (i.e. pressing the button for 5 seconds or more), then follow the setup steps but leave the cloud token empty (to avoid any potential Blynk connection issues). Once firmware is updated, go to the Options page and put in the Blynk token, make sure the Accessibility is set to ‘Direct IP + Cloud’.
  • If neither of the above work, you can use a USB cable to flash a new firmware (see instructions below).

After updating firmware, check the bottom of the homepage and make sure the firmware version is correct.


Q: How do I reflash the firmware using a microUSB cable?
A: In the event that the controller cannot boot correctly (such that you can’t have access to over-the-air update), you can reflash the firmware via a microUSB cable.

Step 1: Driver. Depending on your operating system:

Step 2: Bootloading mode and serial port.
Let the device enter bootloading mode. To do so, get a microUSB cable, plug the smaller end to the device’s USB port, then press and hold the pushbutton while plugging the cable’s other end to your computer. The LED light should stay on constantly, and you should not hear any buzzer sound. If not, unplug the USB cable and redo this step.

Next, the device should appear as a serial port and you need to find out the serial port name:

  • Windows: the serial port name is COM? where ? is a number. You can find out the port name in the notification area, or in Device Manager — Serial Port.
  • Mac OSX: the serial port name is /dev/tty.wchusbserial? where ? is a number. You can find out the port name by running ls /dev/tty.wch* in Terminal (i.e. command line).
  • Linux: the serial port name is /dev/ttyUSB? where ? is a number. Run ls /dev/ttyUSB* in command line to find out.

Step 3: Reflash firmware.

Download the OpenGarage reflash package and unzip it. The package includes esptool, nodemcu firmware, and OpenGarage firmware. Open a Terminal (i.e. command line window), cd to the folder where you unzipped the package. Depending on your operating system, run the following command (assuming the device is in bootloading mode):

  • Windows: esptool.exe -cd ck -cb 230400 -cp COM? -ca 0x00000 -cf nodemcu.bin
    where COM? is the serial port name you found in Step 2 above.
  • Mac OSX: ./esptool_mac -cd ck -cb 230400 -cp /dev/tty.wchusbserial? -ca 0x00000 -cf nodemcu.bin
    where wchusbserial? is the serial port name you found in Step 2 above.
  • Linux: sudo ./esptool_lin32 -cd ck -cb 230400 -cp /dev/ttyUSB? -ca 0x00000 -cf nodemcu.bin
    where ttyUSB? is the serial port name. If you use Linux 64-bit, use sudo ./esptool_lin64 instead.

If you encounter any error, check if the device is in bootloading mode. Repeat Step 2 to enter bootloading mode before flashing.

Finally, once the nodemcu firmware is flashed, re-enter bootloading mode (Step 2) and run the above esptool flashing command again, except replacing nodemcu.bin at the end with og_1.0.4.bin. This completes the firmware reflashing.


140 Responses to “Introducing OpenGarage: an Open-Source WiFi Garage Door Opener”

  1. James Hansen says:

    Les,

    Did you not honestly read this?

    He’s interfacing to the push-button on the garage door. Which assumes all the doors existing pressure and obstruction sensors are in place. By your logic, an aftermarket replacement button is “unsafe”.

    James

  2. spaceshipdev says:

    I’m interested in working on this project although I see there is a severe lack of open source code. I checked out your github repo and the app folder is actually empty.

    I am unable to find any up to date PCB files for EAGLE and quite simply cannot commit time to help unless these crucial assets are made available.

    I understand if you have changed your mind and have decided to not open source your project but if this is your intention you might want to update your site to reflect this.

    Good luck with your project, please let me know if you decide to make available the complete projects technical assets, I would like to help you make this better.

    • ray says:

      Did you actually read the blog post or watched the video? The app is a Blynk app, so all you need is to scan the bar code (see link in the blog post) in Blynk. There is no standalone app yet, the github folder is reserved for a standalone app for the future, hence it’s currently empty. Also, what do you mean there are no up to date Eagle PCB files? They are right there in the opengarage-hardware repository. I don’t want to sound cocky, but if you are questioning the open source nature of this project, make sure you have read the project details before drawing your conclusion. I am not sure how I can make the resources more obvious.

  3. Kris says:

    Hey Ray,
    Can you give some description of what the “Security+ 2.0 adapter” $30 option is?
    The blog post only talks about interfacing to a compatible door button; I’m assuming it’s one the user already have.
    Good project.
    Thanks,
    K.

    • ray says:

      Hi Kris, the adapter is basically an off-the-shelf security+ 2.0 door button, with 4 wires soldered from the circuit board. If you have soldering skills you can get this door button yourself. Two wires (soldered onto the tactile button) go to OpenGarage, and the other two wires (door button wires) go to your garage door opener. This way, when OpenGarage’s relay clicks, it essentially triggers a click on the tactile button, which in turns sends security+ 2.0 signal to the garage door opener.

      If you already have such a door button, or a remote, you don’t need to buy an extra, you can solder wires to your existing button or remote, as the video shows. Because OpenGarage is meant not only for makers but also average users, we offer the adapter (with wires pre-soldered) as an easy-to-use option.

      • Kris says:

        Hi Ray, that’s my guess once I started thinking about it and you basically said that in the blog. Thanks!

  4. Brent says:

    Fantastic.
    Do you think there could be a version in future which will do 2 garage doors? Possibly have sensors on an 45 degree angle

    • ray says:

      No plan yet. At the moment if you want to control two garage doors, you will need two separate OpenGarage controllers.

      • Mike says:

        I would love to see a Remote Distance sensor added to this project for the purpose of detecting the presence of a second car in the same garage (single door/two cars).

      • ray says:

        What type of remote distance sensor do you have in mind?

      • TedM says:

        Ray,

        I think he means a second ultrasonic sensor that would show the presence (or not) of a second vehicle.

        Ted

  5. Mark says:

    Received my hardware today, thanks.

    Has anybody interfaced this to ThingSpeak?

    • ray says:

      Not yet. We’ve received some requests to get OpenGarage supported in OpenHAB etc. I haven’t had time to take a look at the integration yet.

      • Peter says:

        I’ve managed to connect openhab using http binding. Here’s the configuration:

        /etc/openhab/configurations/openhab.cfg:
        # configuration of the first cache item
        http:opengarage.url=http://192.168.4.1/jc
        http:opengarage.updateInterval=11000

        /etc/openhab/configurations/items/opengarage.items:
        Group Garage
        Contact Garage_Door “Garage Door [MAP(opengarage.map):%s]” (Garage) { http=”<[opengarage:10000:JS(opengarage-door.js)]" }
        Number Garage_Door_Distance "Garage Door Distance [%.0f cm]" (Garage) { http="<[opengarage:10000:JS(opengarage-dist.js)]" }

        /etc/openhab/configurations/transform/opengarage-dist.js:
        JSON.parse(input).dist;

        /etc/openhab/configurations/transform/opengarage-door.js:
        (function(i) {
        if (JSON.parse(input).door == 0)
        return 'CLOSED';
        return 'OPEN';
        })(input)

      • ray says:

        Nice. Thank you for sharing!

      • Gordon Geist says:

        Ray – think you should capture this as it is rock solid. Have had it working on Openhab 1 and now Openhab 2 using the HTTP binding.

      • ray says:

        Good to know that. Thanks!

      • Matthew says:

        Hey Gordon, you said you managed to get this working on openHAB2 through HTTP binding. Can you confirm if this is still working and it is the same configuration as what Peter says above?
        Thanks.

  6. Darrell says:

    Can the same garage door controller be operated by the Blynk application installed on two different phones?

    For example, can a husband and wife both have control of the same garage door?

    • ray says:

      Yes, it can. There are two ways: one is to use a shared Blynk account. You can log in to the same account in different devices, and you will see the same projects. For example, I have installed Blynk on my cell phone and iPad, both work just fine and I received notifications on both.

      Another way, if you don’t want to share the account, is to use Blynk’s ‘Shared Access’ feature. This way, your spouse does not need to log in to your account, but can still access the same device.

  7. paul says:

    I received my hardware yesterday. Installed in 10 minutes. Got hung up briefly getting Blynk to respond (needed to do another reboot). Wrote a quick python script to interface with the OG webpage so I can just run a cronjob on the RaspPi and never worry about going to bed with the garage door left open.

    @Darrell, I installed on a phone and tablet and both work, so it does work on multiple devices.

  8. Dennis says:

    I am one of the lonely crowd using a windows phone which does not have access to the blynk app. Can I use port forwarding and still have remote access using the web interface?

    Thanks

  9. Dennis says:

    Well… I got the device installed today and unfortunately, the interface with two different windows 8.1 phone browsers does not work very well. It does not “read” the button push most of the time. It works just fine with explorer on my android device as well as the blynk app on the android phone.

    Perhaps Ray can make some tweeks to the GUI for better function on windows phone 8.1

    Thanks,
    Dennis

  10. Dennis says:

    Note, I also find that the interface on windows 10 desktop computer has some of the same response issues as mentioned on windows phone 8.1

    Thanks

  11. Naren says:

    After I power up the module, I do not see any wifi network starting with OG_xxxxxx. I have tried resetting to factory default also. What could be wrong?
    Thanks
    Naren

    • ray says:

      Is the LED blinking at about 2Hz? If so, that means it’s in AP mode and it should create a network. If it’s blinking slowly (like once per 2 seconds), it’s trying to connect to your router. If it’s not blinking at all, that suggests there is an error.

  12. Babel says:

    Hi,
    Have you ever thought about adding a DHT22 sensor. When the garage door remains open too long in cold weather in winter the door could close automatically.

    • ray says:

      I have thought about adding a temperature sensor (not DHT22, but something simpler like MCP9700) but in the end I feel it’s not that useful so didn’t include it.

  13. babel says:

    Hi,
    I have one more question. BLYNK works with blocks of energy. What amount of energy Opengarage needs? when I scan the QR code Blynk ask me to add energy.
    Thanks for your good works.

  14. Dennis says:

    I guess there is no need now to answer any of my previous three questions. I broke down and gave up my windows phone and got an IPhone like everyone else.

  15. santa says:

    Hi
    First this is a awsome website with lot of great informations.

    I have one question.
    I tried to load the Open Garage Example on a ESP8266, flashing the device works.
    When the controller restarts I always have the following log message.
    Have you am idea what’s wrong?

    loading config file…ok
    server started @ 80
    STA mode
    ……MDNS registered
    192.168.1.8
    set time server

    Soft WDT reset

    ctx: cont
    sp: 3fff09e0 end: 3fff0d00 offset: 01b0

    >>>stack>>>
    3fff0b90: 3fff0dcc 00000035 3fff2fb4 4020b283
    3fff0ba0: 4022c461 00000000 00000000 4020b2c8
    3fff0bb0: 01000100 3ffef9b0 3ffefa64 4020d32e
    3fff0bc0: 4022c52b 00000000 3ffeed30 00000000
    3fff0bd0: 00000000 3fff0c00 00000000 3fff0bcc
    3fff0be0: 3ffeed30 4022c7b3 3fff0c30 3ffe8b9c
    3fff0bf0: 4022c840 3ffe8b8c 3fff0c30 3ffe8b9c
    3fff0c00: 00000000 4022c828 00000000 401004d8
    3fff0c10: 00000000 40105a30 402311de 00000000
    3fff0c20: 00000000 40105995 00000000 3ffef9c0
    3fff0c30: 3ffef9c4 40231258 3ffefc18 4020e635
    3fff0c40: 402424e0 fffffffb ffff8000 0000003e
    3fff0c50: 3fff2f48 00000000 3ffefc18 4020e660
    3fff0c60: 40201bc4 3ffef9c8 3ffefc18 3fff2214
    3fff0c70: 3ffef794 3ffef9c8 3ffefa18 4020ced5
    3fff0c80: 0801a8c0 00ffffff 0101a8c0 3fff2214
    3fff0c90: 3ffef794 3ffef9b0 3ffefa64 4020df80
    3fff0ca0: 3ffe8e60 0801a8c0 40210824 40210810
    3fff0cb0: 4020cc08 3ffefa64 40210824 40210810
    3fff0cc0: feefeffe feefeffe feefeffe 3ffefcd4
    3fff0cd0: 3fffdad0 00000000 3ffefccc 40206db4
    3fff0ce0: feefeffe feefeffe feefeffe 4020f6b4
    3fff0cf0: feefeffe feefeffe 3ffefce0 40100718
    <<<stack<<<

    ets Jan 8 2013,rst cause:1, boot mode:(1,1)

    ets Jan 8 2013,rst cause:4, boot mode:(1,1)

    wdt reset

    Thank you in advance

    • ray says:

      We did receive a few reports of similar issues, where the firmware crashes and repeatedly restarts. The solution, oddly, is to flash the controller with the nodemcu firmware first, then re-flash it with OpenGarage firmware. I have no idea why this works, and it was a purely co-incident that I found the solution. I suspect is has something to do with the flash memory space not initialized properly. In any case, use esptool.py to flash a nodemcu firmware (for example, nodemcu 0.9.6 firmware). Once that’s done, re-flash the OpenGarage firmware, see if this fixes the issue.

      • santa says:

        Hi
        Thank you for your quick response.
        I’ve tried your suggestion.
        Unfortunately, it didn’t work. I used the nodemcu flasher (https://github.com/nodemcu/nodemcu-flasher) to download the nodemcu firmware, not the esptool.py. I think that should not be the problem?

        When I try some examples, which comes with ESP8266 core for Arduino (for example AdvancedWebServer), the module works fine.

        I didn’t get the Wroom-2 module I use somethink like this:
        http://www.aliexpress.com/item/ESP8266-ESP-12E-serial-WIFI-Industrial-stable-version-A-full-test-board-Full-IO-leads/32582919061.html

        Do you have an idea what’s wrong?

        Thank you in advance

      • ray says:

        I just remembered to ask you this: do you have an ultrasonic distance sensor connected to your board? Note that OpenGarage firmware assumes there is an ultrasonic distance sensor, and if you don’t have one, the read_distance function will time out, triggering watchdog timer reset. The easiest solution is to go to OpenGarage.cpp, read_distance_once() function, return 0 or some constant right at the beginning. This will avoid it triggering time out.

      • santa says:

        Hi Ray
        It solved the problem.
        Thanks a lot!!!

  16. nunyabiz says:

    When i compile in audrino i get this error. I have tried both 1.6.5 and 1.6.8. Any idea what the issue is?

    Arduino: 1.6.8 (Windows 10), Board: “NodeMCU 1.0 (ESP-12E Module), 80 MHz, 115200, 4M (1M SPIFFS)”

    Build options changed, rebuilding all
    C:\Program Files (x86)\Arduino\libraries\OpenGarage\main.cpp: In function ‘void on_sta_upload_fin()’:

    C:\Program Files (x86)\Arduino\libraries\OpenGarage\main.cpp:474:12: error: ‘class UpdaterClass’ has no member named ‘reset’

    Update.reset();

    ^

    exit status 1
    Error compiling for board NodeMCU 1.0 (ESP-12E Module).

    This report would have more information with
    “Show verbose output during compilation”
    option enabled in File -> Preferences.

      • Raptordemon says:

        Hi Ray, i did the modifications listed but im now getting this error:

        Updater.cpp:17:3: error: class ‘UpdaterClass’ does not have any field named ‘_async’

        i didn’t see an Updater.cpp on GitHub. Im looking to test the API on an esp8266 before purchasing.

      • ray says:

        Hmm, I’ve never seen this error about ‘_async’. Updater.cpp is part of the esp8266 core, and is not part of the OpenGarage code. Depending on how you installed Arduino — if you installed the stock Arduino and then installed the esp8266 core, then generally the files are in a folder named Arduino15. If you installed using the makeEspArduino: https://github.com/plerup/makeEspArduino, then it’s in the installation folder. In any case, if you do a global search of Updater.cpp you should be able to find it.

      • Gompka says:

        I am getting the same updater.cpp _async error. Any luck on fixing this? I am using a Wemos d1 mini.

      • ray says:

        I wonder if this has to do with the ESP8266 core version. The one I am using is 2.2 I think and the latest is 2.3. Can you try to switch to version 2.2 and see if the error still persists?

      • Gompka says:

        Ray, i do not have the hardware in front of me at the moment, but when using esp8266 core 2.2 and doing the modifications to blynk and updater.h the sketch now compiled without any errors. I will try this on the hardware when i get home and report the results, but i do think this fixed the issue. Thank you.

      • ray says:

        OK, that’s good to know. Thanks.

      • Gompka says:

        Ray, i tried it on the hardware and it worked, it showed up as an AP and i was able to connect to it and enter my wifi details. I still don’t have the ultrasonic sensor hooked up yet, it just came in today, i went with a 3.3v model to avoid having to use a voltage divider. Thanks again for your help.

      • jtburke says:

        I have the same compilation error: ‘class UpdaterClassÂ’ has no member named ‘resetÂ’. I have the updater.h modification file, but I don’t know where to put it. I do not have an esp8266/x.x.x/cores/esp8266 folder and a global search does not find a current updater.h file installed.

        I installed the esp8266 v2.2.0 via the Arduino 1.6.5 Boards Manager method, which works for all my other esp8266 projects. Could this be the issue? How do I install the updater.h file?

        Love this project, please help.
        jtburke

      • ray says:

        Not sure if this makes a difference: but it’s Update.h with a capital U, not small case u.

  17. Eric Boinaud says:

    After few test everything was ok. But now the led is always on and i can’t do nothing even reset.
    How can i resolve my problem.
    Thank you advance.

  18. Corrin Lakeland says:

    Hi, I ordered your kit and it’s just arrived. It looks to be working correctly thank you. I’ve set it up following your videos and everything worked correctly.

    I’ve run into a small problem installing it – I can’t get a reliable wifi signal as far as the garage. Is it possible to run it without an internet connection? E.g. opens when phone gets within wifi range?

    I’m planning to run ethernet to the garage at some point via powerline, so I could potentially accelerate that project and add a wifi adaptor but it feels a bit messy – it would mean I’ve got the unit, the powerline, my generally dodgy internet connection and the phone – lots of things to go wrong.

    Any ideas?
    Thanks!

  19. Paul says:

    Ray,

    I received the kit and had it configured within 10 minutes, and installed and working in 30 minutes. Brilliantly simple and effective, thanks for a great product!

    Best,

    Paul

  20. Stan says:

    I just received the open garage but when I plug it in I hear 3 tones repeating and the LED blinks once every two seconds. The OG_xxx wifi does not show up. When I press the button for 5 seconds the led stays on constantly. Any ideas on what is going on and how to reset it?

  21. Michael Heckhuis says:

    Hi, great work!
    This will work absolutely fine, if you are sitting warm in a car 😉
    I try to find a system which allow me, to just hold my phone (sitting on my bike) to a certain point (like NFC sticker), and then the garage opens.
    The idea with your great opener: stick a NFC button somewhere near the garage door, take my phone out of my jacket, place it near to the nfc sticker, start with tasker thze blynk app and open with that task the door. So i need something like a “autorun” command, which directly opens the door when you start the app. Is this possible ? Or have anyone a better solution for my “bike” scenario?
    Kind regards
    Michael

  22. Matt says:

    Hi Ray,

    I live in Arizona. What is the maximum temperature that all components can operate and not fail?

  23. Paul Smedley says:

    Hi All – any photos of this installed on a rollup roller door? I don’t quite understand the comment “For roll-up garage doors, the ceiling mount would not work. Instead, you can mount it to the side of the door, with the sensor facing the outside. This way the logic is reversed: if the distance reading is small, it means the door is closed, and vice versa.”

    The side of the door moves up and down a track when the door opens – surely cables moving would risk entanglement over time? Or am I missing something?

    • ray says:

      If you google image search ‘roll up garage door’ you will find plenty of examples. Mounting on the side does not mean mounting the controller on the door — you can mount it at a certain distance, say, 20 to 50 centimeters away from the door.

      • Paul Smedley says:

        I was meaning any photos of an OpenGarage mounted to a rollup door. This type of door have a track/guide on each side running the length of the door. Anyhow, I’ll take photos of my installation once my OG turns up in a couple of weeks.

      • Paul Smedley says:

        Hi Ray,
        Received my OpenGarage in the mail yesterday, and got it configured this morning. Even though our garage door is of the roll up type, I ended up going for ceiling mount. I worked out a location where the distance sensor could pickup the increased diameter of the roll when the door is open.

        One question – is there any way to configure the Blynk notifications? I don’t need to know everytime the door is opened or closed, but it would be useful to know (for example) if the door is left open for greater than a certain duration – for instance when I might have forgotten to close the door.

        A photo of the installed OG is at https://dl.dropboxusercontent.com/u/76425158/20160604_090351.jpg

      • ray says:

        You can remove the Blynk notification by clicking on the Stop button to stop the app, then clicking on the notification widget (on the right of Read Cnt), and remove it. This way, you won’t receive notifications.

        To customize the notification (e.g. if the door is left open for a certain duration), it will require modifying the firmware. This is something we can do in future firmwares.

      • Brent d says:

        +1 for custom alerts after x minutes.
        Until then, i will run a script on my computer to check status. Then open for more than x minute’s then will send an email. Phone notification would be better though.

  24. Mark Roberts says:

    Hi,

    A couple of days ago the Blynk app seems to have stopped working with my open garage board. Local direct access to the board web page works fine. Tried changing the cloud key but the Blynk app keeps saying my generic board is not in the network.

    Any idea on how to debug this?

    -mark.

    • ray says:

      Yes, I did notice the issue. I’ve re-compiled the firmware with the updated Blynk library, and it seems to have fixed the issue. Here are the details: http://rayshobby.net/introducing-opengarage/#reflash_firmware

      You can use the built-in web interface to update firmware (click on the ‘Update’ button at the bottom of the homepage). If the built-in web interface is not responding, do a factory reset (i.e. pressing the button for 5 seconds or more), then follow the setup steps but leave the cloud token empty.

      If it doesn’t succeed, try to power cycle the controller and try again. If that still doesn’t work, you can use a USB cable with esptool.py to update the firmware (instructions can be provided upon request).

      After putting in Blynk token, make sure the Accessibility is set to ‘Direct IP + Cloud’, otherwise the controller won’t communicate with Blynk server.

      • Mark Roberts says:

        Thanks Ray,

        It worked great. Was able to download the binary and update the opengarage entirely from my phone using the web page and confirm that the Blynk app is working again.

        Did you figure out what Blynk changed that broke it?

        -mark.

      • ray says:

        I am not sure what broke it. I did read that it requires updating Blynk Arduino library to the most recent version, which is what I did. I haven’t followed their forum post to find out what has changed.

  25. Javier says:

    Hi Ray,

    Congratulations for the project. It’s really neat!

    I want to test it with a wemos mini D1 and I’m trying to compile as I will need to adapt it to a solution for 2 doors controlled by a set of relays for the two motors.

    I’ve tried to compile it with Arduino IDE and I get several errors all related to the Blynk library.

    I’ve updated the the Blynk library so since I’ve seen your note at the beginning of the blog regarding to a new firmware, I was wondering if the the source code needs to be updated to be used with the new version of the Blynk library.

    Thanks,
    Javier

    • Javier says:

      I’ve been able to isolate the issues by commenting a couple of functions but I still have the following error:

      libraries/OpenGarage/main.cpp.o: In function `std::_Function_handler::_M_invoke(std::_Any_data const&)’:
      /Users/gonzzo/Library/Arduino15/packages/esp8266/tools/xtensa-lx106-elf-gcc/1.20.0-26-gb404fb9-2/xtensa-lx106-elf/include/c++/4.8.2/functional:2031: multiple definition of `Blynk’
      sketch/mainArduino.ino.cpp.o:(.bss.Blynk+0x0): first defined here
      collect2: error: ld returned 1 exit status

      any hint of where the issue could be?

      Thanks,

      • ray says:

        Your error message seems to be incomplete: it says ‘multiple definition of’ but I need to see multiple definitions of what?

        If you update Blynk library, be sure to follow the instructions here to add a function to one of its files:
        https://github.com/OpenGarage/OpenGarage-Firmware/tree/master/Modifications

        The reason is that OpenGarage firmware manages WiFi connection itself while Blynk library doesn’t provide a suitable function to allow this. So I added a function to allow it.

  26. James says:

    Hi Ray,

    Just got and installed it on my garage tonight. It’s great! It works so much better than the remotes.

    One suggestion for future firmware: a report of WiFi strength (if possible). It took some fiddling to get it to connect in my garage.

    Also, is it intentional that one has to long press the door button on the Blynk app? If I short press or tap, it seems like the relay does not stay on long enough for my door.

    Otherwise, great tool. Couple this with the OpenSprinkler and my house gets smarter!

    Thanks!
    James

    • ray says:

      WiFi strength: yes, this is definitely possible as the WiFi chip’s API function does provide this data.

      Currently the Blynk button is set in ‘push’ mode, which means the duration of the signal depends on how long you press it. This simulates physical button where it depends on how long you have pressed the button. However, in case of Blynk, if you press too quickly, it might not have enough time to send the signal to the controller. The alternative is change it to ‘switch’, which makes it a toggle switch, but it’s not really suitable here.

      • James says:

        Hi Ray,

        Thanks for the feedback! I’d suspected the Blynk app had some sort of limitation there. I had been playing with its setup and noticed that buttons were push/toggle but didn’t go much further as I didn’t want to break it.

        So far, it has been great! It works every time now that I have made my self used to the longer press in the app. Which is far better than the remotes that came with the garage door opener.

        I tell my friends and family about it often!

        Thanks,
        James

      • ray says:

        Thanks! Same here: the remote in my car is so not working that I now use my phone exclusively.

  27. Dan says:

    Hi Ray,

    Thanks for sending over the product last week.
    I had it working but for some reason the unit is not opening my door anymore. I checked the soldering on the buttons and they seem fine since when i connect the two wires my door opens. Any ideas? Reboot and factory settings did not help.

    • Dan says:

      let me explain somemore what i did. I soldered two wires to my garage remote which works wireless. When i connect the wires to eachother the door opens.. But when i connect the wires to the OpenGarage unit via the orange plug the unit will not open the door.

      • ray says:

        The first thing to check is to hear if the relay clicks when you either click the button on OpenGarage, or use the web interface to trigger a button click. If the relay clicks, the next thing to check is the connection from OpenGarage to your remote.

  28. David says:

    Hello Ray,

    Just a quick question for you, the hc-sr04 ultrasonic sensors are 5v, while the esp8266 is a 3.3v device. From looking at the schematic it looks to me like your powering the ultrasonic sensor directly from the 5v usb, and it looks like the signal coming out of the ultrasonic sensor is going through the 100 ohm resistor to knock the voltage down to be 3.3v compliant, am i understanding this correctly? I am attempting to build my own circuit for the hands on learning experience and I wasn’t quite sure how the ultrasonic sensor was wired. Thanks

  29. Matt says:

    I just bought the opengarage door, and it works as expected with the html page. This is my first time using Blynk and setup a local private server on my rasp pi, and as I assumed, it doesn’t connect to the Blynk app. I am assuming you are pointing to the cloud version, not local. I was looking through the repo and cannot locate the lines I would need to change, to have it point to my local Blynk server, and not the cloud version.

    • ray says:

      You are right — by default it connects to the Blynk server. If you want it to point to your local server, you need to modify the firmware — specifically the Blynk.begin method, by providing the IP (or domain name) of your custom server.

  30. Gene Retske says:

    Ray –

    I got the OpenGarage today, thanks. I added the Blynk app to my iPhone. I got the OpenGarage connected to my network. I can see the web interface on my network and it changes as the distance sensors change. I scanned the QR code and Blynk shows an OG app. But, Blynk does not seem to be connected to OpenGarage. When I move the sensor, nothing changes on the Blynk display.

    What did I miss? I read the documentation but I can’t figure it out.

    Gene

    • ray says:

      For Blynk connection, there are two steps:
      1) make sure you copied the correct Auth Token (which you can get from the OpenGarage Blynk project settings)
      2) make sure the ‘Accessibility’ is set as ‘Direct IP + Cloud’.
      Once the above 2 are set, reboot OpenGarage and it should connect to Blynk.

      • Gene Retske says:

        Ray, I got it to connect and I get messages when the door opens and closes (I simulate this). The browser interface works over my WiFi network. But, the Blynk app on my iPhone is not doing anything at all. The button doesn’t work and the other widgets don’t change or do anything. I have it set up as you said. Maybe I should just start over again, reset the OD and set up a new Blynk account?

        -gene

      • ray says:

        Sure, you can try that. To reset, just press and hold the button for more than 5 seconds, and the LED will stay on, at which point you can release the button and it will reset back to AP mode. During set up, you can fill in the Blynk Auth Token.

        Another thing to try is to use a different mobile device (for example, if you have an Android device) to just see if the Blynk connection issue is reproducible on other devices.

      • Gene Retske says:

        Good idea. I have an Android pad I can try.

        Thanks,
        -gene

      • Gene Retske says:

        Ray, update –
        I uninstalled the Blynk app from my iPhone, reinstalled it and everything linked up as it was supposed to. I probably fat-fingered something, but it is working now. I am going to install it on the door tomorrow.

        Thanks for the advice.

        -gene

  31. c6pjr says:

    I noticed that my when I try to connect it to my network on my 192.168.4.0/24 wireless network the unit crashes. It wont let me browse to the ip my router has assigned it. When I reset the unit, and connect it to my 192.168.1.0/24 network there are no issues. Has anyone had this issue? I am stumped. I really want it on my 4.0 network.

    • ray says:

      I don’t understand the /24 part of 192.168.4.0/24 — could you explain?

      • c6pjr says:

        /24 means my subnet mask is 255.255.255.0. Every time the device connects to my 192.168.4.0 network it goes into some freeze and wont let me in. I have to restart it. It is on the newest firmware update. I have no issues adding it to any other network.

      • ray says:

        I wonder if this has to do with the fact that 192.168.4.x is the chip’s default AP mode network IP. As you know, when it starts in AP mode, itself has an IP address 192.168.4.1, and any device connected to it has a DHCP IP of 192.168.4.x. This is really the only thing I could think of.

      • c6pjr says:

        It is the default AP mode network Ip. I tried several different ranges. Everything works except the 192.168.4.X. Keep this in mind if someone has issues. I just had to move my whole IOT network range to make this work. I am happy with it though.

  32. Tomasz @ PL says:

    Great project.

    Received mine overseas from Ray. Just had a few hours to get it all wired up and integrated with my OpenHAB. Very happy with the end result.

    This little bugger took care of a number of ‘open issues’ that I had with my home automation:

    A) Can now tell when a vehicle is inside or not and use that data point for further actions.
    B) Single click “Disarm Alarm + Open Garage Gate” from my OpenHAB app.
    C) Was able to mount a wall mounted garage door button in our garage since I already have a 433.92 bridge. Yes yes, the Raspberry PI + Tellstick Duo 433.92 bridge double checks the alarm is actually fully disarmed before popping the door open. Wouldn’t want someone cloning the button and opening the gate at will.
    D) Previously I was using (and continue to, to some degree) our alarm system to read the gate open / closed status. This would well, but due to reasons out of my control, there is a bit of a delay between when the alarm will publish the open / closed status. I now use both the alarm and the OpenGarage sensor. So there is a chance that the OpenGarage sonar will have the data for me a bit quicker then the alarm system.

    Overall I can highly recommend this to someone looking at a low cost and feature filled garage door home automation device. Well packaged and Ray clearly has put some thought into the whole project. Even has a buzzer which I’m sure it could have done without. And not lost any + points from me anyways.

    The only downside I can see to it is the ios / android app. Although this does not affect me in the slightest as I would have integrated any one of these types of devices into my OpenHAB setup, but essentially that would be the ONLY reason to go out and purchase (at three or more times the cost) any commercial / retail system.

    Thumbs up Ray! Bookmarked your site, will keep an eye open every little while to see what you come up with!

    • ray says:

      Thanks for your feedback. Glad to hear you have been able to use the device with OpenHAB. The buzzer was added because a customer told me that all unattended garage door remotes / buttons should meet the new UL 325 standard, which requires having an audible alarm.

  33. Mike H says:

    Hi Ray:

    I am planning to order the open garage, but I have 2 garage doors and just want to verify I can set run 2 doors before I order. How do I set up 2 doors in the Blynk app. Am I correct that I will just set up 1 project for each open garage (each door)?

    thanks,

    • ray says:

      Hi Mike: you are right: each OpenGarage can only operate one door, but you can have two separate OpenGarages, one for each door. In Blynk app, each project has its own unique token, and you can have duplicate projects, so it works fine — albeit a bit awkward since you need to switch between two different projects, but it’s pretty straightforward. Also, you can change the project name for each to help you easily identify which is for which door. Regarding the native web interface: each OpenGarage will have its own IP, so you can individually access each (and similar to above you can give each a different name).

  34. Michael Chang says:

    Hi Ray: Just curious if RP3 build-in WIFI will work? Did not find in the FAQ or any thread here. Thanks, Michael

    • ray says:

      Hi, on the forum users have reported mixed results. The main issue is that RPi 3 can draw a large amount of current that exceeds the design spec of OSPi. If this is the case, the work-around is simply to power RPi 3 separately with a USB adapter. This way, RPi 3 will draw its power from the USB adapter instead of OSPi, and should fix the power issue.

  35. JT says:

    Just got it in the mail. Unfortunately, it wont work for my use case. I am not willing to pay blink $1 and all I wanted was for it to close itself overnight if I leave it open. which it does not do natively. Can I add this feature to the device? The code is python and jquery? If I flash bad settings to the device what are my recovery options?

  36. CuriousG says:

    I finally got around to installing this. I don’t know if anyone else ran into this problem but my garage door opener “brain” is quite a bit further away than the supplied cables to reach the OpenGarage module. The USB cable barely reached my mounting point. I tried to mount it as close as possible from where the garage door opened up all the way to an overhanging beam. Anyway the supplied wire that connects to the relay was way too short for me. I ended up cutting up a spare CAT5e cable that was just leftover cable from an install to get the required length.

    • ray says:

      Sorry to hear about the cable length issue. The cable length is generally sufficient for most garage door systems, because the distance from the opener (the ‘brain’ you said) to the edge of the garage door when it’s fully open is well within 4 to 5 feet. For future reference, you can always contact us for technical issues and we will be happy to provide you a longer cable and wire to fit your need. Thanks.

      • CuriousG says:

        I installed it Friday and it operated fine Saturday to my knowledge then come Sunday I had issues with my cars intermittently stopped working with HomeLink and also remote controls that came with the garage door opener. I eventually replaced my CAT5e cable (too brittle when stripping the core) with speaker wire and moved the shared connection from the switch on the wall to it’s own connection. Would seem odd that I would have problems shortly after installing and something that should affect wireless signals.

        I’m running Android, is there some way to change the default notification sound to a custom sound within the Blynk app? I’d like to distinguish a sound just for garage door opening and/or closing.

      • ray says:

        I am not sure how to change the notification sound. I don’t think Blynk app itself provide such an option, but you may want to check system settings to see if there is away to assign a different sound to each app.

  37. Frank says:

    Hi Ray,

    I’ve installed the the source into my Arduino 1.6.5 IDE user Library, made the modifications as suggested however when I compile I get “fatal error: OpenGarage.h: No such file or directory
    compilation terminated.”
    I’m using Mac OSX by the way.

    Any Ideas?
    cheers
    Frank

    • ray says:

      Did you put the OpenGarage folder into your Arduino’s library folder? The error message sounds like Arduino is not detecting the OpenGarage folder.

  38. Ron Webb says:

    Will OpenGarage connect to Wifi with WPA2-Enterprise (802.1x) sign-on or a method to connect Ethernet.

  39. Nathan says:

    I would love to use this on my electric gates for my driveways. Has anyone used this product for an electric gate?

    • ray says:

      The product is basically made of two parts: a sensor that senses the status of the door, and a relay that triggers garage door action. I am not familiar with electric gate, but as long as the status of the gate can be detected using the ultrasonic distance sensor, and you can interface with the gate opener via a simple button (or a remote), it should work well with OpenGarage.

  40. Pat Furrie says:

    Ray,

    You present to options for mounting the ultrasonic sensor; I’d like to suggest a third:
    Mount the sensor at a location where it “looks” horizontally, towards the garage door, but from a position in-line with the upper tracks of the door, and far enough away from the door so that when the door is fully opened, the sensor is just behind the fully opened door. The sensor would be looking end-on to the door when the door is open (looking at the “top” end of the door which is now horizontal when the door is open).

    The reason to do this is to allow the sensor determine just how much the door is open, and provide a means of opening the door partially, and sensing that condition. Would be great for OpenGarage to be able to automatically open the garage part-way, know that it is in that state, and then properly close it when commanded. We sometimes leave our garage door open enough to allow the cats in and out, or for ventilation.

    Another feature which would be nice to have on the OpenGarage device is a way to piggy-back off of the optical sensor which the garage door uses for safety. This would be useful to allow OpenGarage to report the status of the sensor back to me when I’m trying to control the door remotely, but don’t understand why the door isn’t obeying my command to close.

    Thanks

    • ray says:

      Good suggestion. Though I don’t think the distance sensor has a small enough angle of ‘view’ to provide the accuracy when it’s facing the side of the garage door. Because of the way ultrasonic waves work, it can only sense relatively large objects (I think the angle of view is about 15 degrees). So if the object it’s sensing is small (say, the garage door is not that thick), then as soon as the object moves a bit further away, it can’t sense the object anymore. So I think this method will only work if it uses a optical based sensor.

  41. Steve Watts says:

    I love the project but I’m not a coder. I’m really looking for something that will automatically close my garage door at a time I set. I can’t tell you how many times I have left my garage door open on accident all night. I know a lot of people have this problem. We have had anything from animals coming into the garage to stuff stolen, peoples houses have been broken into. SOMEONE PLEASE! code a timer to close it at a specific time of the night.

  42. davidF says:

    Ray,
    Thank you for your OpenGarage project and the fact you set it to be open source. I have it running on a NodeMCU with just the ultrasonic sensor. Wife is not wanting it to remote control the door yet with a relay. Had a few issues with Arduino IDE and the code, but yur force search got past them with missing library and such.

    Question about the option you have on the OpenGarage web interface for IFTT. Do you have a doc, or weblink that covers setting up IFTT and the OpenGarage to send a SMS text if garage is open for X minutes? Wife does not want another app on her phone (Blynk), and the notifications are not working on Blynk for me .

  43. mark says:

    Hi Ray,
    I’ve been using both OpenSprinkler and OpenGarage for 12 months now and very happy with your products. Thank you. I had an issue with the OG where it randomly goes offline, then comes back online. I reset the device several times, reflashed the software all to no avail. I then noticed that the Micro-USB cable connection seemed to slightly shift at the connector to the board. I opened the case and discovered one of the anchor solder joints was loose! No problem I can fix this by soldering power leads directly to the board. I’ve also been experimenting with IFTTT and I’m really happy your devices are compatible. I also just discovered the option of connecting a flow meter to OpenSprinkler! I thought I would have to build a custom solution for this!
    Cheers, Mark from Australia.

    • ray says:

      Thanks for supporting our products. Sorry about the microUSB connector issue. If the issue persists, you can contact us and get it replaced.

  44. Gurjinder says:

    hi i am getting this error C:\Users\user\Documents\Arduino\libraries\ESP8266WiFi\src\ESP8266WiFiScan.cpp: In static member function ‘static void ESP8266WiFiScanClass::_scanDone(void*, int)’:
    C:\Users\user\Documents\Arduino\libraries\ESP8266WiFi\src\ESP8266WiFiScan.cpp:297:41: error: cannot convert ‘bss_info::’ to ‘bss_info*’ in assignment
    for(bss_info* it = head; it; it = it->next, ++i)
    ^
    C:\Users\user\Documents\Arduino\libraries\ESP8266WiFi\src\ESP8266WiFiScan.cpp:305:45: error: cannot convert ‘bss_info::’ to ‘bss_info*’ in assignment
    for(bss_info* it = head; it; it = it->next, ++i) {
    ^

    • ray says:

      I am not sure. Maybe you didn’t select the correct board? The board should be ESP8266, not standard Arduino.

  45. Gurjinder says:

    In file included from C:\Users\Gurjinder\Documents\Arduino\libraries\OpenGarage\espconnect.cpp:23:0:
    C:\Users\Gurjinder\Documents\Arduino\libraries\OpenGarage\espconnect.h:42:31: fatal error: ESP8266HTTPClient.h: No such file or directory
    #include
    ^
    compilation terminated.
    Error compiling.
    ^

  46. Gurjinder says:

    Hi Ray

    i already install ESP 8266 core and Modifications/Updater.h in the folder
    C:\Users\gurjinder\AppData\Roaming\Arduino15\packages\esp8266\hardware\esp8266\2.2.0\cores\esp8266. now i getting the different error. please let me know what i am doing wrong.

    OpenGarage\main.cpp.o: In function `std::_Function_handler::_M_invoke(std::_Any_data const&)’:
    c:\users\gurjinder\appdata\roaming\arduino15\packages\esp8266\tools\xtensa-lx106-elf-gcc\1.20.0-26-gb404fb9-2\xtensa-lx106-elf\include\c++\4.8.2/functional:2031: multiple definition of `Blynk’
    ogMainArduino.cpp.o:(.bss.Blynk+0x0): first defined here
    collect2.exe: error: ld returned 1 exit status
    Error compiling.

    • ray says:

      This is likely due to ‘BlynkSimpleESP8266.h’ included in multiple places. Go to examples/ogMainArduino/ogMainArduino.ino and uncomment the include BlynkSimpleESP8266.h line there, then try again.

  47. Jamie says:

    I have tried inputting the configuration above into openhab2 but have not had much success. Does anyone have any advice for this?

    • ray says:

      Sorry, I am confused: what ‘above configuration’ are you referring to?

      • Jamie says:

        Peter says:
        May 25, 2016 at 4:58 am
        IÂ’ve managed to connect openhab using http binding. HereÂ’s the configuration:
        /etc/openhab/configurations/openhab.cfg:
        # configuration of the first cache item
        http:opengarage.url=http://192.168.4.1/jc
        http:opengarage.updateInterval=11000
        /etc/openhab/configurations/items/opengarage.items:
        Group Garage
        Contact Garage_Door “Garage Door [MAP(opengarage.map):%s]” (Garage) { http=”<[opengarage:10000:JS(opengarage-door.js)]" }
        Number Garage_Door_Distance "Garage Door Distance [%.0f cm]" (Garage) { http="<[opengarage:10000:JS(opengarage-dist.js)]" }
        /etc/openhab/configurations/transform/opengarage-dist.js:
        JSON.parse(input).dist;
        /etc/openhab/configurations/transform/opengarage-door.js:
        (function(i) {
        if (JSON.parse(input).door == 0)
        return 'CLOSED';
        return 'OPEN';
        })(input)

  48. Spitfire says:

    Thanks for your great work. I put together my own OpenGarage device with an esp8266 dev board and HC-SR04. I have an issue where it seems to reboot every 60 or 120 seconds. I have tried a second 8266 dev board thinking it might be a hardware issue and got the same result. Would you know what might be the cause?

    • ray says:

      The HC-SR04 sensor must be connected correctly, otherwise the firmware will time out when reading the sensor and trigger a watchdog timer reset.

  49. Sergey says:

    Hello
    Can it work without the internet? I access my home via VPN and would like to operate it just off the local network. I don’t have any other home automation apps like HA etc running, just want to be able to control the garage door. Is web interface is the only available app?

    • ray says:

      Sure, the device works locally and does not rely on cloud connection. It only connects to cloud if you provide Blynk token.

  50. Ali says:

    Thanks for your great work. I put together my own OpenGarage device with an esp8266 dev board and HC-SR04. I have an issue where it seems to reboot every 60 or 120 seconds. I have tried a second 8266 dev board thinking it might be a hardware issue and got the same result. Would you know what might be the cause?

  51. TedM says:

    Ray,

    I just received and installed my Open Garage system and I’m happy. I’m using the Blynk App (I’ve used Blynk before) but I can’t get the iPhone App to work. I installed the iPhone App and here’s what happens:
    1. It says there are No Controllers so I click the [Add Controller] button and select the ‘Add by Blynk Token” option
    2. So I paste my Blynk token into the window that appears but then I’m taken back to the ‘No Controllers’ screen as if nothing had been entered.

    I’m using an iPhone 7+. Am I missing something obvious?

    Ted

  52. Don B says:

    Ray,

    Thank you for the great tutorial and great application idea. I implemented a variation of your design with an Arduino Mega256 with an Arduino hardwired ethernet shield rather than WiFi.

    One additional item that you might want to add to your arsenal, which I implemented, is an visual indicator controller that resides in the house to indicate if the garage door is open or closed. I used an ESP8266 microcontroller and a large, single tri-color LED (Red, Green, Blue). The in-house microcontroller connects to the webserver on the garage door sensor microcontroller to read the sensor distance (every 10-15 seconds). Then it illuminates the LED with BLUE if no communication, GREEN if closed, or RED if open.

    The inside-house visual display has saved me numerous times from leaving the garage door open overnight. What’s nice is that you can make multiple indicator devices for various places in the house. It’s just another microcontroller client reading the garage door sensor microcontroller’s webserver.

    Let me know if you would like additional details on my in-house indicator implementation.

    Keep up the great work Ray!

Leave a Reply