Feed on
Posts
Comments

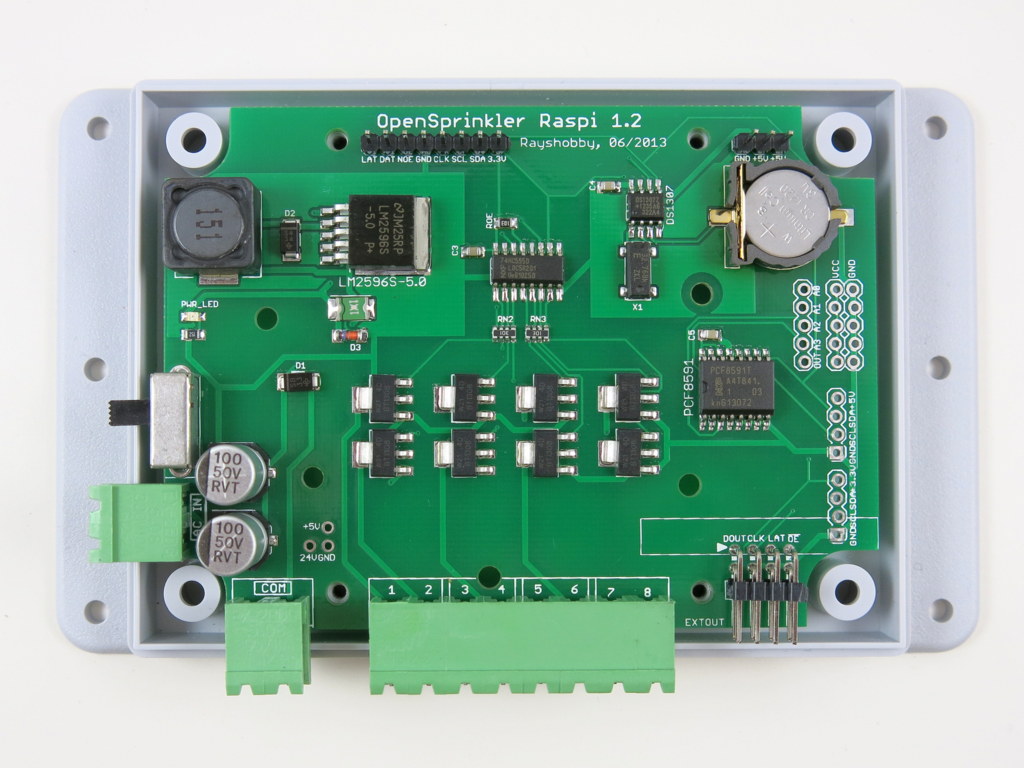
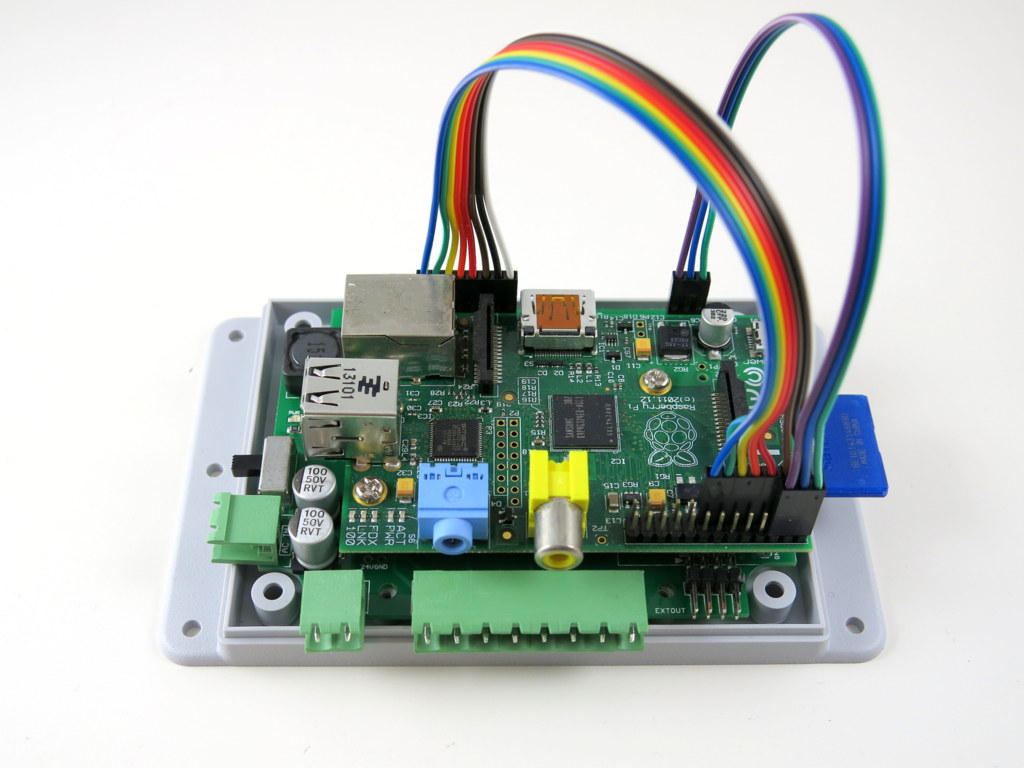
Hi, this is a new product post for OpenSprinkler Pi (OSPi) v1.2. Since its original release, OSPi has become a very popular product. This version is a minor revision. The main change compared to version 1.1 is the addition of a PCF8591T 8-bit A/D D/A converter, which provides four independent 8-bit analog input pins, and one 8-bit analog output pin. The reason this has been added is that Raspberry Pi (RPi)’s GPIO pins do not have built-in ADC capability. In order to interface with analog sensors (such as soil moisture sensor, light sensor etc.), you would need an ADC unit. The addition of the PCF8591T chip allows OSPi to provide on-board analog inputs as well as output. This makes it more convenient for your prototyping need. Other than this, the rest of the circuit is pretty much the same as before, with 24V AC to 5V DC switching regulator (based on LM2596S), DS1307 RTC and backup battery, 74HC595 shift register and triacs. Here are two pictures of the OSPi v1.2 board:

IMG_0004IMG_0008

If you Google ‘RPi ADC’ you will find plenty of choices of ADC modules and tutorials on how to get them to work with RPi. Why did I pick PCF8591T? There are several reasons. First, it’s low-cost: volume pricing is just a couple of dollars per piece. Second, it provides four independent A/D channels, and one D/A channel. This means you can use one chip to interface with 4 different analog sensors, and additionally you can get one channel of analog output. According to the datasheet, the analog output is implemented with resistor divider chain, which is sometimes a better choice than PWM. Also, it uses I2C interface, so it doesn’t require any extra GPIO pins from RPi. Overall it’s a very attractive choice. The main downside is that it’s only 8-bit. This means the analog input value is on a resolution of 0 to 255, same with analog output. A lot of the other chips provide at least 10 bits of precision. But I figured that 8-bit is sufficient in many cases, so I settled with this choice.

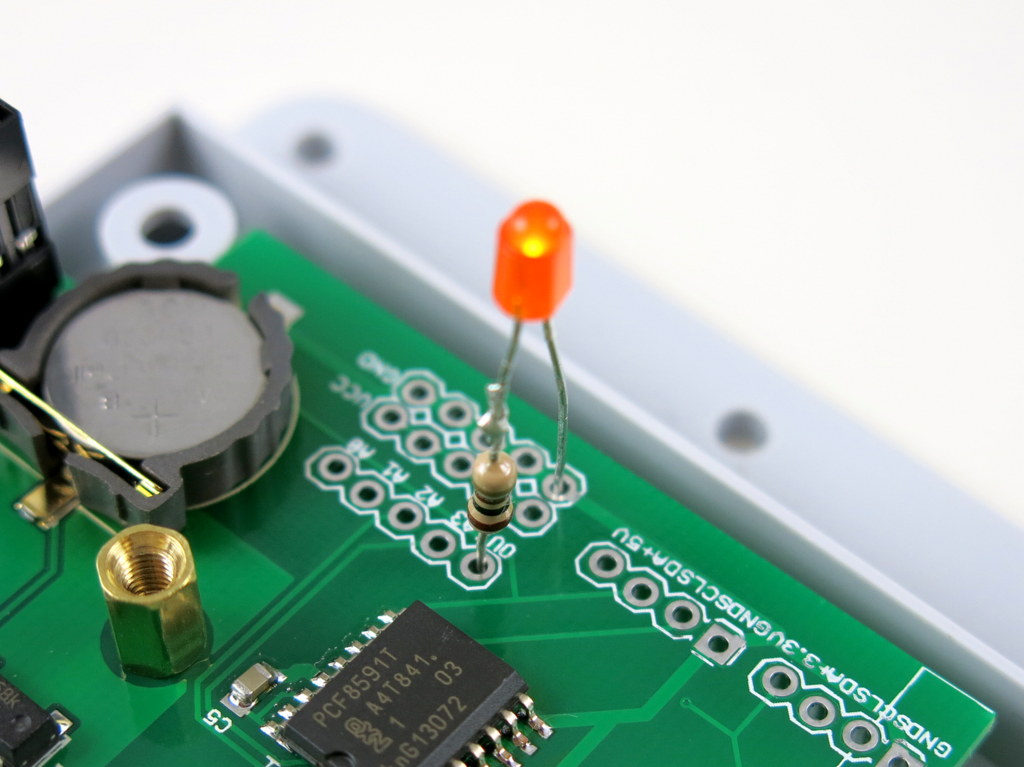
The chip, together with analog pinouts, are located on the right-hand side of the board:
IMG_0006_annotated

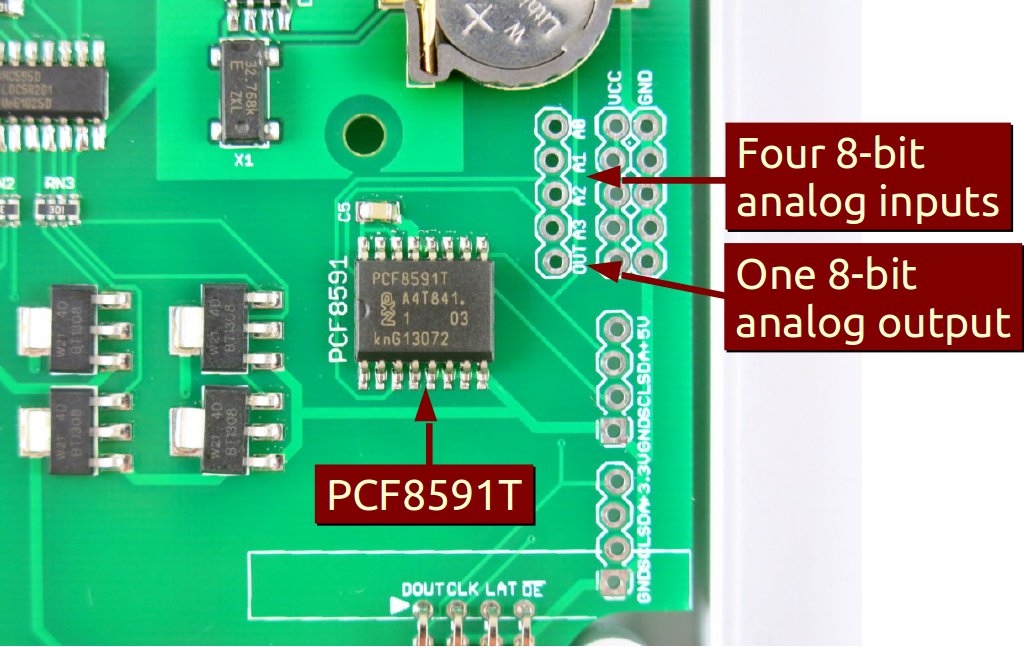
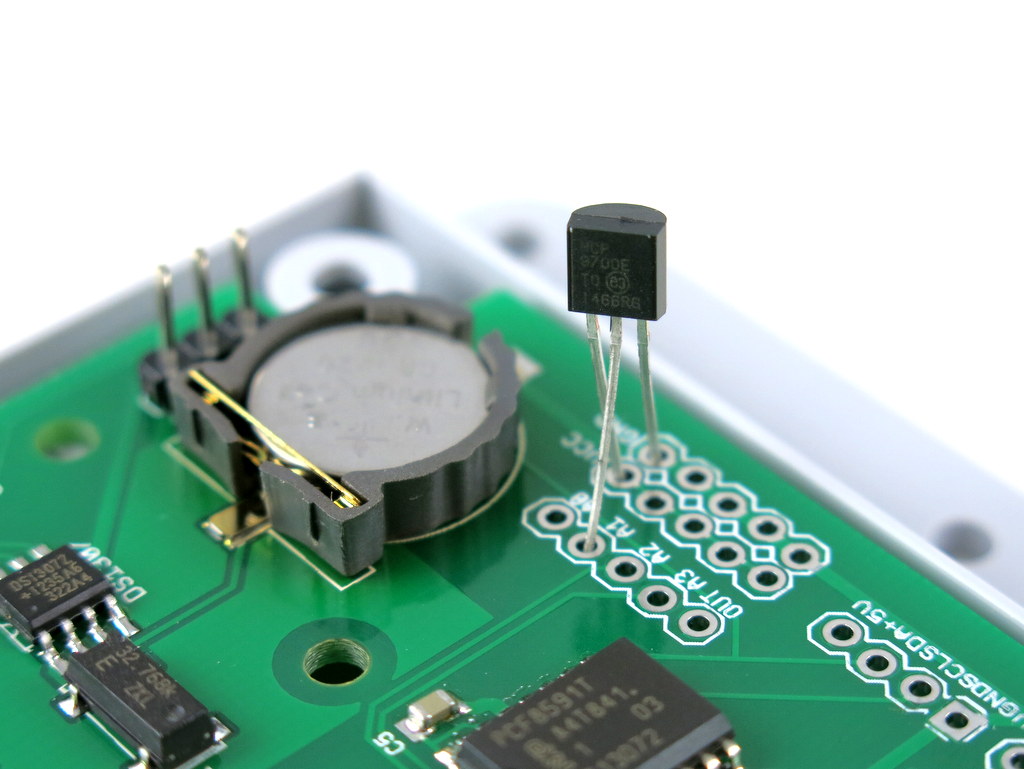
For convenience, I’ve also provided a separate pair of VCC and GND pinouts for each analog channel. The picture on the left below is an example of plugging in a MCP9700 temperature sensor directly to the pinouts; and the picture on the right below shows an LED (with current limiting resistor) plugged into the analog output channel, to allow programmable control of the LED brightness.

IMG_0005IMG_0009

Suppose this gets you interested, the next question is how to program RPi to talk to the ADC chip? Fortunately there are plenty of tutorials online. In particular, I found the following posts very useful:

If you are confused and just want a quick demo. Here is a short tutorial to get you started.

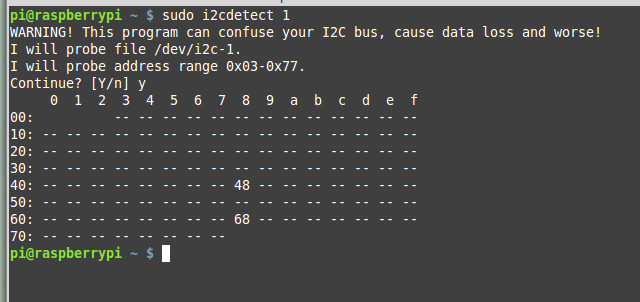
First, run sudo i2cdetect 1 to check if the PCF8591T chip is detected. (Note, if you own RPi rev. 1 you should run sudo i2cdetect 0 instead). You should then see a printout like the following. This shows it has detected two I2C devices, one is at address 0x68 (that’s the DS1307 RTC), and one 0x48 (this is PCF8591T).
pcf8591t_i2cdetect

Next, you can use the i2cget command to read analog values from a particular channel. For example, run
sudo i2cget -y 1 0x48
repeatedly to sample the analog value from channel 0 (pin A0). To change to channel 1 instead, run
sudo i2cset -y 1 0x48 0x01
and then if you run sudo i2cget -y 1 0x48 that will return sampled value of channel 1, and so on.

To enable analog output, use the i2cset command. For example:
sudo i2cset -y 1 0x48 0x40 0xff
where 0xff is the 8-bit analog output value. You can change it to any value between 0x00 to 0xff to enable 256 grades of values. Since the chip is powered by 3.3V supply, that will translate to an analog output from 0V to 3.3V linearly.

The above use shell commands as an example to interface with the chip. There are also WiringPi and Python code examples which can do the same. When I get time I will write a more complete tutorial. For now, try to explore on your own ๐Ÿ™‚

OpenSprinkler Pi v1.2 is immediately available for purchase at Rayshobby Shop, at the same old price.

17 Responses to “Announcing OpenSprinkler Pi v1.2”

  1. Jonathan says:

    Hi Ray,

    The shopping cart when adding the OpenSprinkler Pi 1.2 still refers to 1.1. I’m assuming if I order you’ll be fulfilling all future orders with the 1.2 version?

    Thanks,
    Jonathan

  2. […] over at rayshobby.net has just announced OpenSprinkler Pi […]

    • Jeff says:

      I have two questions about the AD input
      1) I have a moisture sensor that is remotely power and puts out a 0-10 Volt signal. I see from the data sheet on the PCF8591T that the input voltage can not be any higher then Vcc but I don’t see any voltage divider on the input of the PCF. Am I correct in my assumption that I would have to build a voltage divider to drop the 0-10 signal to something more in the range of the PCF or is there something else going on in the sprinkler board that will take care of that.

      2) The sensor is powered by AC mains and a wall wart that is on a different line leg then the RPi. If I run just the 0-10V signal to the PCF how will it measure that voltage (No common ground)? Would I need to also bring a ground wire from the moisture sensor? Is there any issue connecting the grounds of two completely different circuits that are probably powered by two completely different Mains legs?

      3) If I have more then one of these sensors all on different Mains legs is there any danger in bringing a ground line back to the sprinkler board?

      Thanks

      • ray says:

        Hi Jeff,

        1) The PCF8591T on the board is powered by 3.3V voltage. You will need to provide a voltage divider yourself to linearly scale 10V down to 3.3V or less. PCF8591T has a maximum operating voltage of 6V, so even if it’s powered by 6V, you still need a voltage divider anyways.
        2) I assume your moisture sensor has two wires, one is ground, and one is sensor reading output. Connect the ground to a ground pin on OSPi, and the other to any of the four analog input pins.
        3) In general, when you have multiple circuits and you want them to talk to each other, you need to share a ground wire among them.

  3. Ken says:

    I recently ordered and installed an OSPi using an RPi Rev2 but I’m not seeing any i2c devices when I run i2cdetect. Output shows ‘–‘ for all locations. I’ve tried on both bus 0 and bus 1. I’m using the pre-configured OSPi image from Oct 31 ’13. Any hints on what I might be doing wrong? I haven’t cracked the case back open to see what rev I have but since it was a recent order in the last month I’m assuming I have v1.2. I have the new version of case so can’t readily confirm v1.2 of the board.

    BTW, would be great if the case allowed access to the audio jack on the Pi by default. ๐Ÿ™‚ I plan to connect some speakers in my garage and set up airplay.

    • ray says:

      Please check this thread on the forum for instructions on I2C:
      http://rayshobby.net/phpBB3/viewtopic.php?f=28&t=339#p2270
      There are detailed instructions on the Wiki page:
      http://rayshobby.net/mediawiki/index.php?title=Set_Up_RPi,_RTC,_WiFi,_Data_Log#DS1307_RTC

    • Donald Sweeney says:

      In reference to the comment by Ken on Nov 20, 2013, I’m having the same problem where I cannot detect any i2c device when I run i2cdetect. Output shows ย‘ย–ย’ for all locations. I followed the directions from the references from the forum and wiki. I also checked other sites for implementing the PCF8591T.

      As expected, when I run i2cget or i2cset I get a read or write error.

      When I put an LED between the VCC and GND pinouts for the OUT analog channel the LED lights.

      • ray says:

        Hi Donald, can you try to restart RPi and run i2cdetect again? I found that if time is not written to DS1307 before you run hwclock -r, it sometimes causes the chip to fail detection by i2cdetect. Restarting should fix it. Just do a hwclock -w first to write time into DS1307. Also, there is a related post on the forum: http://rayshobby.net/phpBB3/viewtopic.php?f=28&t=405

      • Donald Sweeney says:

        Ray

        I think there is a bug in the sprinkler_pi program, written by Rich Zimmerman

        I followed your suggestions above with no success. I did follow the suggestion in the posting:

        Re: OSPi RTC not found/detected
        Postby paddyofurniture ยป Tue Nov 19, 2013 9:52 pm

        I removed the sprinkler_pi program then rebooted and both the PCF8591 and DS1307 were detected using I2Cdetect.

  4. John says:

    nice unit but has one major flaw. Missing is the pump controller TRIAC and connector most need usual 24VAC triac switch to run to the pump 24VAC input which turns on the high power relay or SS Switch to run the pump. With this controller missing it, you can only control home city water based supplies. irrigation is normally not city water, infact needs isolation backflow valves if used or city water gets contaiminated. So guys how about a 10 bit shift register with 2 reserved and setup for 24VAC pump signals. Even 4 zone $35 controllers have this included. Must have for next revision and a kit is needed for current one.

    • ray says:

      This is already included. On OSPi, pump station (or sometimes called the Master station) is software defined. Any station on the main controller can be defined as the pump station. This provides more flexibility. For example, you can modify the software to define two pump / master stations if you need.

  5. Garry Smith says:

    I just purchased an Opensprinkler PI. Way cool machine. Anyway I was wondering how to connect and integrate a rain gauge onto the OSPI? There are not nice screw terminals as with some of the other Opensprinkler boards. I appreciate the feedback.

    • ray says:

      Do you have a link to the rain gauge you have? OpenSprinkler Pi has a terminal block to connect to an off-the-shelf rain sensor (two wires). I am curious what kind of rain gauge you have?

  6. Sathish says:

    Hi Ray,
    Hope we can have a Analog to Digital and other extra additional pin readings available on the Mobile/Web App? with some conditional valve operations as per these extra sensors… that would make the OpenSprinkler/Pi hardware fully functional. Presently we have these pins redundant in most cases… ๐Ÿ™‚

Leave a Reply to Sathish