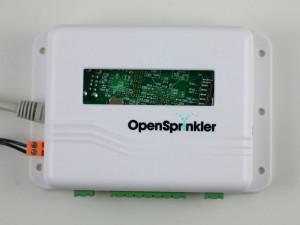
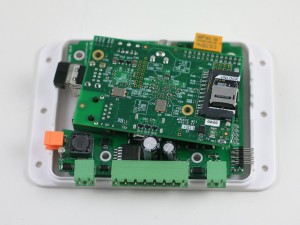
Curious what the next version of OpenSprinkler Pi (OSPi) is going to look like? Here is a sneakpeak preview of version 1.4:
Wait a minute, what is this strange looking board?! And the Pi is installed at an angle? What’s happening here? Well, the new design is all centered around one simple goal: to fit OSPi and RPi into the existing OpenSprinkler injection-molded enclosure. There are many good reasons to do so. The first is cost reduction: the current OSPi uses the Serpac WM032 enclosure with custom cutouts. This is quite expensive to make. On the other hand, the microcontroller-based OpenSprinkler already has an injection-molded enclosure (and I paid a good amount of money for the mold!), so it makes sense to consolidate the design to use the same enclosure. This will bring down the cost quite a bit. Using the same enclosure also gives both products a consistent look. In fact, in the near future OpenSprinkler Beagle will also adopt the same enclosure, and hence all three will have the same exterior look.
Design Story
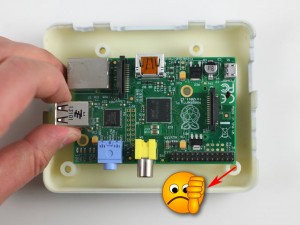
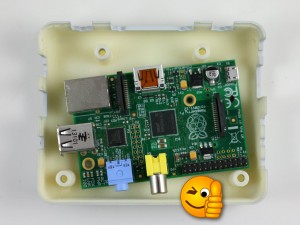
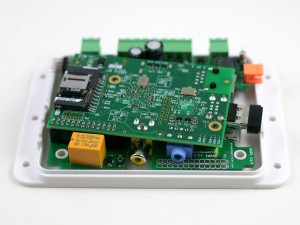
The ‘why’ part is easy to explain. But the ‘how’ part proves to a non-trivial engineering challenge. When I was first fiddling with the idea I didn’t think it was at all possible. After all, the injection-molded enclosure was made before OSPi came into place, naturally it was not designed with RPi in mind. It turns out that, due to the positions of the support pillars, the enclosure is just a little bit too narrow to fit RPi at a straight angle. Ouch! But after staring at it for a while like a geometric puzzle, I was delighted to find out that if you rotate RPi by 3 to 4 degrees, it fits perfectly! This gave me inspiration to further develop the idea. It also explains why the Pi has to be installed at an angle, as the picture at the top shows.
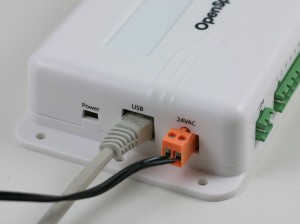
In fact, by carefully positioning the Pi, the Ethernet cable can also fit, albeit through the USB cutout instead of the RJ45 cutout. It’s a bit tricky to figure out the position precisely, but I am glad that after two rounds of prototypes I finally got it right 🙂
Of course since OSPi doesn’t have buttons and LCD, some of the cutouts are useless. I am not completely sure what to do with the LCD cutout. If I leave it alone, it looks quite ugly (see picture on the left below). So my temporary solution is to just put a sticky label at the back, thus covering the big empty hole (see picture on the right below). Eventually I think it’s best to put some graphic design here. I am undecided what to put here. It shouldn’t be the OpenSprinkler logo as the enclosure already has a printed logo. If you have suggestions, please leave them in the comments section. I would greatly appreciate it!
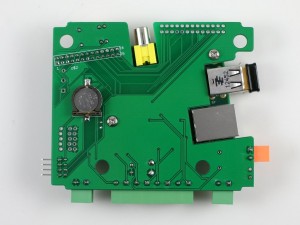
Next, because the injection-molded enclosure is not high enough, I cannot continue using the current design where the Pi faces up and connects to OSPi through ribbon cables. It’s necessary to flip the Pi and plug it into OSPi facing down. This will reduce the height of the overall assembly. However, there is one additional complication: the USB, Ethernet, and composite video connectors on the Pi are all quite tall, so it’s necessary to make cutouts on the OSPi PCB to allow these connectors to sink below the board. The picture on the left below shows the back of the PCB, and you can see where the connectors go through the board.
As the Pi is now facing down, it’s not easy to access the GPIO pins directly. Therefore I’ve mapped out all the 2×13 pins on the Pi to the pinout area, seen at the top-left corner of the PCB.
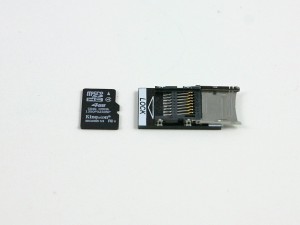
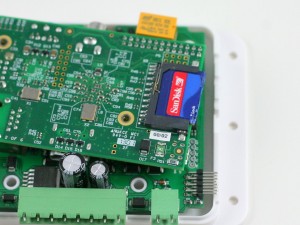
The last bit of the puzzle is the SD card. Since the enclosure has very limited space, it’s not possible to fit a full-size SD card, without making a cutout on the side. So we need a low-profile SD card. There are several options, one is this microSD to SD adapter. It’s basically a microSD card slot soldered onto a PCB shaped like an SD card but half the size. This and other similar adapters are readily available online and they work reasonably well.
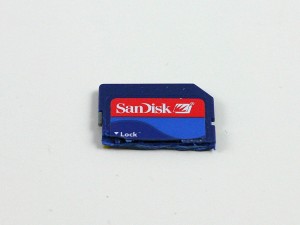
While Googling ‘low-profile SD card’, I found an surprising solution that’s dead simple. In case you don’t know this already: many full-size SD cards are actually half empty. What this means is that the useful stuff (namely the chip and connectors) only take half the space, while the other half has nothing in it! As a result, you can safely cut half of the card away, thus making a low-profile SD card without any adapter. This also has the advantage of preserving the high performance of a full-size SD card (while the microSD card is considerably slower). The downside though, is that if you ever need to insert the SD card to your computer’s SD card slot, you will have to tape the other half back, so that it extends to the original length. Otherwise it will be too short to push in and pop out.
Anyways, this is the end of the story. I admit the new funky design feels a bit forced: it’s born out of the need to re-use the injection-molded enclosure, which wasn’t designed with OSPi in mind. But I am quite excited that I figured out all the pieces of the puzzle. Eventually I may pay a sizable chunk of money to order a new mold dedicated to OSPi, but before that happens we have to stick with the existing resources 🙂
The hardware components remain largely the same with version 1.3. The only difference is that the relay has been upgraded to a slightly bigger, 250V / 3A type. I am also considering adding a pin header for the nRF24L01 transceiver, to make it possible to communicate with our upcoming products such as OpenSprinkler Bee. Pending a few minor tweaks, things should be finalized within a month or two. Please leave your comments and suggestions, as this will be the last chance to influence the final design of 1.4. Thanks!
Despite the pinout area on the new board it doesn’t look like there’s a lot of clearance for making use of it. Looks like some of the vias are very close to the audio jack on the pi. Am I just seeing it wrong in the pics?
You are right, because is the space is very limited, it’s very difficult to fit pin headers to the mapped out pins, and some pins are under the audio jack. But you can solder wires from those pins to connect to external components, like sensors or actuators. Also, you can fit some components at the back of the circuit board (for example, the battery holder is currently installed at the back).
Out of curiosity do you use 3D models when you’re experimenting with these?
I’ve tried, but it proves to be more time consuming than eye-balling 🙂 Well, not really eye-balling, but with some basic measurements (using a caliper) and calculations.
I’m not sure if this is possible, but is there a way to leverage the button holes for a simple connection point to a sensor? B2 could be ground/common and B3 for sensor in from something like a rain sensor or a garage door sensor. B1 looks like a lost cause as it seems to be right in front of the new angled Pi connector.
I was imagining something small, like a simple a jumper wire pin connector.
Just a crazy idea, I know.
That area for the LCD would be interesting if you could actually use an LCD and snap it in there. How tight is the clearance? Even if the LCD stood proud of the it would be cool. I’d like to have a simple status display if possible.
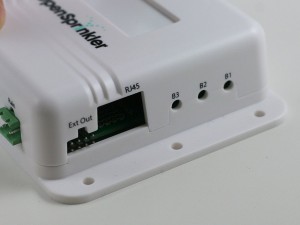
Yes, it’s possible. Actually the button holes are currently planned to run through wires to the relay pins. If you look at the board image, the relay NO, CO, NC pins are close to the buttons so you can run wires through the holes to connect external devices. Of course you can also use them for other purposes. The ADC pins are close to the RJ45 cutout, that’s also designed by purpose.
The LCD is too thick to fit in the LCD hole. There is only about 4 to 5 mm clearance and LCDs are much thicker than that. I am going to try to make an acrylic piece to fill the LCD hole, and see how it works.
As boring as it might be simple, my suggestion is to simply create a cheap, flat piece of the same material plastic as the case that snaps in through the front of the display hole that covers the entire hole. The bottom edge of this piece would follow the case’s front accent and would obscure the already printed front logo. You could then have the logo printed slightly larger than the logo that is being covered up on this plastic piece and have the new logo centered relative to the entire case. Might look better than a simple blanking plate, which wouldn’t necessarily be that ugly either.
I actually thought about the same thing a while back — create a plastic panel that snaps into the hole. But I felt the cost of creating this plastic panel may not be worthwhile (I am not sure what options there are, injection mold is definitely too expensive, cutting from a big plastic sheet may be doable). Last night while reading your comment, I thought about another idea, which is to use laser cutter to make acrylic piece that can then be glued at the interior surface of the hole. This might give it a cool look, and acrylic pieces are cheap to make.
Ray, my suggestion is to cut off two of the support pillars and see how the board will fit between them. I think you just might find alot of the space you need to put the board straight. When I was screwing my enclosure together last month I was wondering why 4 screws were needed to hold together this thing anyway. Two diagonally-opposed pillars is plenty to hold the enclosure together. If you like that, your injection molding company can easily make this change permanently or the two new pins making those posts and be interchanged with the old for each half ( I used to design plastic parts). They also likely would be able to offer suggestions on the LCD display hole, so talk to them and see how flexible your tooling is for easy alterations. Adding any side holes for the SD card and such would likely be more complicated and left as secondary operations.
@QMan: ‘cut off two of the support pillars’ -> I am not sure about it. These support pillars are not only used to put the case together, but they secure the PCB to the case, so there are no separate PCB screws involved. If two support pillars are taken off, the PCB might not be reliably fixed in place.
I just noticed that the Raspberry Pi foundation has announced the upcoming RPi compute module. This can be a big game changer: since the compute module is very small (size of a memory stick), it leaves a lot of room to add LCD and buttons, just like the standard OpenSprinkler. So I am putting my bet on that now 🙂
I just went to buy an OpensprinklerPi just now, and I saw that v1.4 is now being sold. Reading this article here, it seems that one of the reasons to use this version is for cost savings. However (and please correct me if I’m wrong) it looks like the price actually increased, from $75 to $78. Also, the enclosure is now exposing the bare circuit board. With the circuit board uncovered like that, it looks quite a bit more hackish. Is there anyway to get the older version?
Part of the reason for price increase is that the microSD to SD adapter is included in the kit. We will probably make this an option in the future. The LCD hole is covered by a transparent acrylic board glued at the back of the hole. It doesn’t expose the bare circuit board.
Hi Ray,
I was looking at the PCB design and got confused looking at the triac. Normally, I would expect the hot wire to get into A1 (24VAC), G to be as set, and then the load going out to the screw terminal and through A2.
Instead, Eagle is showing that all triacs share the ground and use A2. This may just be an Eagle-ism that I don’t understand, but it certainly seems as though a few things are inverted here. I’m sure the product works, it’s more about understanding what Eagle is displaying and understanding it.
i see this even looking back at the very first design of the OSPI and it’s confusing me to say the least.
That’s because one wire of the 24VAC transformer is connected to the circuit ground (and the other wire is connected to COM). You can think of a triac as similar to a transistor, where sufficient voltage between G and A1 opens the channel, allowing AC current to flow between A2 and A1. That’s why all A1 terminals are connected to ground, and each A2 goes to the individual valve port.