Recently I was involved in a project that requires reading data from a personal weather station (PWS) installed at a friend’s backyard. If you search for “personal weather station” you will find plenty of off-the-shelf products manufactured by various companies. Almost all of them use 433MHz Radio Frequency (RF) signal to transmit data from the outdoor sensors to the indoor receiver (with integrated LCD display). A few years ago I wrote a series of blog posts about how I reverse engineered some of the individual wireless sensors, like temperature, humidity, rain, and soil sensors, so that I could decode and use them in my own project. The basic technique is to use a RF sniffing circuit to capture the signals, then patiently take many RF readings and compare them with the reference readings displayed on the received unit. By correlating the binary values of each RF signal with its corresponding reference value, I was able to figure out the encoding pattern. That was a lot of fun, but honestly very painful and tedious, as I had to simulate the changes of weather conditions many times to create variations in readings, and figuring out how they are correlated with the raw signals is not always trivial.
This time I am dealing with a even more sophisticated PWS which combines several different sensors, so the RF signals contain a lot more values that will be very difficult to reverse engineer. I was definitely not looking forward to repeat the same tedious experiments I’ve done a few years ago. However, technology has changed rapidly the past few years. What’s interesting now is that this particular PWS has a receiver unit that is WiFi-capable, and it can even send data to Weather Underground. I was reading its user manual and came across this part: open a browser and type in IP address 192.168.4.1. That immediately caught my attention as that’s the default IP address in AP mode for ESP8266. Ah ha, I bet it has an ESP8266 inside. So I took it apart and there you go, a ESP-WROOM-2 chip laid right in front of my eyes.
Next to the ESP chip are three pins clearly marked TXD, RXD, GND. I wasn’t actually hopeful that the TX pin will send any useful data, but I decided to hook up a USB serial adapter to check it anyways. I soldered three wires to connect the receiver’s 5V, GND, and TXD pins to the serial adapter’s 5V, GND and RX pins.
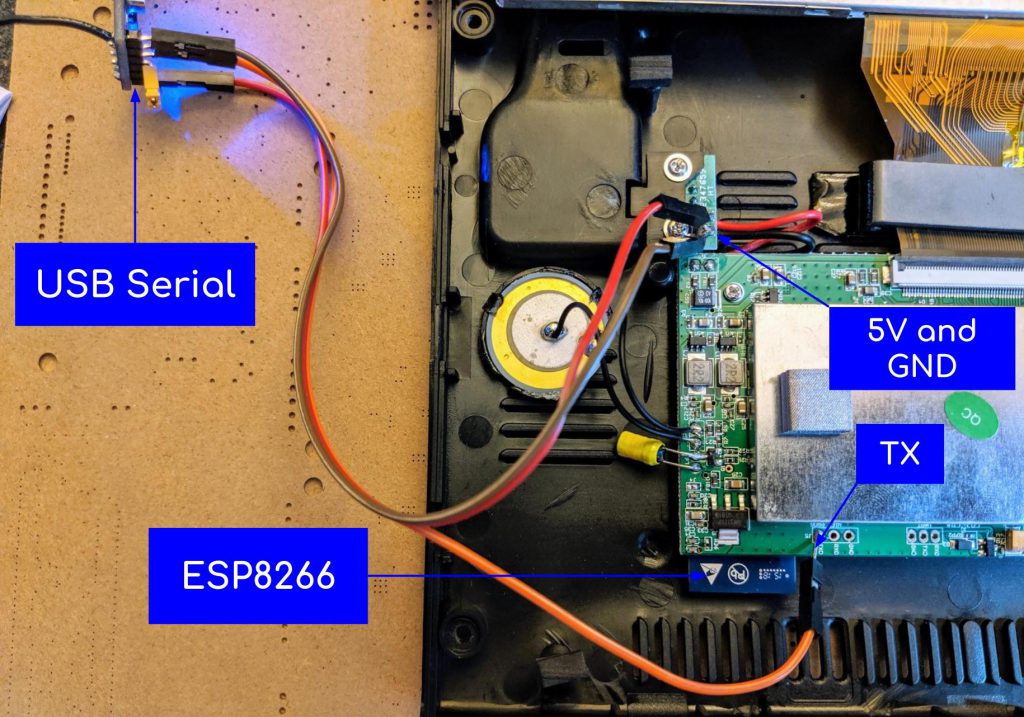
I took a few guesses about baud rate, and found that 115200 is the correct one. Well, I didn’t think it was going to be that easy, but right there on the serial monitor screen, the chip is sending out sensor values in plain text, presumably for debugging purpose. Can’t be easier than this 🙂
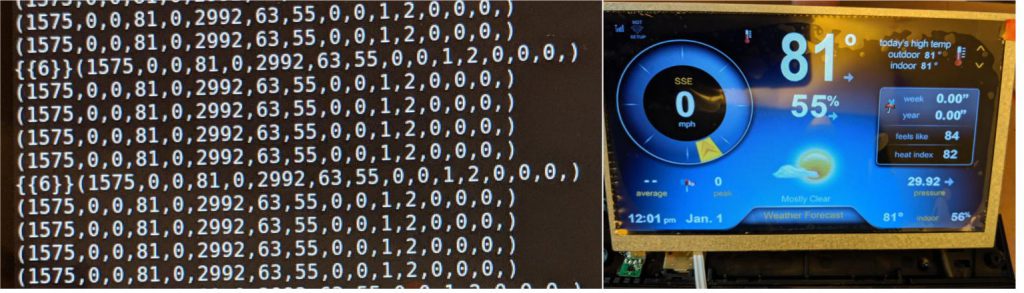
You can see that it occasionally print out {{6}}, which probably indicates the current status. Then it’s a sequence of numbers separated by commas. Some of the values are easily recognizable if you look at the LCD screen. For example, 2992 must be the barometric sensor value, 81 and 55 are the temperature and humidity values respectively. But the other values are more obscure, like what is that 1575 value?
Then I remembered this PWS can connect to Weather Underground. Maybe the serial print out will change once it’s set to send data to Wunderground? So I followed the user manual to configure the WiFi settings and typed in a random WU station name (aaa) and a fake key (bbb). You can actually go to Wunderground.com and apply for a proper PWS station name and key, I didn’t do that because I was merely experimenting with the unit so I didn’t want my unit to contaminate the Wunderground data in my area. In any case, once it’s configured, the serial output started showing the HTTP GET command that it’s using to send data to Wunderground. Below is an example:
/weatherstation/updateweatherstation.phpID=aaa&PASSWORD=bbb&dateutc=now&winddir=157.5
&windspeedmph=0&windgustmph=0&tempf=81&dailyrainin=0.00&baromin=29.92&dewptf=63
&humidity=55&weather=0&clouds=0&softwaretype=vws%20version00&action=updateraw&realtime=1&rtfreq=2
So now the numbers all make sense: that 1575 value is the wind direction (157.5 degrees), and all values have clear meanings marked by their variable names. At this point, I can easily write a script that parses the serial output and use the data for my own project.
Summary: this PWS turns out to be the easiest wireless sensor I’ve worked with, as it involves practically no reverse engineering effort. I am glad to see that ESP8266 has made into so many WiFi products on the market today. To be fair, this is a lucky example as it prints out all the useful data through serial, so no painful RF decoding effort is necessary. I am not sure so other weather stations would be as easy.
