User Manual — Web Interface (Firmware 1.8.3 and 2.0.3)
Content:
- PDF User Manual
- Overview
- OpenSprinkler Homepage
- Options and Stations
- Program Water Schedules
- Program Preview
- Run-Once Program
- Switch to Manual Mode
- Direct HTTP Commands
- Change Javascript URL
Instructions of previous firmware versions have been archived here.
Overview
The OpenSprinkler web interface allows you to program water schedules and monitor station status through the web. Compared to traditional sprinkler timers, which limit you to a few buttons, dials, and a small screen, the web provides a much more intuitive user interface. You can access the controller using any device that has a built-in web browser. In addition, you can remotely access and monitor your sprinkler stations online, even when you are traveling away.
In order to use the web interface, you need to connect OpenSprinkler to your home router, using either a wired connection, or wireless via a WiFi adapter/bridge. Once the controller starts, it will request an IP address from your router through either DHCP or static IP set by you. If you encounter any issues, please check the F.A.Q. page for troubleshooting suggestions.
Time keeping: OpenSprinkler performs automatic NTP time sync to obtain current time based on your time zone. In addition, built-in Real-Time Clock (RTC) (available since hardware version 1.4) allows time keeping even when power is lost. Thus the controller can operate truly independently without any computer or network connection. The controller will continue to sync with NTP whenever it’s available.
Access the controller: once the controller starts and establishes a valid IP, you can access the controller homepage by typing in the IP address in a browser. To find out the IP address, click pushbutton B1. This will briefly display the IP and HTTP port number. For example, if the IP address is 192.168.1.22, you can type in:
http://192.168.1.22/
If your HTTP port number is not the default 80, say, you’ve changed it to 8080, then you should also include the port number in the url, separated by a colon:
http://192.168.1.22:8080/
Web Password: for security reasons, changes to the controller settings and water schedules must go through password verification. The default password is opendoor. It can be changed in the options. In addition, you can set the controller to ignore/bypass the web password.
OpenSprinkler Homepage
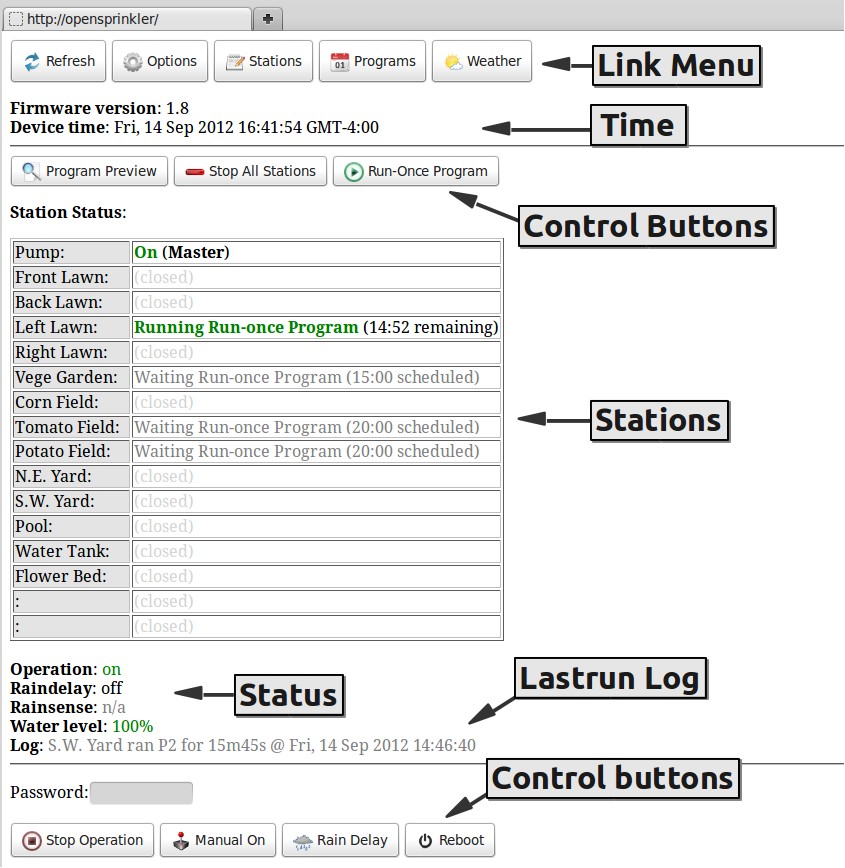
Open a web browser on your computer or any mobile device connected to same local network, and type in either http://opensprinkler/ or the IP address (for example, http://192.168.1.22). This will bring up the homepage. An annotated image is attached below:
At the top are the Menu Links to other pages, the Firmware Version and Device Time, followed by a button and the current Station Status. If a station is turned on, the status will show which program it is running and the remaining water time; if a station is scheduled to turn on but not running yet, the status will show the the scheduled water time. Next you will see the Controller Status, including the Operation status, Rain Delay and Rain Sensor status, Water Level/Percentage, and a Lastrun log (which shows the record of the station that ran most recently).
At the bottom of the page are a list of Control Buttons, with which you can Start/Stop Controller Operation, switch to Manual Mode, set Rain Delay time, or Reboot the controller. Note that to use these control buttons, you need to input your password for security reasons. Again, the default password is opendoor.
At any time, you can click on the button to reset and close all stations. You can also click on the to run a one-time manual program.
Options and Station Names
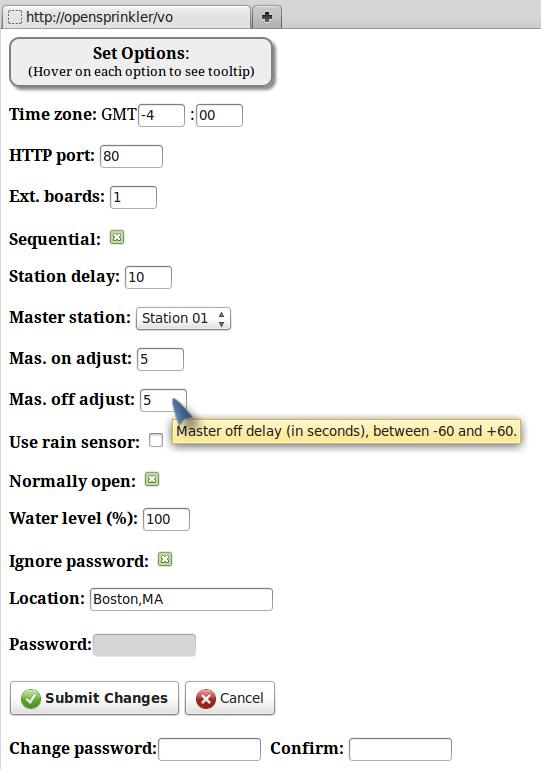
Click on the link at the top of the homepage. This will direct you to the options page (left image below). Here you can change many options including Time Zone, HTTP port, Zone Expansion Board, Master Station, Station Delay, etc. You can also change the password, set the controller to ignore password, and set your Location (by entering either a zip code or city/state/country name). These options have been covered in OpenSprinkler User Manual — Basics. Hover the mouser pointer at each option and you will see a tooltip that explains the option and acceptable range of values.
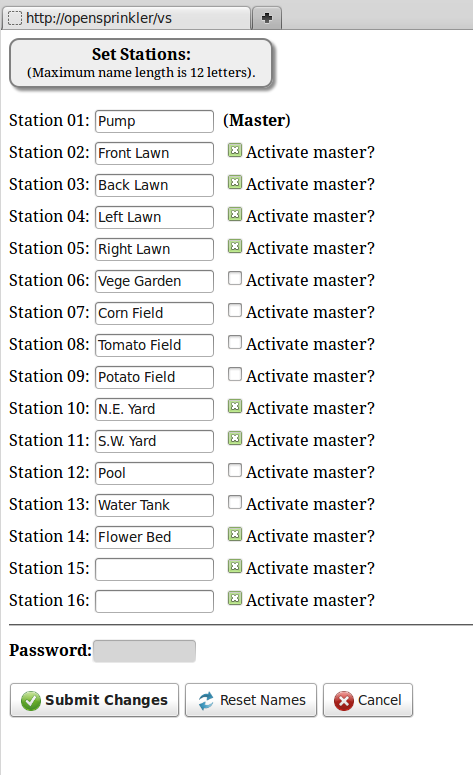
Go back to the homepage, and click on the link at the top. This will direct you to a page where you can set Custom Station Names and Per-Station Master Operation (if master station is defined). The maximum length of each name is 12 characters. You can use abbreviations to shorten the name. The master operation flag indicates whether the master station will be activated when each station is turned on.
Program Water Schedules
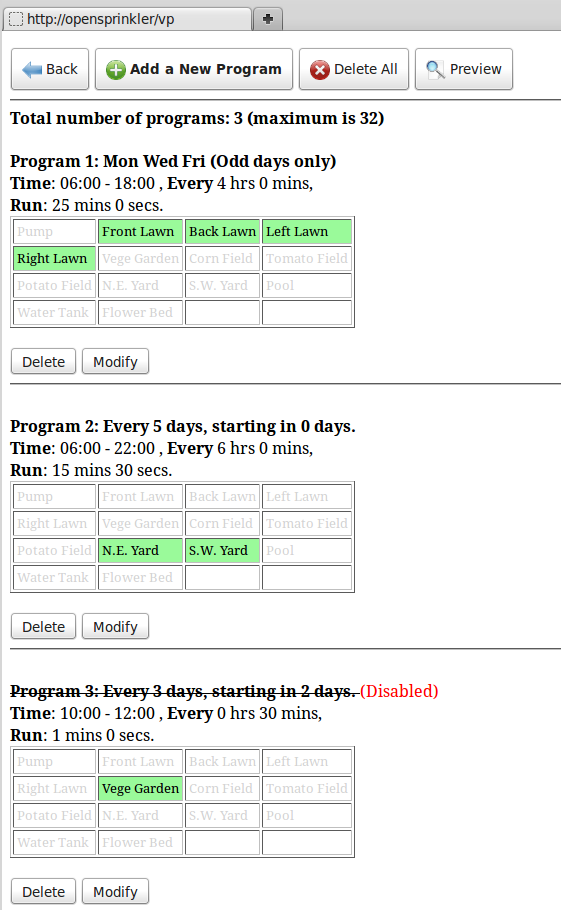
At the homepage, click on the link at the top. You will see a summary of the existing programs. For each program it shows the selected days, water time, selected stations, and whether the program is enabled. You can , check and or any existing program, and graph a of the entire program schedules. The maximum number of programs supported in the current firmware is 36.
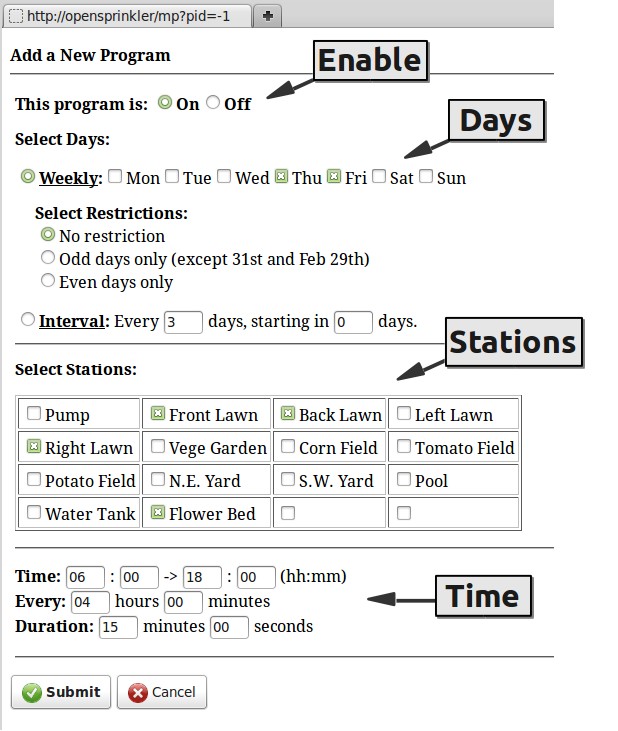
Now click on the button (or the button of any existing program). This will direct you to the program editing page shown in the right image above.
For each program you need to set the following:
- Enable: default on.
- Days: select either a Weekly schedule or an Interval schedule.
- For Weekly Schedule, select the week days, and an optional Odd/Even day restriction. If an Odd day restriction is selected, the program will only apply on the selected week days and if it’s an odd day of the month (except the 31st or Feb 29th).
- For Interval Schedule, you can set any interval of 2 days or more, and the starting day. For example, if the interval is 3 and starting day is 0, the program will apply today and every 3rd day from today. If the starting day is 1, it will apply tomorrow and every 3rd day from tomorrow.
- Stations: select the stations that this program applies to.
- Time: set the Start Time, End Time, Interval Time (down to minutes), and Duration (down to seconds). The program will begin at the start time, repeat at each interval time, and stop after the end time. If you only need to run the program once during a day, you can set a very large interval to ensure the program doesn’t run more than once.
Understand how the programs are executed:
The program execution is determined as follows. First, at every minute, the controller checks through all programs stored in memory. If today matches the selected days and the current time matches the start time or an interval since the start time (but before the end time), a program match is found. The algorithm will then pass the selected stations with duration time to a list of scheduled stations. If multiple stations are matched at at the same time, they will all be scheduled into the same list, regardless of whether they come from the same program. Therefore if two programs have the same start and interval time settings, they will always be scheduled together. Next, the algorithm will start running the scheduled list, and the running pattern is as follows:
- If Sequential mode is yes, the controller will run stations one after another, with every two consecutive stations separated by the Station Delay time, until the current scheduled list is complete. During this period, no other stations will be scheduled, and program matches will be ignored.
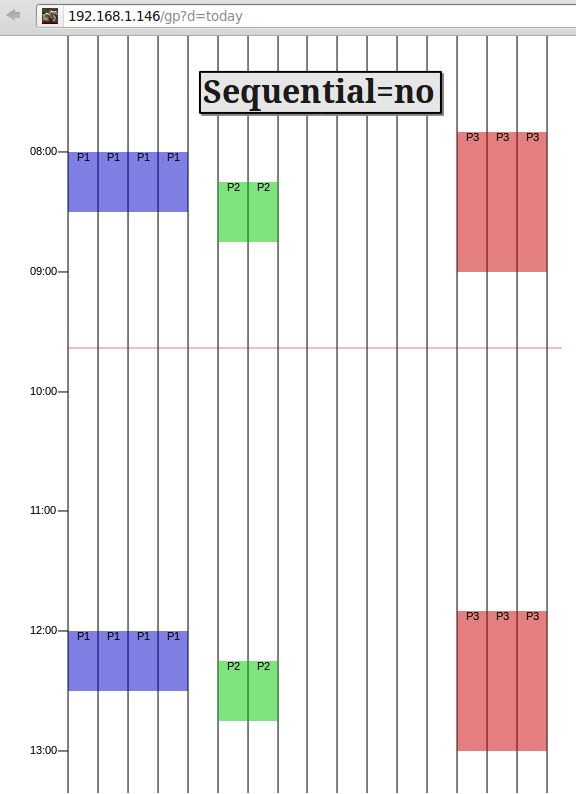
- If Sequential mode is no, the controller will run all scheduled stations simultaneously. During this period, if other program matches are found, they will also be executed concurrently.
- If a station’s Master Operation flag is on, Master On/Off Adj will be applied (Sequential mode only) to fine tune the time to turn on and off the master station. For example, if the Master On Adj is +3 and Master Off Adj is -3, the master station will turn on 3 seconds after a station opens, and off 3 seconds before the station closes.
Use the same time settings with different duration times:
The program settings are very flexible. There is no restriction on how you can set them. Although in the same program the duration time is uniform for all stations, you can vary the duration time by adding more programs. Let’s say you want to run stations 1-8 each Tuesday and Friday starting at 6:00am with a 6-hour interval, but you want stations 1-4 to run 20 minutes each, and stations 5-8 to run only 5 minutes each. You can do so by creating two programs: both will select Tuesday and Friday with 6:00am starting time and 6-hour interval. Program 1 will select stations 1-4 with 20-minute duration time, and Program 2 will select stations 5-8 with 5-minute duration time. As explained above, these stations will always be scheduled together.
To verify if the programs are set correctly according to your need, check the Program Preview feature described below. It provides a graphical view of the program settings and makes it easy to identify program mistakes.
Program Preview
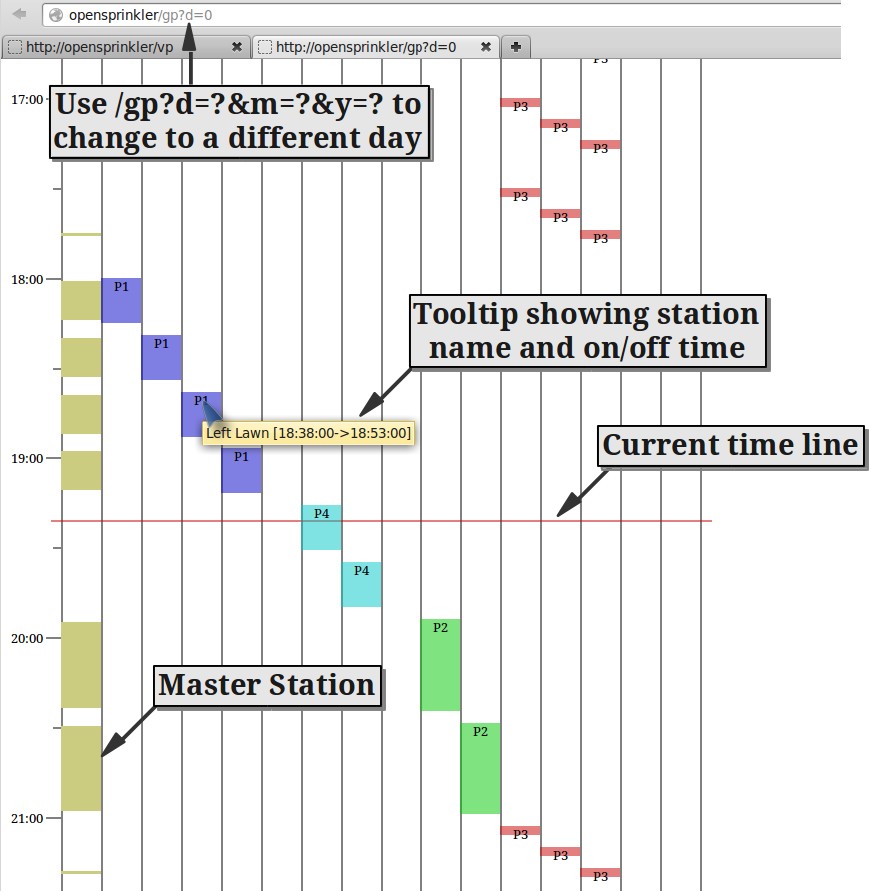
At the homepage, click on the button (or at the program page, click on the button), a new page will pop up with a graphical plot of today’s program schedules. A pink line shows the current time. The graph helps you to visualize the time blocks during a day that each station is scheduled to run. Different colors correspond to different programs. Master station is indicated by yellow-brown bars. You can hover your mouse pointer on each bar to see a tooltip which shows the station name and scheduled on/off time.
To check the schedule of a different day, you can modify the link URL. For example, use
http://opensprinkler/gp?d=16&m=8&y=2012
to preview the program of Aug-16 2012. You can leave the month or year out, in which case it will automatically use the current month and year.
How does the program preview feature work:
This feature is implemented using a Javascript that performs a full software simulation. It uses the same algorithm that the controller runs. Therefore what you see is what you get: the graph faithfully represents how the controller will the programs during that day. All relevant parameters, such as station delay time, master on/off time, and each station’s master operation flag are taken into account in the simulation. If you are unsure whether you have set the programs correctly, you can easily use the preview feature to find out.
Keep in mind that this feature does not account for dynamic changes during a day, such as rain delay, switching to manual mode, run-once programs, or controller reboot. These dynamic changes will obviously affect whether some programs will run or not, and the software simulation cannot predict them.
Please note that Internet Explorer is currently unsupported. Please use a different browser, such as Firefox, Google Chrome, Safari, Opera, Android or iPhone/iPad browser.
Sequential mode in program preview:
The program preview also takes into account the Sequential mode setting. The images below show two examples, one with Sequential mode set to yes, the other set to no. As you can see, the left example runs only one station at a same time. During the execution of the current scheduled list, it cannot run other stations, even if another program match is found. In contrast, the right example runs stations in parallel, and new stations can turn on at any time. This allows concurrent running of stations.
Run-Once Program
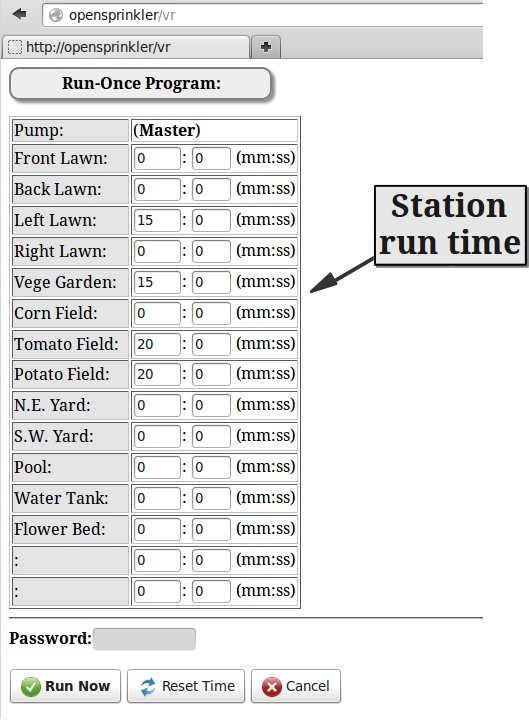
Run-Once Program is a feature where you can set an individual water time for each station, and start running them immediately. This is similar to the Manual Override or Run-Now feature found on other sprinkler timers. To use it, go to the homepage and click on the button. This will direct you to a new page where you can manually set the water time for each station. Leave the time 0 if you don’t want to run that station. After you are all set, click on the button, and the selected stations will start running immediately. At this point, the normal program schedules will be temporarily interrupted until the Run-Once Program finishes, at which point the controller will return back to the normal program mode. Station delay time, master on/off time, and master operation flags all apply to Run-Once program as usual.
If you want to stop the Run-Once Program before it finishes, you can click on the button on the homepage to reset all stations. The controller will then automatically return to normal program mode.
Switch to Manual Mode
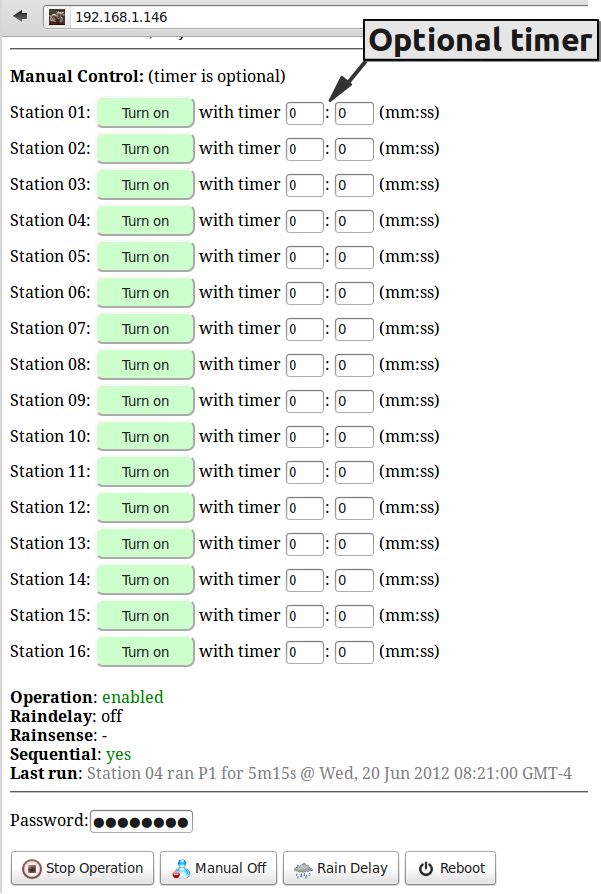
This firmware has an integrated Manual Mode. To enable manual mode, go to the homepage, input your password, and the click on the button. The controller will then switch from program mode to manual mode. Stations will be reset, and programs will stop running, and the homepage will show a list of buttons corresponding to each station.
In manual mode, you can Turn On / Off a station by clicking on buttons. The manual mode ignores password, so you don’t need to put in any password. When turning on a station, you can set an optional Timer value (down to seconds) in order to automatically shut off the station after a certain amount of time. By default the timer value is set to 0, and the station will remain on until it’s turned off. At any time, you can turn the station off by clicking on the button again, or switch the controller back to program mode.
Note: while in manual mode, all programs will stop running, until you switch manual mode off (i.e. switch back to program mode). If you just want to run an ad-hoc program, and would like the controller to automatically turn back to program mode, you should consider using the Run-Once program feature above.
Use Direct HTTP Commands
The OpenSprinkler web control is implemented using HTTP GET commands. If you want, you can bypass the web user interface, and use http requests directly to send control commands. Here is a selected list of common commands. A more complete list is documented in the PDF file here.
- Get Station Bit:
http://x.x.x.x/sn1
returns Station 1’s status as a binary number: 0 means off and 1 means on. You can replace sn1 with other station names (sn2, sn3, sn4…), up to the total number of stations. Use
http://x.x.x.x/sn0
to return the status of all stations as a binary string. - Switch to Manual Mode:
http://x.x.x.x/cv?pw=opendoor&mm=1
where pw= gives the password, and mm means manual mode. Set it to 0 will switch back to program mode. - Set Station Bit: (Note: this only works if the controller is in manual mode)
http://x.x.x.x/sn1=1
will turn on Station 1 immediately. You can set an optional timer value by
http://x.x.x.x/sn1=1&t=xxx
where t= gives the time (in seconds). Use
http://x.x.x.x/sn1=0
to turn the station off. Again, you can only set station bits if the controller is in manual mode. - Set Rain Delay:
http://x.x.x.x/cv?pw=opendoor&rd=xx
where rd= gives the rain delay time (in hours). - Reboot:
http://x.x.x.x/cv?pw=opendoor&rbt=1
Change Javascript URL
(Note: this is an experimental feature and only available on firmware 2.0.3).
OpenSprinkler makes use of Javascripts for rendering the web view. These Javascripts are stored on the Rayshobby.net server. Therefore the browser you are using to access OpenSprinkler must have Internet connection in order to get the Javascripts. If needed, you can copy the Javascripts to a microSD card to serve them locally on the controller, or copy the Javascripts to another server accessibly by your browser. To change the Javascript path / url, use the following page:
- http://x.x.x.x/su
where x.x.x.x is your OpenSprinkler’s IP address. Make sure you set a valid url. If not, you won’t be able to view the controller’s homepage anymore (i.e. the browser will report error), but you can use the page above to change the url back to default.
