OpenSprinkler Firmware Update
The OpenSprinkler firmware is regularly updated to include new features and functionality. You can update the firmware at any time by reflashing the microcontroller (MCU). The source code is completely open and free. You are welcome to modify it and share your contributions through GitHub.
Upload a Precompiled Firmware
- OpenSprinkler Firmware Updater 2.0 (cross-platform, for OpenSprinkler Hardware 2.x only)
(Updated Sep 27, 2014: new Qt-based GUI, does not require Java any more). - OpenSprinkler Firmware Updater 1.0 (for OpenSprinkler Hardware 1.x only)
- Linux and Mac users do not need to install any driver.
- For Windows: please install the Zadig fully-signed driver (choose to install libusb-win32 driver). This works for OpenSprinkler 1.x, 2.0, 2.1, and for all versions of Windows.
Compile and Modify the Source Code
If you wish to modify the OpenSprinkler source code and customize the software, please follow the instructions below. The F.A.Q. page contains some basic information to get you started. The source code has been documented with comments. It is your responsibility to understand the code if you wish to make changes. We will try our best to answer your questions but cannot respond to all requests.
The default sudo user of the virtual Linux is opensprinkler and the password is the same as the user name.
If you wish to install everything from scratch:
- For OpenSprinkler 1.x generation hardware, please follow instructions archived here: http://rayshobby.net/?page_id=6210
- For OpenSprinkler 2.x generation hardware, please follow instructions archived here: http://rayshobby.net/?page_id=6619
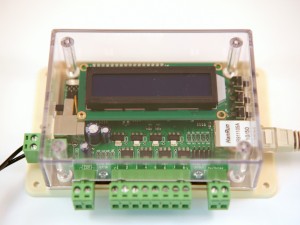
Which FTDI breakout board is required: 3.3V or 5V?
I use 5V FTDI. This way the LCD will still work when powered by FtDI.
As far as programming goes, I assume 3.3V should work as well. It’s just that the LCD will not turn on when powered by 3.3V input. I don’t have one at hand to test, so I can’t say for sure.
If you have an actual serial port on your PC (not USB) can you use this to connect to these pins? (assuming you are powering up the system via an external power source).
That may be possible. Since the FTDI cable is basically simulating a serial port, if you have a real serial port, you should be able to substitute the FTDI cable. You need to figure out the TXD, RXD, DTR, and GND pins on the serial port, and you need to check the voltage level from these pins (e.g. make sure they dont output more than 5V). But the short answer is that I dont know. You need to search and/or experiment on your own.
you can use a normal serial port, but you need a rs232-ttl converter like max232 to change the +/- 15v to 5v/gnd, if you look around the internet, there’s tons of schematics for one.
I prefer to use a full cable instead of a USB cable that connects to an open board that connects to your Berg header. Besides, the Sparkfun FTDI breakout is discontinued (you might want to update your web site to reflect this).
If I buy this cable, will the pinout be compatible with the 1.1 OpenSprinkler that I just purchased?: http://www.ebay.com/itm/6FT-1-8M-USB-to-TTL-5V-Serial-Cable-FTDI-FT232RL-Chipset-for-Arduino-UNO-Mini-/270895207542?pt=LH_DefaultDomain_0&hash=item3f129cd476
If not, what is the exact cable that you showed in your v1.1 video that I should buy?
Also, I would like to have a way to immediately turn on a specific valve. Do you have some way to send on/off commands via a command line utility? For example, something like the Windows “Net Send” command. Of course, I would like to do this from my Android tablet/phone, not Windows.
The real reason I purchased your controller is that my home town is very “buggy” in the summertime. Each AM when I go to work I have to get the hose out and clean the windshield. It is too thick to use the wiper fluid reservoir, it will all be gone before the windshield is cleaned. It needs to be softened up with a jet spray of water. I want to be able to turn it on and off from my vehicle while operating the wipers.
I might also use it to control sprinklers with later but for now I just want an on and off button, no password, no going through multiple menus. Password is already handled by logging onto the wifi router connected to the OpenSprinkler. It would be great if the main web page that shows valve status had click-able buttons on it that would work like radio buttons to turn one of the zones on at a time (and an “all off” button as well of course). This would also be a nice sprinkler system test and debug feature (5 seconds is NOT long enough to see if the zone around the other side of the house came on, you need to leave it on and go look. If it’s not working you need it on to take readings at the sprinkler valve…) and it would also solve my needs. Any chance this can be added? If you will not consider it I understand, but what source files should I focus my investigations on? I’m already working on another Arduino Mega based project so the coding part should be fairly simple, especially if you put comments in the code or have other design docs.
Dave,
The cable you pointed out should work since it especially says ‘for Arduino’. The one I got was from SparkFun I think (http://www.sparkfun.com/products/9718). Adafruit and Digikey also have similar, just search ‘FTDI Cable’ and make sure it’s 5V (some cables are 3.3V and I have not tested them).
What you mentioned about the reason you bought the controller is fascinating! First of all, you should check the svc_button_ctrl program already available in the GitHub repository:
http://rayshobby.net/?p=1994
It’s a simple button based interface to directly turn on or off station valves. No password. You can flash this program to the controller and it should work.
Then, if possible, I suggest that you take a video when spraying your windshield. I can post it on my youtube.
Hi Ray,
My first time dealing with adruino and was stumped with this re-programming instruction for V1.2u. Adruino program 0.23 gives me an error when uploading and it read something like – hardware must be defined on “defines.h”. Defines.h has this two entries which I guess is a choice
for the following scripts to work, I guessed that // means remarks that the program ignores.
//#define SVC_HW_VERSION 12
//#define SVC_HW_VERSION 11
So I change this to
#define SVC_HW_VERSION 12
//#define SVC_HW_VERSION 11
and it worked.
I think this needs to be included in the instructions.
Thks,
Hi,
That’s a good suggestion. Since the pin assignments are different for versions 1.1 and 1.2, I intentionally used the macro to let the user to explicitly define their hardware version, to make sure the software works with their particular hardware. I will add the description to the instructions. Thanks.
-Ray
Hi Ray,
I wanted to check out your opensprinkler source code. I just set up a fresh arduino 0023 environment (64 bit linux) and tried to compile one of the example files (svc_button_ctrl). I get several errors of the type:
svc_button_ctrl.cpp:327:27: error: variable ‘htmlOkHeader’ must be const in order to be put into read-only section by means of ‘__attribute__((progmem))’
This is repeated for every progmem string defined (htmlOkHeaderjs, htmlMobileHeader, htmlNotFound, htmlFavicon, htmlUnauthorized). Declaring all these const prog_uchar … fixes this file, but then I get the same progmem errors from tcpip.cpp. So I’m wondering if I’m missing a fundamental declaration somewhere or possibly pointing to the wrong library file.
Any suggestions?
Tim,
I have never seen this error before. Which version of Linux are you using? I am wondering if this has to do with your version of avrdude. Could you re-post this question in the forum? Someone may have an answer there.
Hi Ray,
Just a note of thanks for your OpenSprinkler product. I received this weekend for Fathers Day from my wife. Brought tears to my eyes 😉 This will be part of my converged, IP network based, Smarthome project that I have been working through as a hobby. I am really impressed with all that you have developed here and sincerely appreciate your efforts! I hope to incorporate this into several other control circuits and with other sensors that I have/am established in my home(solar, weather, power, AV, HVAC, etc). Also, looking forward to your incorporation of remote javascripts to drive more complicated services and UIs. Hopefully, I will be able to utilize and add HTTP commands, simple web services (get/post), etc in the future to make it do even more. For example, it would be great if I could just pass it a simple command like
192.168.1.xx/S01=ON
that is still incorporated with your interval program code so I can invoke OpenSprinkler from another Graphical UI. For example: I am out in my garden and I just want to turn on Valve 1 from my Iphone running a common Smarthome Remote graphic interface from IRule.
Thanks for everything and looking forward to following and using the evolution this project.
-Dave
Hi Dave,
Thanks for your kind words. The web control interface is already implemented using http GET command. You can get a snapshot of it when you perform some operation with an incorrect password. In this case you can see the http command sent to the controller on your browser’s link bar. In other words, you can send the same command without using the UI at all, although this requires checking the code to figure out how the GET command is constructed.
What I am working on next is a manual override feature which will do exactly what you want: pass a command and it will turn on a station. This should be integrated to the software soon. Thanks again for purchasing OpenSprinkler.
-Ray
Ray
Two hex file questions:
1. When I download “rayshobby-opensprinkler-fef6c33” I do not see the 1.3u compiled file only 1.2u.
2. Just in case i goofed up downloading 1.3 took a look how version 1.2u was configured. I noticed there are several hex files available to load, which one is the full complement of what I need? Can you give this rookie a little coaching?
David
David,
1. I just checked in the compiled hex (interval_program) for 1.3u. This is the program shipped with all 1.3u kits.
2. 1.2u was shipped with the svc_full_program, which is now replaced by the interval_program. There are also two other programs (svc_button_ctrl and svc_interval), which are now integrated into the new interval_program. So they are not useful anymore.
In case this is not clear: each hex file is an independent program.
-Ray
Ray
I purchased my rev 1.2u board at the Maker Faire. I just tried to reprogram it for version 1.3u. The script seems to load/verify just fine. But all I get is a single row of blank characters on the LCD. Cycling the power yields no change (btw, the usb cable is unplugged and the network cable is plugged in). So I reprogrammed the board with the hex file for 1.2u. Much better, version 1.6 interface comes up, but the program preview opens to a blank page. Both times I am reprograming using avrdude -c usbtiny -p m328p -F -U flash:w:interval_program.cpp.hex. Any hints as to what is going on?
David
Ahhh! One problem fixed. I ran into this before, Internet Explore was the problem with no preview page. I switched to Firefox and the preview works just fine. Oh and my IPhone works OK also.
David
Hi Ray,
I have been trying to upload a hex file to my opensprinkler board. Every time that I connect the usb connector to my windows 7 box the display keeps saying “Connecting to the network”. I have the ftdi breakout board.
I am unsure if its connected to my pc. It looks like the drivers got loaded properly. I see USBtinyISP AVR Programmer in my device manager. How do I know if its been loaded properly?
Raj, if you see USBtinyISP programmer in your device manager, that means the programmer has been detected and the Windows driver is installed properly. Please follow the re-programming instructions on the following page to flash a new program:
http://rayshobby.net/?page_id=732
Check the firmware version to see if the new firmware has been loaded properly.
Thanks for the info Ray. I did exactly as you instructed.
1. I installed the USbtinyISP drivers in Windows 7 x64 and saw the driver under devices. 2. I also installed the Arduino development software.
3. Downloaded the firmware files, et al from guthub.
4. When I run “avrdude -c usbtiny -p m328p -F -U flash:w:xxx.hex”. It comes back with
Error: could not find USBtiny device (0x1781/0xc9f)
I think this means that it could not find the programmer….which tells me that somehow avrdude is not connecting to the board correctly.
5. Shouldn’t the led’s on the board blink for rx and tx? How do I verify that the tiny board is working properly? Should I look at the settings on the driver? Soldering issues?
Thanks for any debug help…
Raj
Which hardware version of OpenSprinkler do you have? I checked your order and it seems you have purchased v1.1, which does not have USBtiny programmer. Instead, you need to use the FTDI programmer. The hardware version is printed at the top of the PCB (OpenSprinkler v1.x).
That did the trick Ray!
Sorry for the confusion…I needed to read your instructions a little bit more carefully.
BTW. I think your OpenSprinkler project is absolutely WONDERFUL and I look forward to hacking it and seeing how you progress it.
Raj
Do you supply .pde files for the FW? Would make uploading much easier for people who don’t want to mess with avrdude.
Of course: the pde files are in the source code repository. By the way, Arduino uses avrdude internally to upload a program, so it is based on avrdude itself.
Ray,
I’m a bit of a novice here and I need your help. I followed your instructions to download the new interval version upgrade. I got the Arduino 0023version for windows. I’m running Windows 7. Next, I downloaded the Opensprinkler library and added it to the Arduino library exactly as per instructions. I go into the software, select the defines.h file from the library to select my hardware version (V1.2u). Arduino tells me that I have a bad file and that its looking for a pde file. What do I do to correct this?
Hi Virginia, you should open the interval_program.pde in Arduino and compile and upload that. Arduino does not recognize .h files (you can certainly edit .h files in the Arduino editor, but you can’t compile it). Since you have hardware version 1.2u, you can also directly upload pre-compiled code. Instructions can be found in the software/compiled/v1.2u folder.
Hi Ray,
I just finished building the board (v1.4u) and testing the power circuit, and everything appears to be working at this point. I’m trying to install the drivers for USBtinyISP programmer and I’m running into some difficulties. I downloaded them from LadyAda’s site, and I plug in the board and get a “USB device not recognized. One of the devices connected to this computer has malfunctioned and Windows does not recognize it” error. I then look for the device on the Device Manager and find an unknown device that won’t let me load the driver manually. It gives me an error about the *.inf file not having information for the device or something of that nature.
A couple of questions:
Power or no power (USB only) to the board?
Do I need the drivers loaded in Windows when using the Arduino software?
Should I try the AVRDude software, or stick to this approach?
Oh, by the way, I’m using Windows XP 32-bit if that makes a difference.
Sorry for the newbie questions, but I think I’m close to success on this one!
Thanks,
Jim
Hi Jim.
– The controller can be powered directly from USB. When plugging in the USB cable, you don’t need to connect 24VAC.
– The driver needs to be properly installed in order to upload a program to OpenSprinkler through Arduino software.
– You can use avrdude, but you still need the driver, otherwise avrdude cannot recognize the programmer.
– Double check the instructions at http://www.ladyada.net/make/usbtinyisp/drivers.html.
– It’s possible that some soldering issue caused the device to be unrecognizable, as opposed to a driver issue. If you have access to a Linux machine, plug in the USB and use ‘lsusb’ to see if ‘USBtiny’ appears in the device list. There are only a few components relevant to USBtiny, these are the ATtiny45 mcu, two 47 ohm resistors, one 1.5K resistor, and the USB connector. Double check these components and the solder joints to make sure they look all right.
Hi Ray,
I’ve been busy checking, rechecking, and scratching my head. I have several idential OpenSprinkler boards, so I can check their behavior against each other. They all appear to function similarly with respect to the USB and driver issue. I even built the USBtiny setup from tequals0’s page on breadboard and it behaved similarly.
The thing I’m suspecting is that I think I’m using Atiny45 chips that aren’t preprogrammed, which is probably an issue. I also don’t have a programmer, yet. Do you think this could be the problem? If so, any suggestions on how to flash one of these things and where the program to flash would reside?
Sorry for lots of questions and the slow learning curve, but I’m a mechanical engineer – not an electrical 🙂
Jim
The attiny45 has to be programmed to function as a USBtiny programmer. Tequal0’s page has a link to the program: http://www.instructables.com/id/VUSBTiny-AVR-SPI-Programmer/
You need an avr isp programmer in order to upload the program to attiny45.
The attiny45 included in OpenSprinkler kits are all pre-programmed.
Hi, Ray:
I’m trying to build the 1.8.1 firmware for my 1.3 hardware using gcc-avr 4.5.3 in Ubuntu 12.04, but Arduino 0023 says, “Binary sketch size: 32628 bytes (of a 32256 byte maximum).” What now?
Jody
In Arduino, Tools->Boards, please select ‘OpenSprinkler’.
Hi, Ray:
Thanks, that did the trick!
Jody
Ray, just tried to compile version 1.8.1 with Arduino 1.0, and received an error with “WProgram.h” not found for twi.c, so I replaced the include with the lines from OpenSprinkler.h:
#if defined(ARDUINO) && ARDUINO >= 100
#include “Arduino.h”
#else
#include “WProgram.h”
#endif
Ray, what a great project! Thanks for sharing it. Quick suggestion on the instructions: in the Instructions section part “3 Upload a Program” add “go to Tools->Programmer and select USBtinyISP”
Adding that may save some other Arduino newbies like me some cycles figuring out how to upload a program… for the google record I encountered a “did not find any USB device” error before correctly setting the programmer.
Hi Chris, which version of Arduino are you using? I am using 0023 and I don’t see the Tools -> Programmer menu item.
I’m using 1.0 (this is the version Ubuntu wants to install for me).
Here is another 1.0 minor issue… the include in the file utility/twi.c needs a conditional change rather than always including “WProgram.h”
#if defined(ARDUINO) && ARDUINO >= 100
#include “Arduino.h”
#else
#include “WProgram.h”
#endif