Web Interface (Firmware 1.5 or below)
Access the Controller’s Homepage
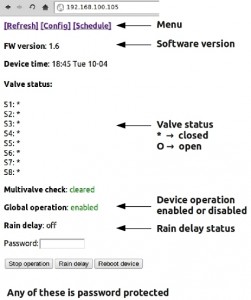
Open a web browser on your computer or any mobile device that is connected to same network, and type in the controller’s IP address, for example 192.168.1.146. This will open the controller’s homepage. An annotated snapshot is shown below:
Basically, the home page shows the controller’s current status, and links to other pages. It also allows you to start/stop the operation of the controller, set rain delay time, and reboot the controller. To apply any of the these changes, you need to input a password.
Default Password. The default password is opendoor, which can be modified on the config page.
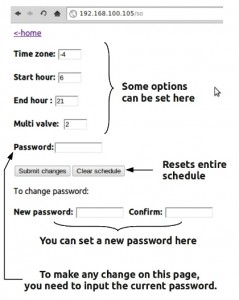
The config page looks like this:

Here you can change some options (which are explained in the Basics), clear/erase the watering schedule, and set a new password. Again, to make any change you need to input the current password.
Set the Watering Schedule
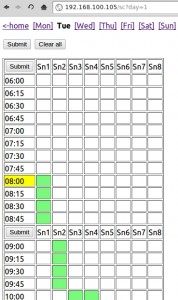
From the homepage, click the ‘Schedule‘ link will bring up the schedule page, which looks like this:


Here you can set a weekly schedule, for each station separately. The link to each weekday is shown on the top; each row of the table is a 15-minute slot, with the starting time shown on the left; each column corresponds to a station. It’s possible to change the duration of a slot (i.e. other than 15 minutes), but that requires re-programming the MCU.
The slot corresponding to the present time (according to the controller’s current time) is marked yellow. When you link to schedule page from the homepage, you are automatically directed to today’s page. This makes it easy to quickly check today’s schedule.
To modify the schedule, you simply click on each slot, turning it to green. Click again to deselect the slot. After you are done, click on any Submit button throughout the page to commit your changes. Since the table is long, it is split into 3-hour blocks so that you don’t get too dizzy. Any submit button works exactly the same. When submitting, you will be asked for the password. Again, default password is opendoor. You can then navigate to a different weekday and repeat the process. Once submitted, the schedule will be stored in external EEPROM (24LC128), so it won’t be lost even if the power is cut off.
Credits: The schedule web interface is based on Tuxgraphics Pool Timer software. I learned many tips about web programming on the microcontroller by studying their code. I really appreciate their valuable resources.
Set Rain Delay Time
On the homepage, you can set a rain delay time by clicking on the Rain Delay button and typing in a desired number of hours. Once set, the controller will disable the operation right away, and start again when the rain delay time is reached. To stop rain delay at any time, just input a value of 0.
Rain delay can also be set on the controller itself by clicking on push button B2. However, this only allows the time to be set on a per-day (24 hour) basis. After selecting the desired number, press and hold B3 to apply. Again, a value of 0 will stop the rain delay.
Other Button Functions
At any time, press and hold B2 to stop the operation of the device (i.e. all valves will be closed). This is the same function as the Stop operation button you’ve seen on the homepage. To start the operation again, press and hold B1 (same function as the Start operation button on the homepage).
