Upload a program using FTDI (for OpenSprinkler v1.1/v1.0)
Where to Get a Programmer (Hardware)
- FTDI cable is available from many websites, such as Digikey, Mouser, MakerShed. You can also get the FTDI breakout from SparkFun, the FTDI friend from Adafruit, or the USB BUB from Modern Device. They all work great.
- AVR ISP programmer is really handy if you need to burn a new bootloader, or upload a program without bootloader. For this I would recommend the USB AVR Programmer from Pololu.
You can also use the USBasp programmer widely available on eBay and other stores such as SuntekStore.com. This programmer is much cheaper (~$4) and is based on an Atmel AVR MCU. You can use it to upload a bootloader, or upload a program directly to the OpenSprinkler without any bootloader. If the version you are getting has a 10-pin (2×5) header, you need to get a converter to convert it to 6-pin (2×3) header. For information about how to use USBasp programmer for burning bootloader or a program, please check the Arduino website.
- If you already have an Arduino board at hand, then you don’t need any additional programmer. All you need to do is to pry out the ATMEGA328 from OpenSprinkler (underneath the LCD), and insert it into the Arduino board. Then you can program it just like programming a standard Arduino (you need to select Arduino Pro or Pro Mini (3.3V, 8MHz) from the Tools->Boards menu, as described in the following). Once you are done, pop the microcontroller back to OpenSprinkler and you are done.
Install Optiboot (Software)
The MCU is pre-programmed with the Optiboot bootloader. It is similar to standard Arduino bootloaders, but has many improvements, including smaller size, and support for watchdog timer. Therefore, to upload a new program you need to install Optiboot to your Arduino software directory.
The MCU in the sprinkler controller is an Atmega328 running at 8MHz. This is compatible with the Arduino Pro board (also the LilyPad Arduino board). Unfortunately at the moment, the Optiboot from the above website contains several bugs that cause issues for 8MHz Arduinos. Therefore, you should download the version from the link below, which has these bugs fixed.
Unzip the file to the Arduino’s hardware folder. For example, C:\arduino-0022\hardware. Just to make sure, you should have a optiboot folder parallel to two other folders named arduino and tools.
Upload a Program using FTDI
Start the Arduino IDE, and you should see under Tools->Boards a list of options pre-fixed with ‘[Optiboot]’. You should select
[Optiboot] Arduino Pro or Pro Mini (3.3V 8MHz) w/ ATmega328
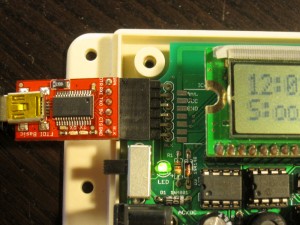
and you can now upload a program using FTDI cable. The picture below shows the SparkFun FTDI Basic plugged into the 6-pin header. For general instructions on how to use FTDI, please check online tutorials such as this one.
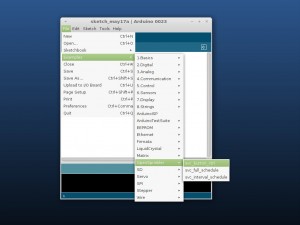
Go to File->Examples->OpenSprinkler and select any example program (e.g. interval_program). Finally, click on the Upload button to upload. See screenshots below:

Upload a Program using an existing Arduino (Optional)
If you already have an Arduino board, you don’t need any additional programmer. You can simply take out the existing ATMEGA328 on the Arduino board, switch it with the ATMEGA328 from the OpenSprinkler (it’s located underneath the LCD screen). Then you can follow the same instructions above to upload a program (note that you need to select Arduino Pro or Pro Mini (3.3V, 8MHz) from the Tools->Boards menu, as described above). This essentially uses the USB-TTL converter on the Arduino board to accomplish the programming. Once you are done, pop the mcu back to OpenSprinkler and you are done.
Upload a Program using AVR ISP Programmer (Optional)
You can also upload a program to the MCU using an AVR ISP programmer. The 2×3 pin ISP header is located at the center of the PCB. Note the white stripe on the left, which should align with the stripe on your programmer cable.
NOTE: the MCU received in your kit has a model number ATmega328-PU. This is slightly different from ATmega328P-PU used in standard Arduinos. Technically the two are the same (the P version is more power efficient), but they have different signatures. If you are using avrdude to upload a program, use the -F option to ignore the signature check.
To upload a program using ISP programmer, follow these instructions:
- First, close the Arduino program if it’s open.
- Make sure your programmer is listed in arduino-0022\hardware\arduino\programmers.txt. If not, you need to add an entry. For example, for USBasp programmer, add the following two lines:
usbasp.name=USB asp

usbasp.protocol=usbasp
If you are using USBasp in Linux, you need to follow these steps to change the device permission, so you can use it as a non-root user. - Open file arduino-0022\hardware\optiboot\boards.txt, locate the block for [Optiboot] Arduino Pro or Pro Mini (3.3V, 8 MHz) w/ ATmega328, and make the following changes:
#pro328o.upload.protocol=stk500

#pro328o.upload.maximum_size=31744

pro328o.upload.using=arduino:usbasp  # the name of your ISP programmer in programmers.txt

pro328o.upload.maximum_size=32768
In other words, comment out the first two lines, and add the second two lines. - Follow the instructions in the next section to modify the signature code.
- Finally, plug in the ISP programmer, start Arduino, load a program, and click on ‘Upload’. The LEDs on your programmer should start flashing, indicating the program is being uploaded to the microcontroller.
Burn a Bootloader using AVR ISP Programmer (Optional)
Normally you do not need to burn a bootloader. But if for some reason, your bootloader is damaged, you can re-burn it by using an AVR ISP programmer. The process is similar to uploading a program using the ISP programmer as described above. If you are using the Arduino IDE for burning bootloaders, you need to first edit the avrdude.conf file to avoid signature check error. This file is located in the arduino-0022\hardware\tools directory. Open it and locate the ATmega328 section. Change the signature from 0x1e 0x95 0x0F to 0x1e 0x95 0x14. Now you should be able to burn a bootloader through the Arduino IDE. Once you are done, change the signature back to the original value.
