Three months after its first prototype version, I am glad to announce that the long-awaited AASaver 2.0 has finally become available! In case you haven’t seen the first version of AASaver: it is basically a versatile boost converter that takes two AA (or AAA) batteries and bumps them to 5V so you can use it to power flashlight LEDs, or use it for breadboard experiments. The nice thing is that since it’s based on an efficient boost converter chip that has low start-up voltage, it can work with both new and used batteries. Even if the batteries can no longer work in other devices, like remote control, electronic toys, you can still use the AASaver to light up LEDs and run circuit board experiments for a long time. It’s a great way to harvest the remaining energy (or in layman’s term, suck the remaining juice) in your ‘dead’ AA batteries 🙂
The New Design
AASaver 2.0 is a completely redesigned circuit from its 1.x version. Here is a list of new changes:
- Added USB port, which allows charging of USB devices such as mobile phones, MP3 players etc. To support up to 500mA charging current, the booster converter is changed to use NCP1450A, an upgrade from the previous MCP1640.
- Added lithium battery charger (based on MCP73831), which allows charging of lithium polymer (LiPo) batteries from AA batteries. There is an on-board LiPo battery jack, and an SMT pot (trimmer) to provide adjustable charging current.
- There is also an input LiPo jack, so the circuit can take source either from AA batteries or external LiPo battery. There is a good reason to provide this functionality, as explained below.
- The original battery clips are changed to a plastic battery holder, which is mounted with screws on the back of the component side. This frees a lot of room on the component side, which in turn reduces the PCB size.
- The breadboard pin headers are now changed to the battery holder side. The AASaver now takes much less space when plugged into breadboard. An additional pair of pinouts are also added to fit breadboards with extended width.
- It’s also possible to use the circuit for solar charging, and charging LiPo battery from external USB port.
In sum, this version preserves the same basic functionality as before, which is to take two AA (or AAA) batteries and serve dual functions as an LED flashlight and breadboard power supply. But it also has a lot of new features and improved usability, most of which were adopted from user suggestions on the original version. Here is a quick summary of the spec:
- Power Source: two AA/AAA batteries, or external 3.7V LiPo battery (selecctable by an on-board switch). Can also be modified to work with a single battery, or with a solar cell.
- Power Output: any of the following: flashlight LEDs (seletable by a switch), breadboard pin headers, USB, or LiPo charger. The LiPo charging current is adjustable from 10mA to 200mA through an on-board trimmer.
- Output Voltage: 5V up to 500mA.
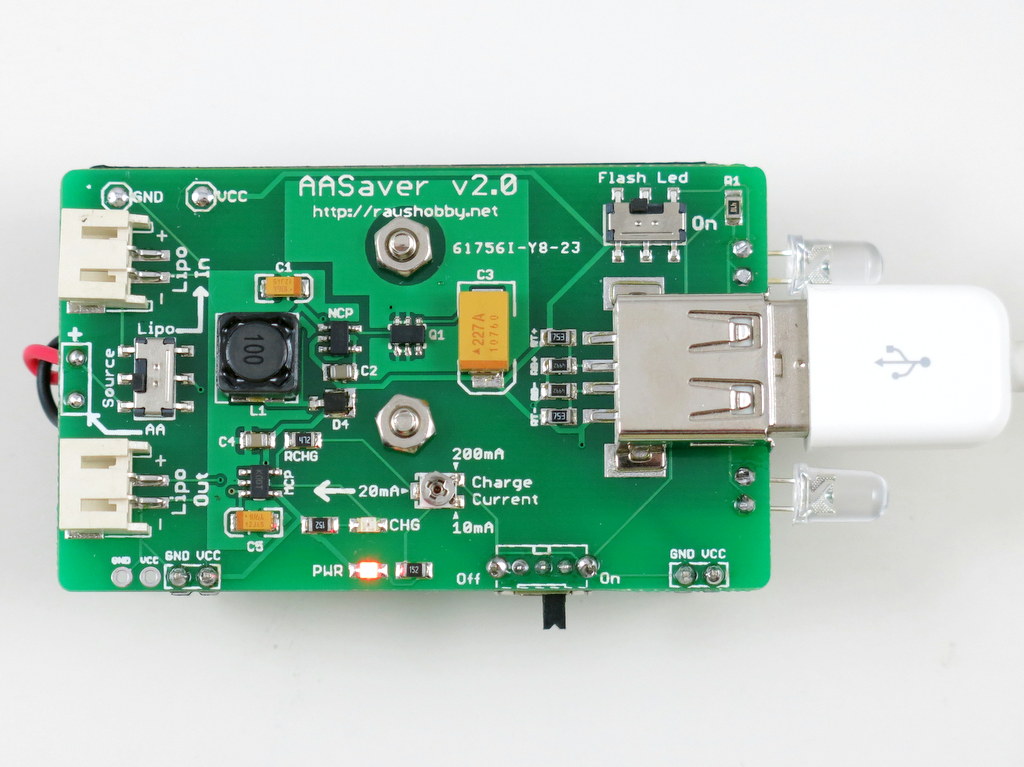
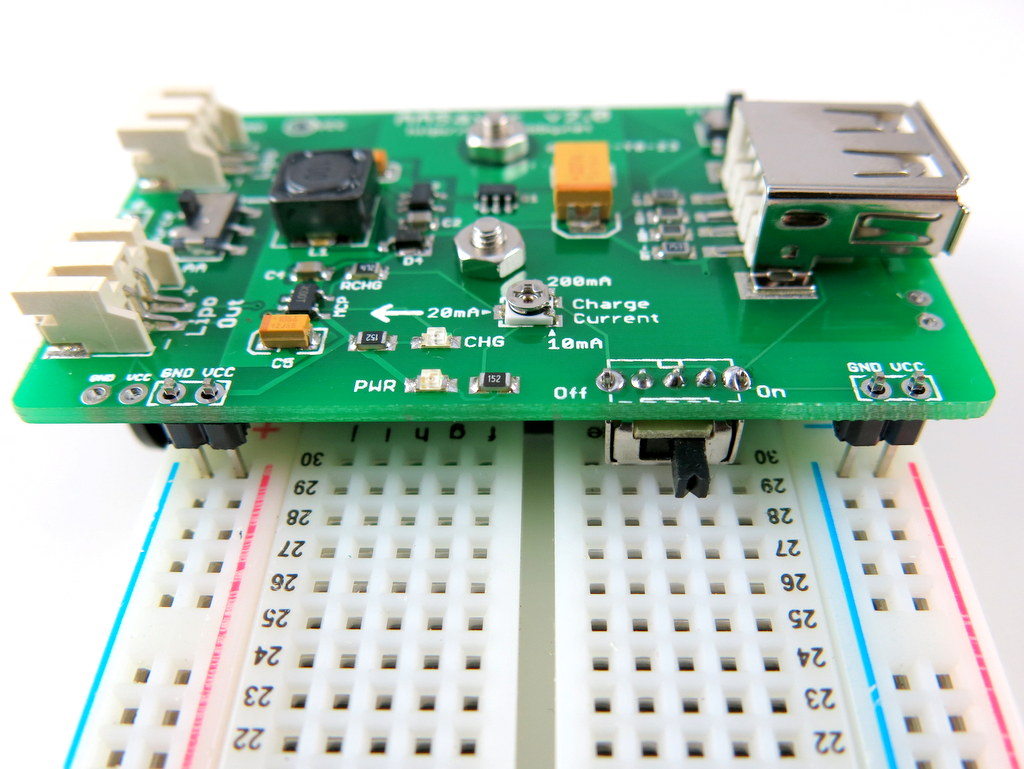
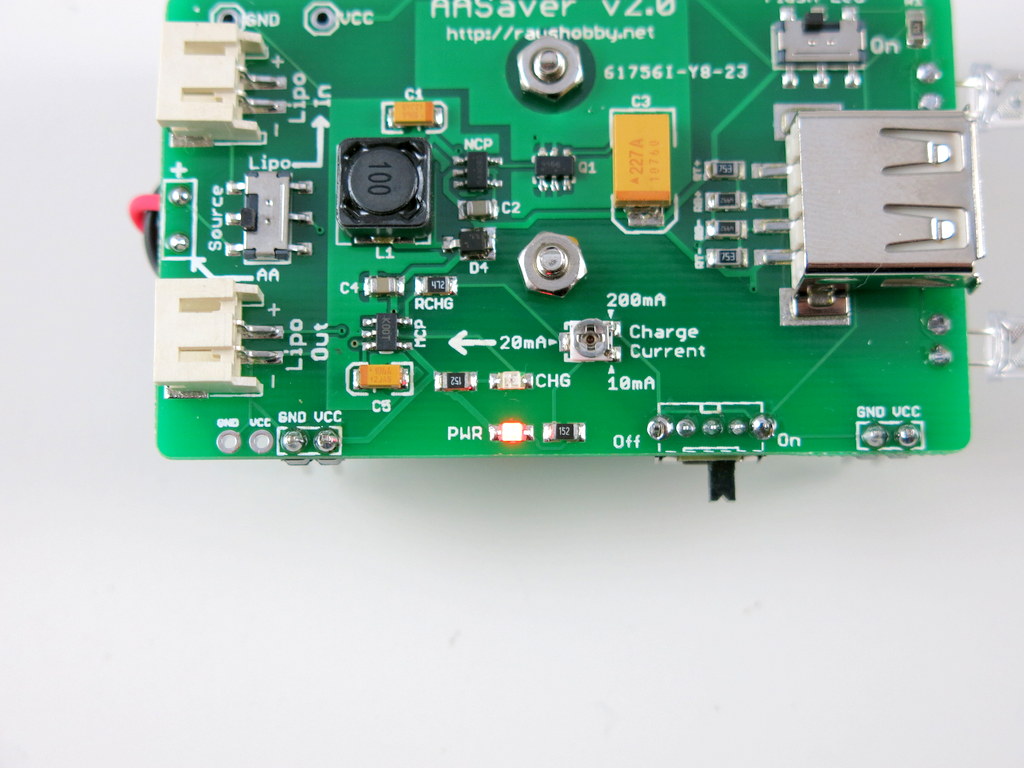
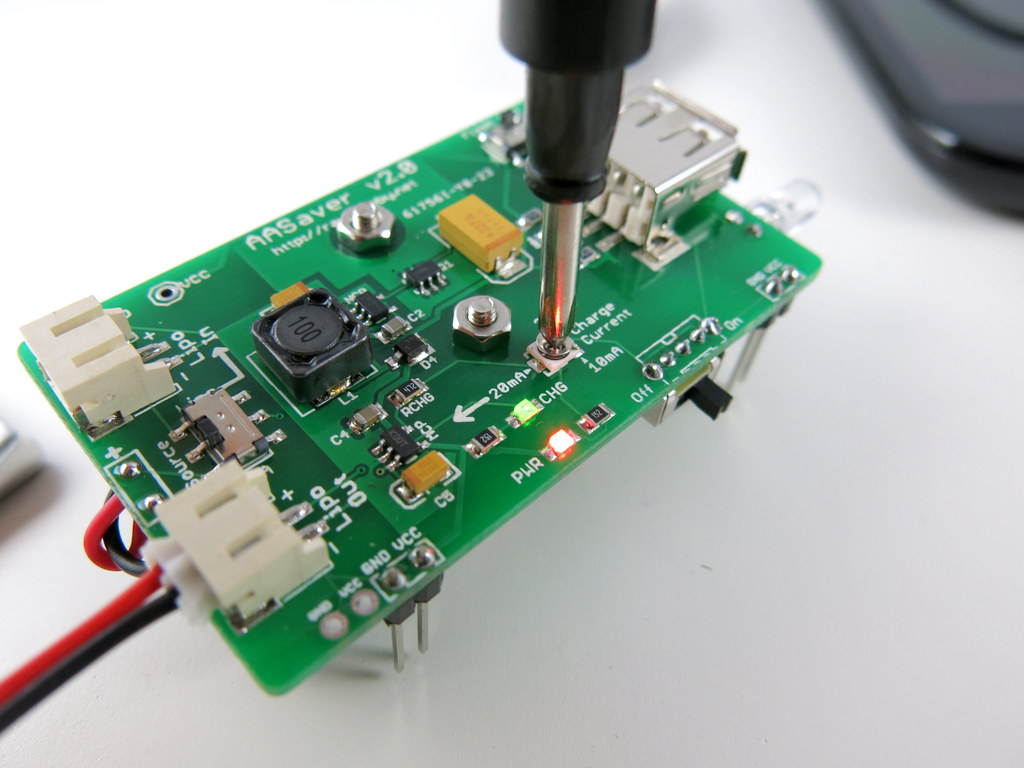
Here is an annotated diagram for the various on-board components: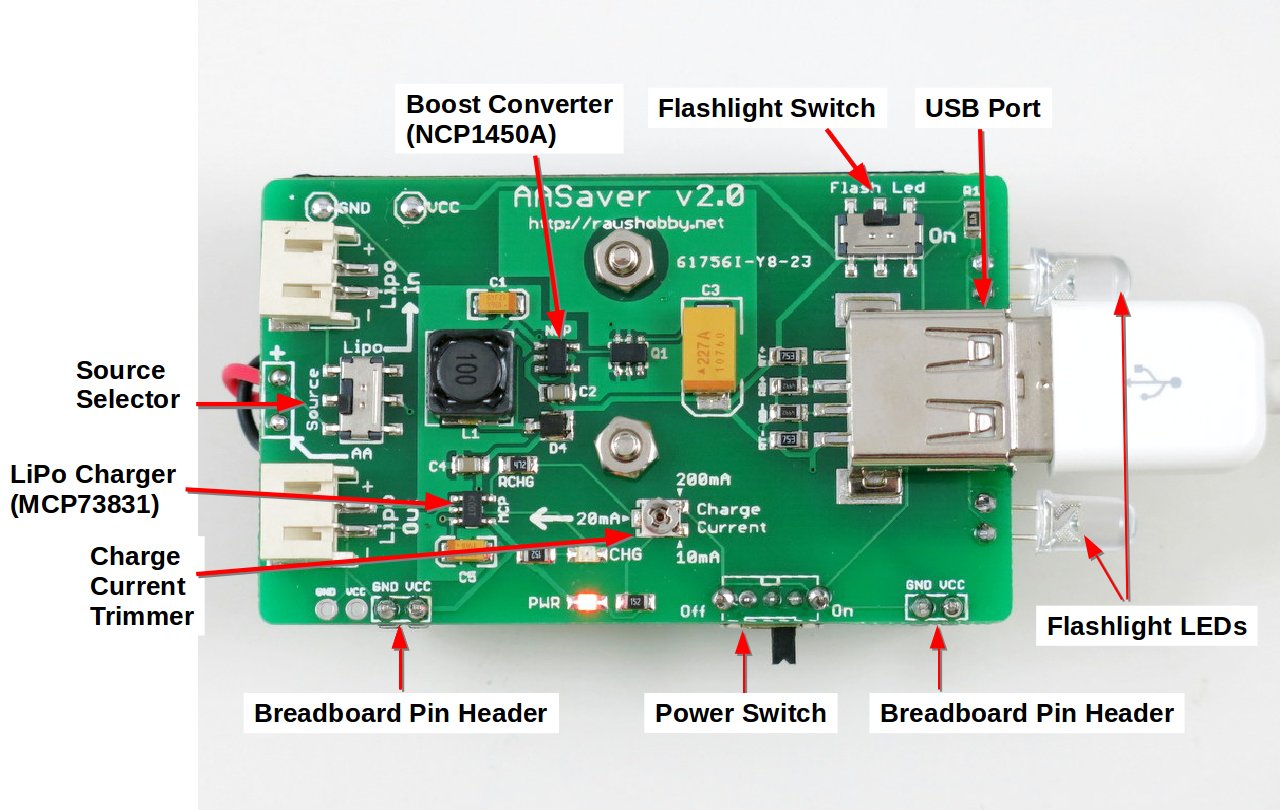
Schematic and Board Design
Acknowledgement: the USB charging circuit, particularly the D+/D- line voltages, references the design of the MintyBoost by Lady Ada. Check the details about USB charging therein.
Technically AASaver 2.0 is different from the MintyBoost in that 1) it uses a different boost converter chip (NCP1450A vs. LT1302); 2) it has a built-in LiPo charger; 3) it uses SMT components and is mostly assembled. Also, AASaver is designed to be versatile and serve multiple functions, including LED flashlights, breadboard power supply, USB charging, and LiPo charging. Its primary goal is to make use of old batteries (hence the name AASaver 🙂 ).
The Kit
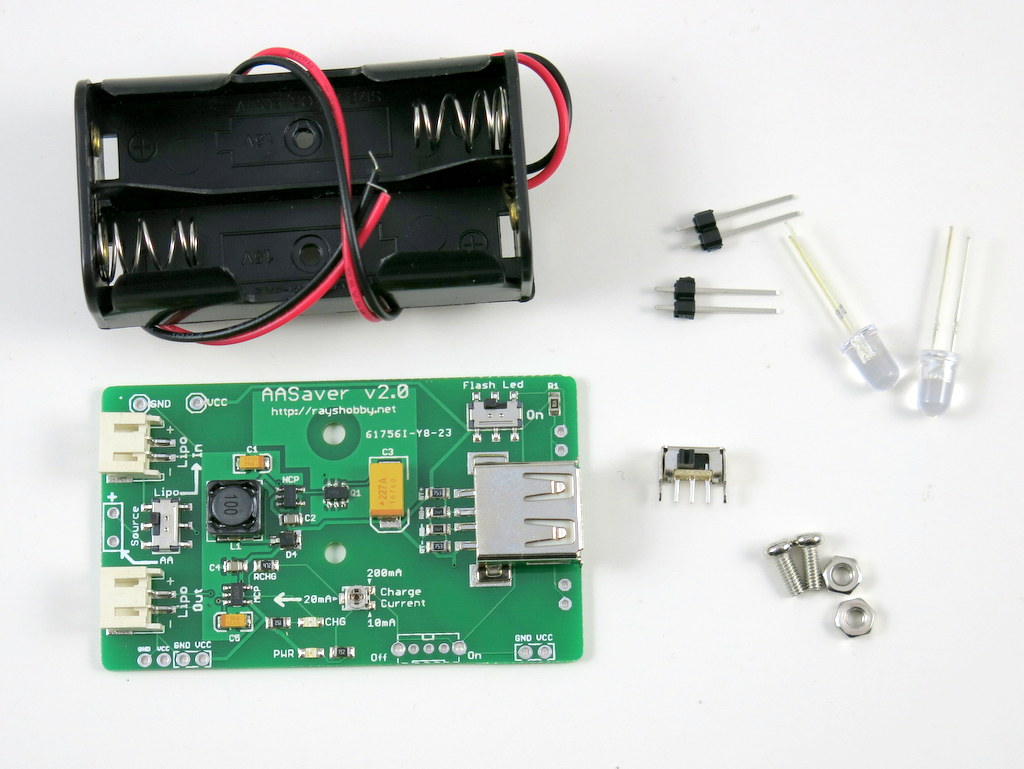
A limited number of the AASaver 2.0 kits are now available on Rayshobby Shop. More will become available in the upcoming weeks. Included in the kit are one assembled and tested AASaver 2.0 circuit board, battery holder, two pin headers, two bright flashlight LEDs, a power switch, two screws and nuts.
Assembly and Usage Instructions
Although the circuit board is mostly assembled, it does require a few simply assembly and soldering steps to get it fully functional. If you’d rather not assemble and solder anything, you can order a completely assembled AASaver at additional cost. The instructions are posted below with high resolution images. These instructions will soon be posted on the AASaver homepage.
Step 1. Attach the Battery Holder
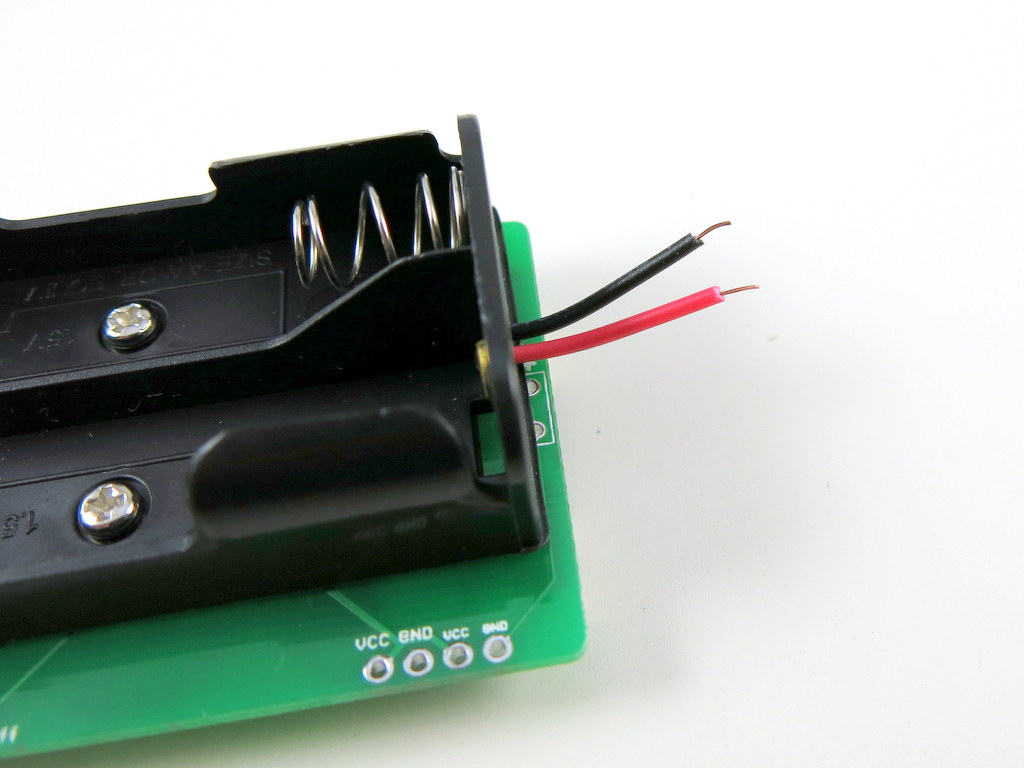
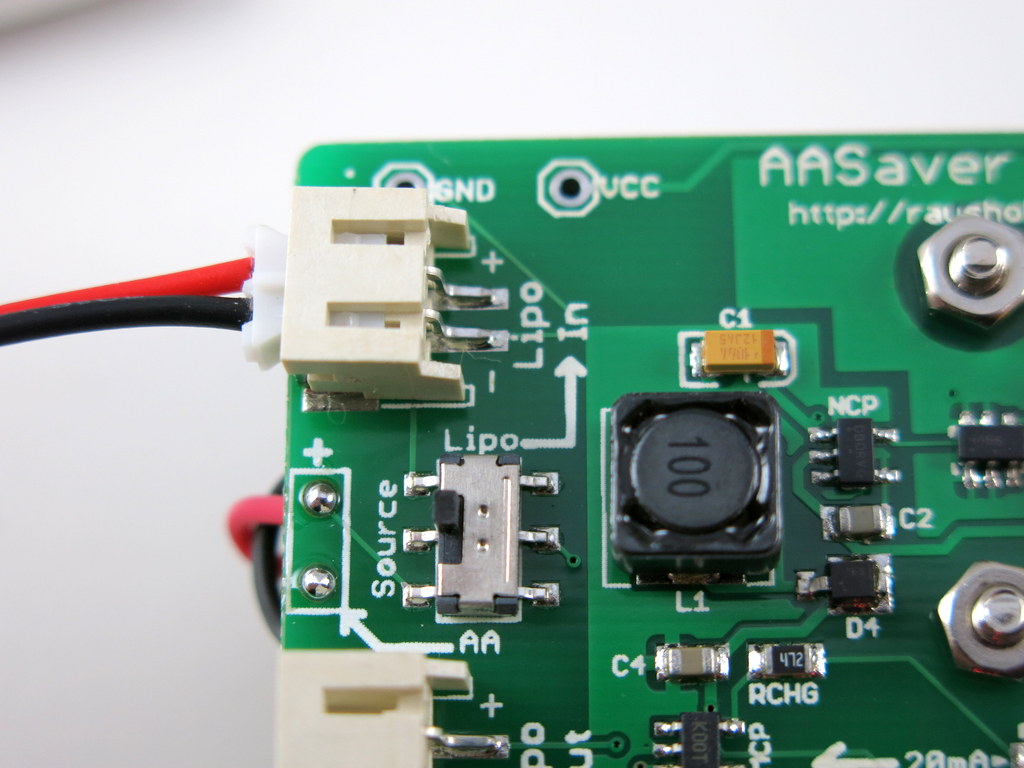
Use the two screws and nuts to fix the battery holder at the back of the PCB. Make sure that the battery holder wires are close to the side with the AA/LiPo Source Selector (i.e. the opposite side of the USB port).


Next, cut the battery holder wires to about 1 to 2 inches long (don’t cut it too short, or otherwise you will have difficulty soldering it later). Then use a wire stripper to strip the lead, and then insert the wires to the PCB holes and solder them. Make sure that the red wire goes into the hole marked ‘+’, because this is the positive wire. Double check yours with the image on the right below.
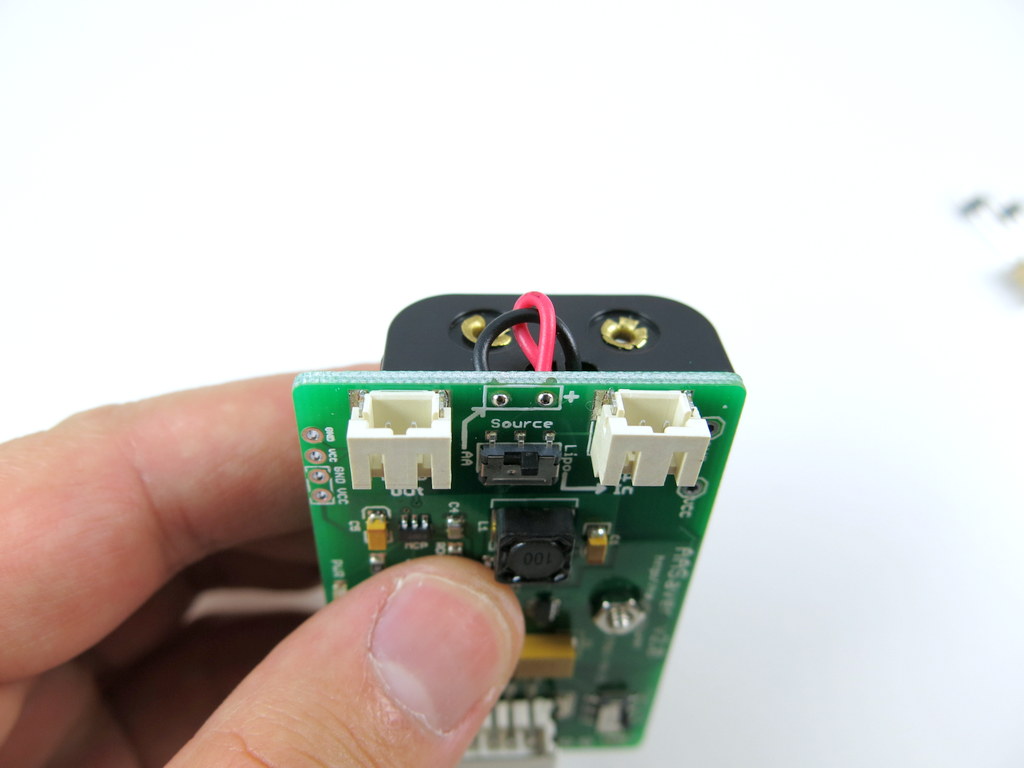
If you want, you can use a little bit of hot glue to fix the wires in place. This is not required, but is helpful as the wires are very thin and are prone to breaking if you wiggle them too much.
Step 2. (Optional) Solder the Breadboard Pin Headers and LEDs
Now you need to solder the breadboard pin headers and flashlight LEDs. NOTE: these steps are optional, and depends on what you want the AASaver for. If you don’t need it to run breadboard experiments, you don’t need to solder the pin headers (or you can always solder them later).
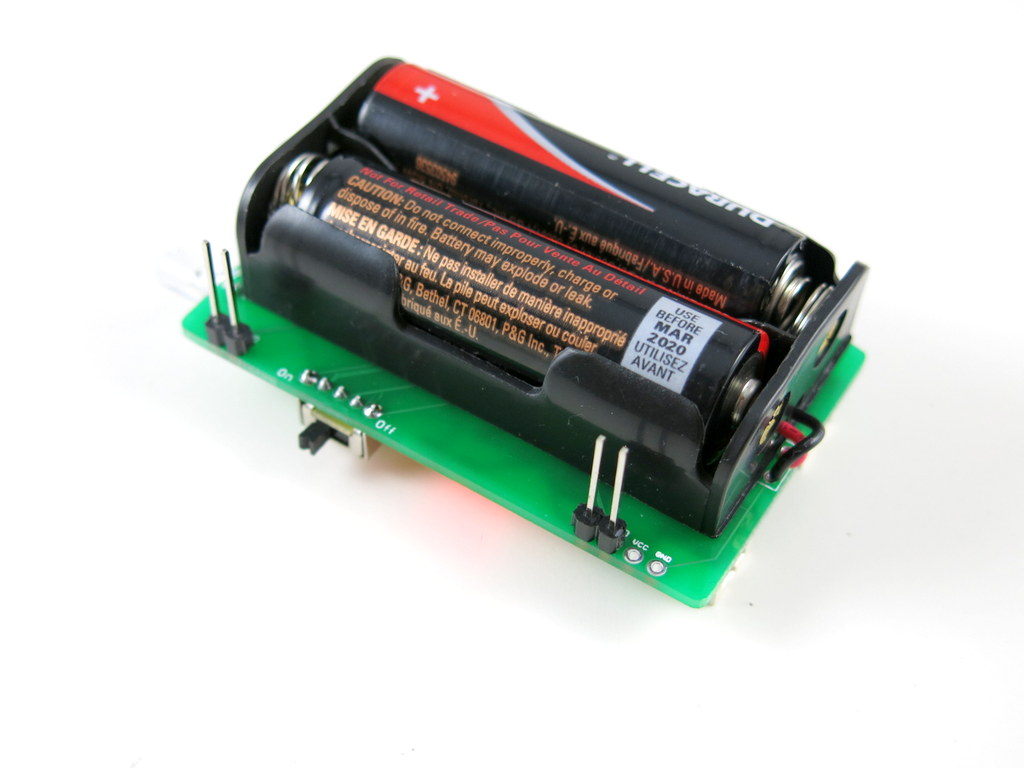
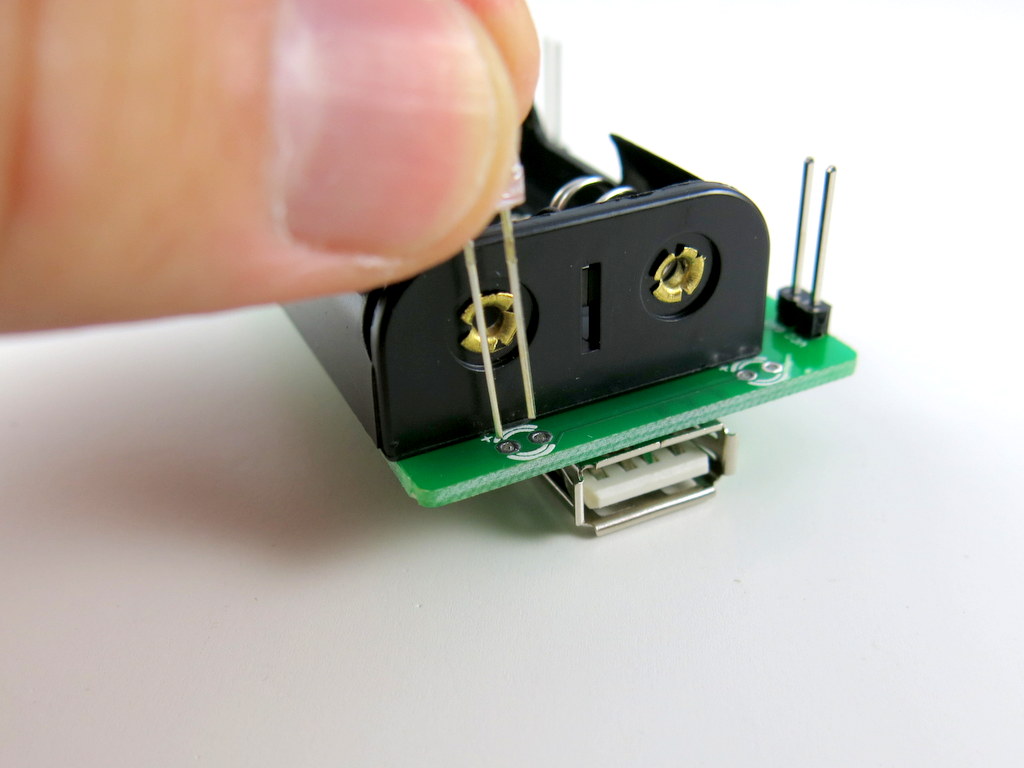
To solder the pin headers, first insert the two pin headers towards the end of a breadboard. This will help fixing them in place during soldering. Next, align the PCB holes on the AASaver with the pin headers. The height of the pin headers are designed to match the height of the battery holder, so if everything is correct, the battery holder should sit flat on the same surface with the breadboard. Note that this only works if the pin headers are inserted towards the end of a breadboard — if they are inserted in the middle of a breadboard, the battery holders will sit on top of the breadboard and this won’t work.
Also note that on the left side there is an additional pair of VCC-GND pin holes. These are designed for breadboards with extended width. So if your breadboard is wider than the one shown in the picture below, use the extended pair of pin holes.

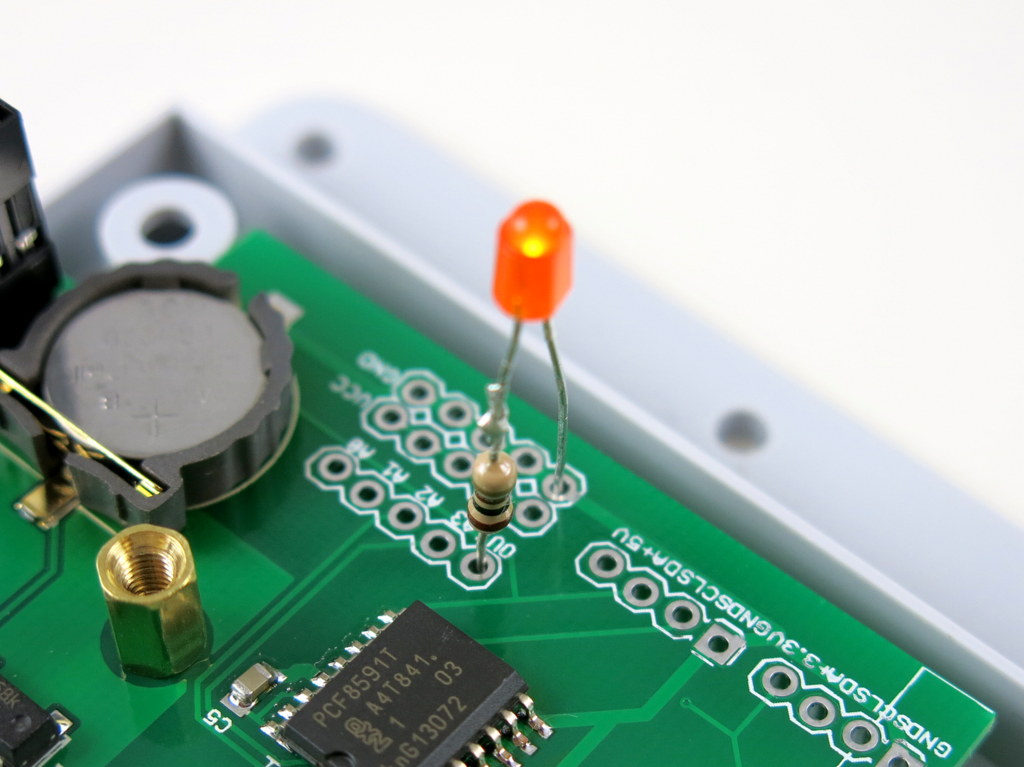
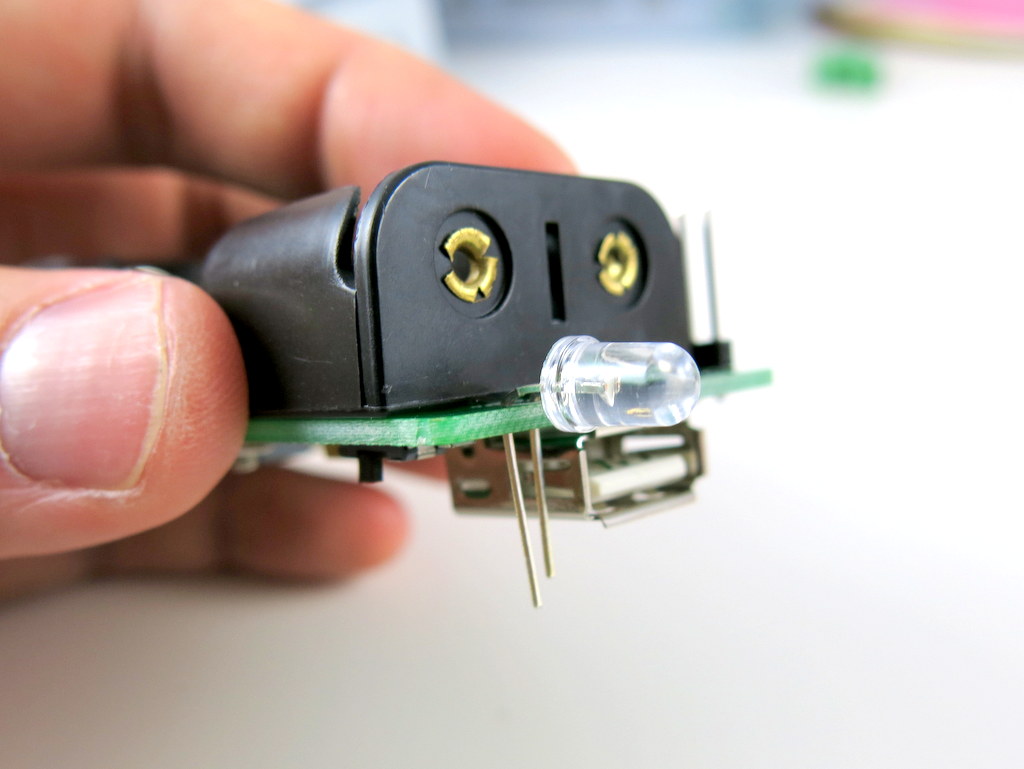
Next, to solder the flashlight LEDs, first insert the LEDs to the LED pin holes. These pin holes are located on the same side as the USB port. Make sure the longer lead of the LED goes into the hole marked ‘+’, as the picture below shows. Then gently bend the LED to 90 degrees, and solder the two leads. You can decide how long the LED should stick out of the circuit board, but in general, keep the LED close to the circuit board so that it doesn’t get accidentally bent. Once the LED is soldered in place, remember to cut the excessive leads. Follow the same process to solder the other LED.
Now the AASaver is completely assembled! Below are the usage instructions.
Step 3. Power it On and Flashlight LEDs
Pop in two AA batteries. Make sure you insert them in the correct orientation. Then turn on the power switch. The red Power Indicator LED should light up. If not, check the Source Selector Switch, and make sure it’s turned to ‘AA’ (instead of LiPo In). The Source Selector allows you to select either AA or LiPo as the power source.
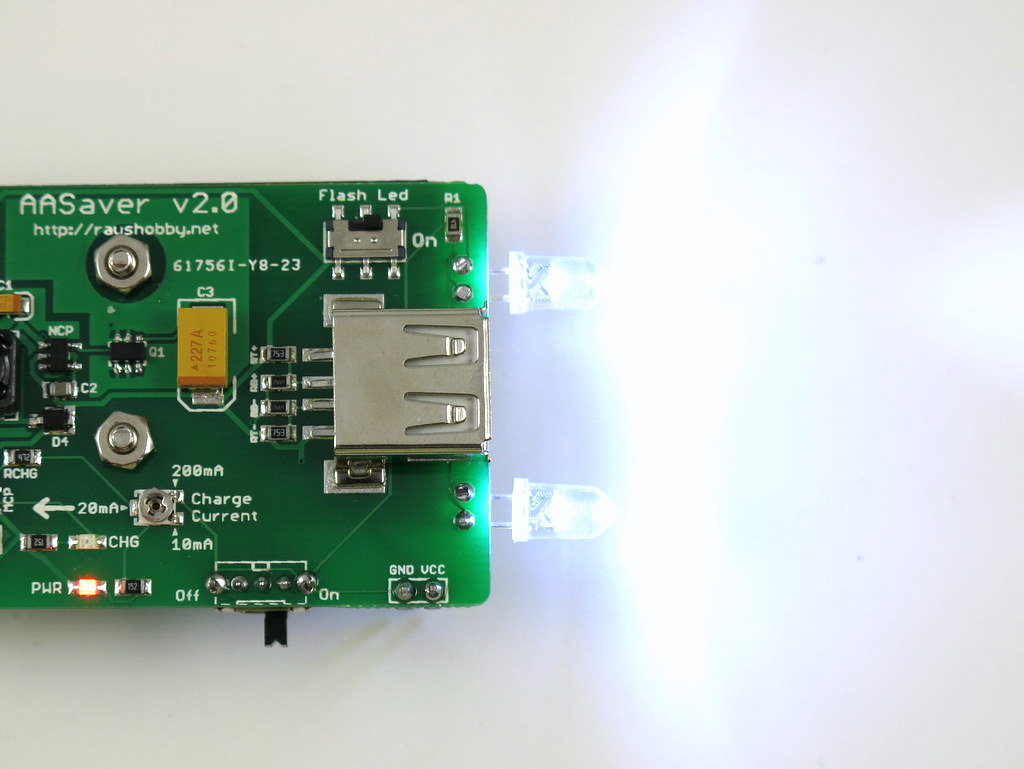
Next, turn Flash LED switch to ‘On’, and the two flashlight LEDs should light up. These are two bright flashlight LEDs, which work really well in the dark.
Note that the battery holder also sort of works for AAA batteries, although the contact is not very reliable. So if you want to pop in AAA batteries, try to use a small piece of aluminum foil to fill the gap between the AAA battery with the battery clips inside the holder. This should make it work perfectly.
Step 4. Use it as BreadBoard Power Supply
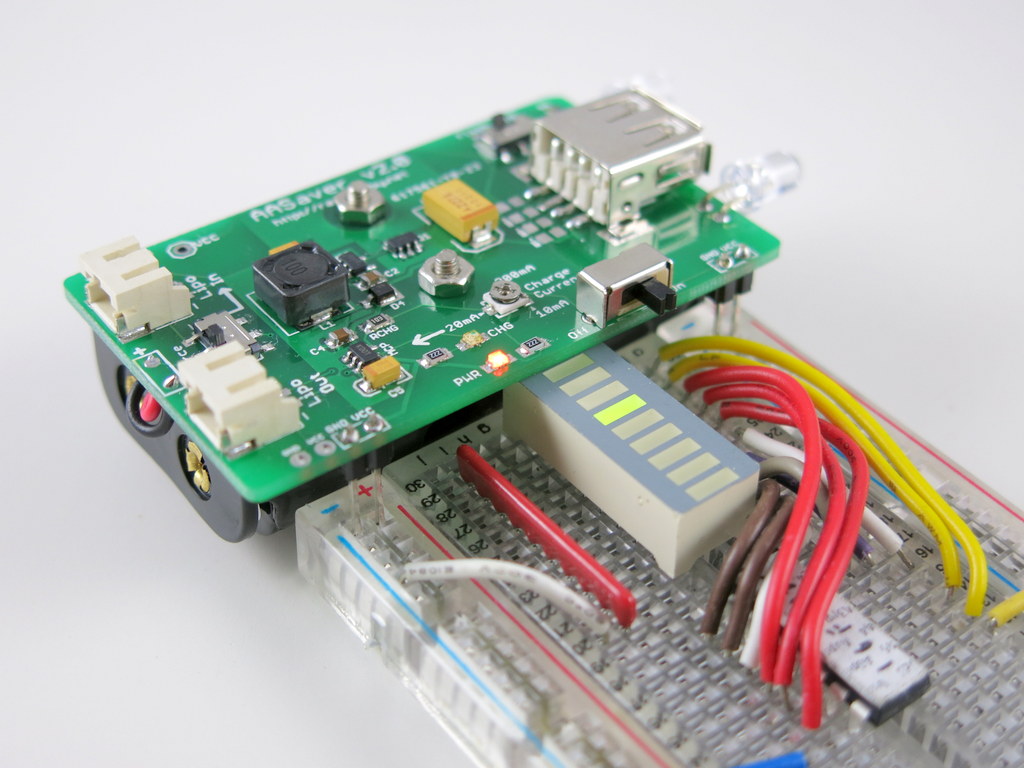
AASaver is also designed to function as a breadboard power supply. It provides regulated 5V, which is great for many circuit board experiments. To use this function, simply plug the AASaver (with pin headers down) into a breadboard. Note that unlike the AASaver 1.x, the body of the AASaver 2.0 will stay out of the breadboard, so this gives you more room on the breadboard.
Step 5. USB Charging
This is probably the most exciting new feature of the AASaver 2.0: you can now use it to charge USB devices. There is a built-in USB port that fits most standard USB cables. use it to charge your mobile phones, MP3 players, or anything that can charge through the USB port.
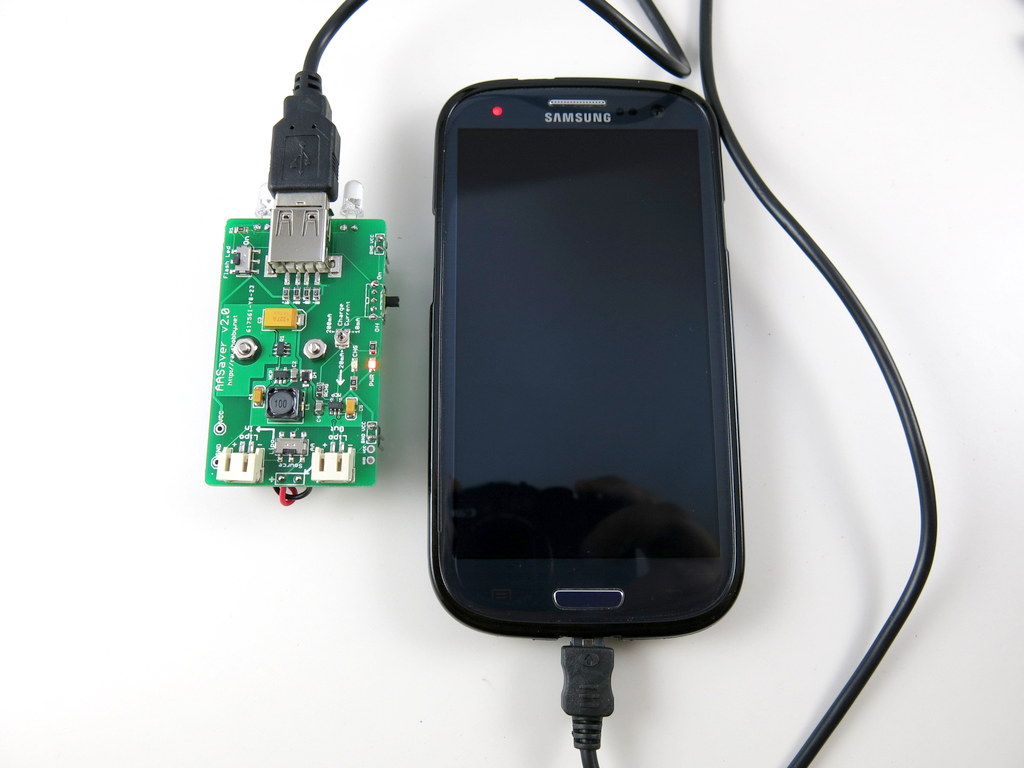
Using a fresh pair of batteries, the circuit can provide up to 500mA charging current @ 5V output, which is sufficient for most USB devices. Also, empirical results show that with a fresh pair of batteries, you can charge the iPhone and the Samsung Galaxy S3 phone up to 20% to 25%. This is not a whole lot, but is good enough as an emergency charger, since AA batteries are really easy to get at convenience stores.
Now, there is a tricky question: since the hallmark of the AASaver is to save old AA batteries, can I use old or even almost ‘dead’ AA batteries for USB charging? The answer is mostly NO. Well, there is no magic: most USB devices require a certain amount of charging current in order to charge properly. Mobile phones are particularly power hungry. To provide 100mA @ 5V output, the AA batteries need to output at least (100mA x 5V) = 0.5 Watt power, and usually more to account for the non-perfect efficiency of the boost converter. Depending on the battery condition, you may or may not be able to draw that much power from a pair of AA batteries — for fresh batteries, no problem; for close to depleted batteries, almost certainly no. Technically, the problem with old batteries is that as soon as you start to draw higher current, the voltage of the battery will drop, and so the boost converter will start sucking more current from it, causing the voltage to drop further. At some point, the boost converter will not be able to maintain a regulated output voltage, hence it will stop charging.
What if you really want to dump the juice from old AA batteries to your phone? There is actually a solution, and you should keep reading below.
Step 6. LiPo Charging
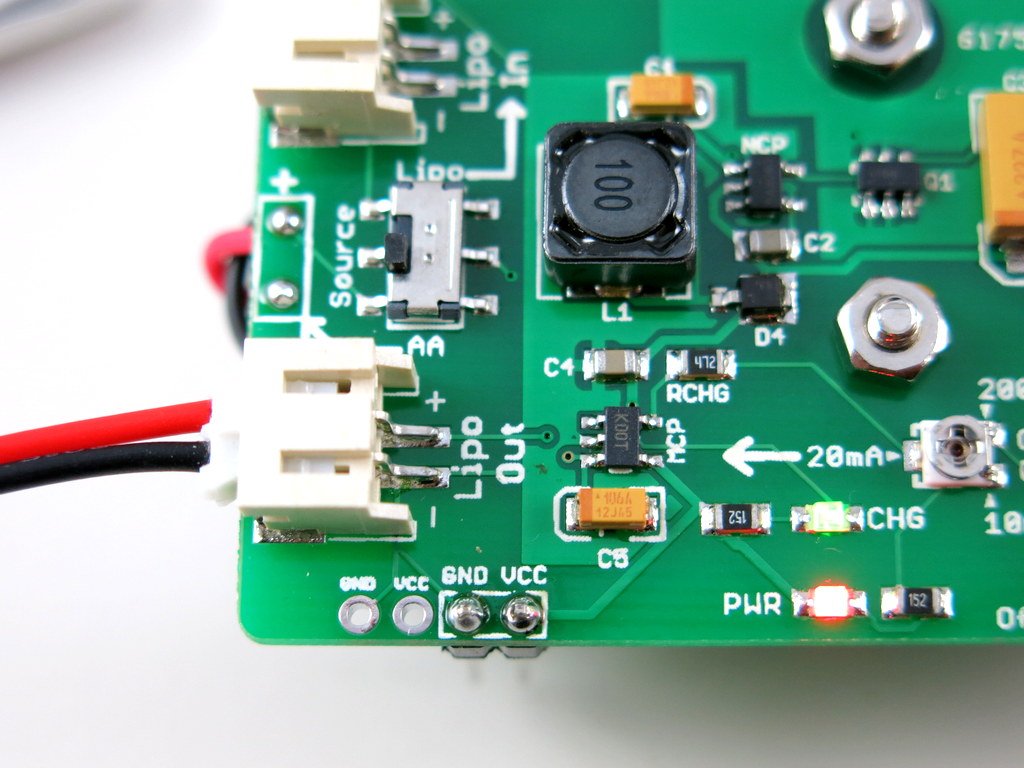
In addition to USB charging, one of the new features of the AASaver 2.0 is LiPo charging. If you have a 3.7V LiPo battery (we carry an inexpensive 700mAH LiPo battery at Rayshobby Shop), you can plug it in to the LiPo Out jack. This allows you to charge the LiPo battery from AA batteries with an adjustable charging current (from 10mA to 200mA). Once the battery is charging, you should see the green Charge Indicator LED light up.
To change the charging current, use a small screw driver to gently rotate the trimmer (SMT POT). The trimmer is very fragile, so be careful when adjusting it. The flat side of the trimmer top is the tail, and the opposite side is the head. The charging current is indicated by where the head is pointing to.
How does the adjustable charging current help? As I described above, the issue with old batteries is that they cannot provide much output current. But they should still work if you ‘dump’ the power slowly. For example, they probably can’t provide 100mA output current at 5V, but they are probably good with 20mA current at 5V. So the trick is to dump the power slowly into a LiPo battery. This is analogous to having a water pipe with very limited capacity: you can’t draw water from it at a high speed, but you can let it drip slowly into a bucket (in this case the ‘bucket’ is the LiPo battery). Then later you can dump the water from the bucket at a much faster rate.
So all in all, if you have an old pair of AA batteries, you can’t charge USB devices directly. But you can still use them to charge a LiPo battery at a slow rate. To do so, adjust the trimmer so that the green indicator LED will remain on. If the LED goes off, it mean either the charge current is too high, or too low. So adjust the trimmer to keep it on. As you will see in the next step, with the LiPo battery, you can then charge USB devices with much ease.
Step 7. Using LiPo Battery as Power Source
To use a LiPo battery as the power source, simply plug it in to the LiPo In battery jack, then make sure that you turn the Source Selector Switch up to point to LiPo In. This selects the LiPo battery as the power source, and everything else works the same way as before.
All right, this is the end of the story. I know this post is very long, but most of it will be moved to the AASaver Homepage after I refine the text and hear back comments and suggestions from users. If you are interested, please place an order for the AASaver from the Rayshobby Shop. We have a limited amount right now and more stock will become available in the upcoming weeks.
Questions and comments? Post them below or on the Rayshobby Forum.