Feed on
Posts
Comments

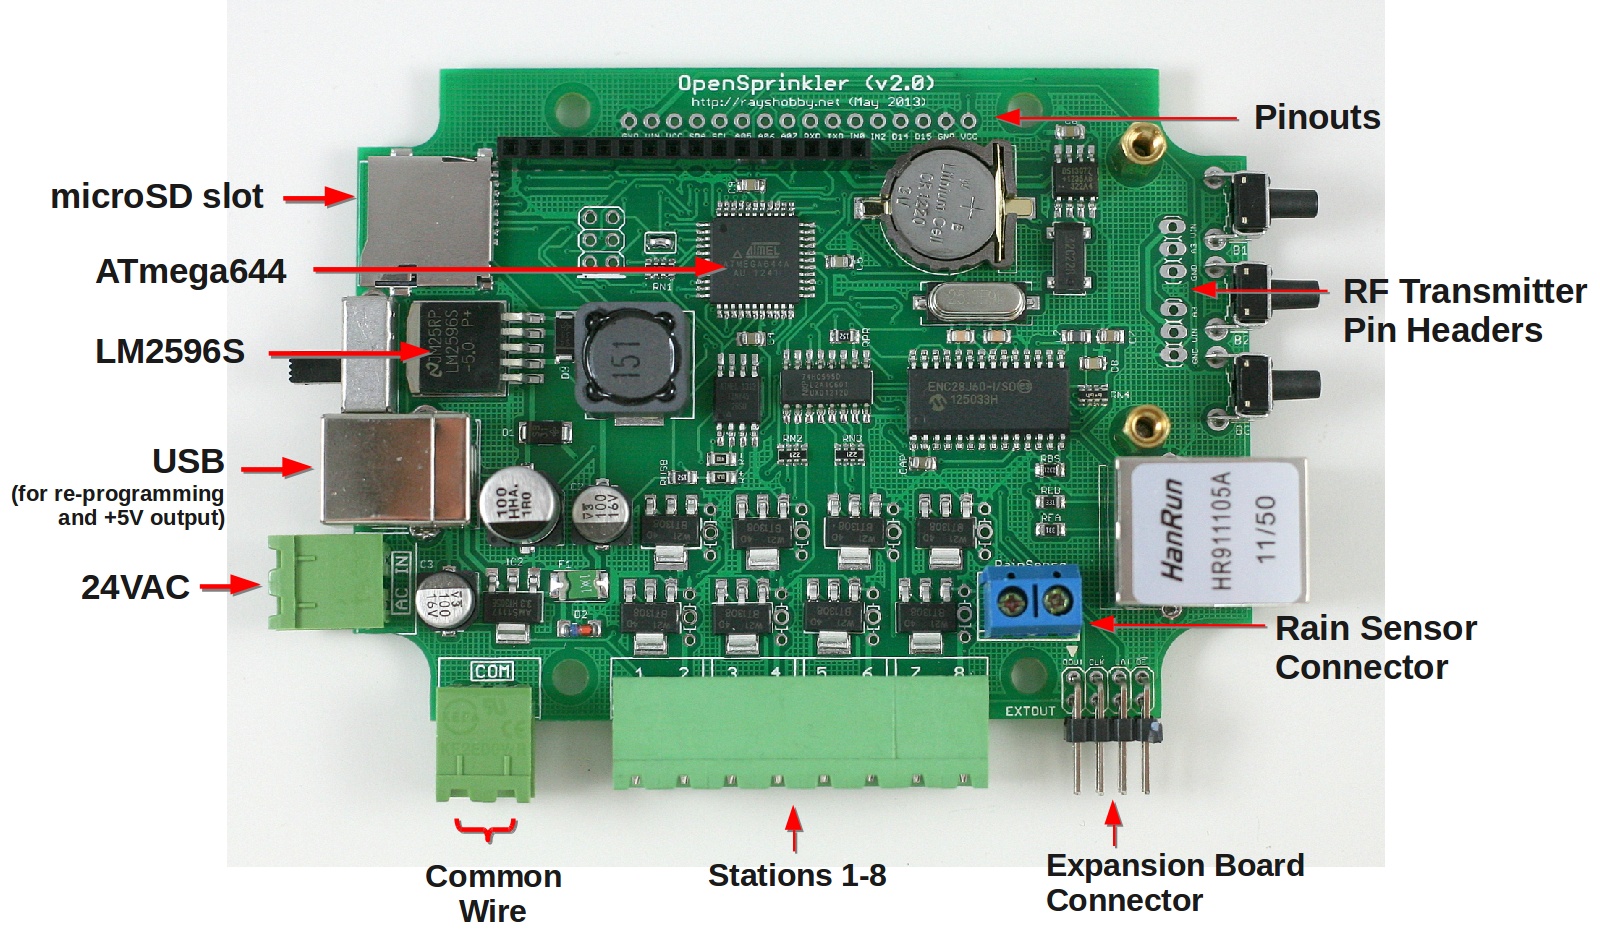
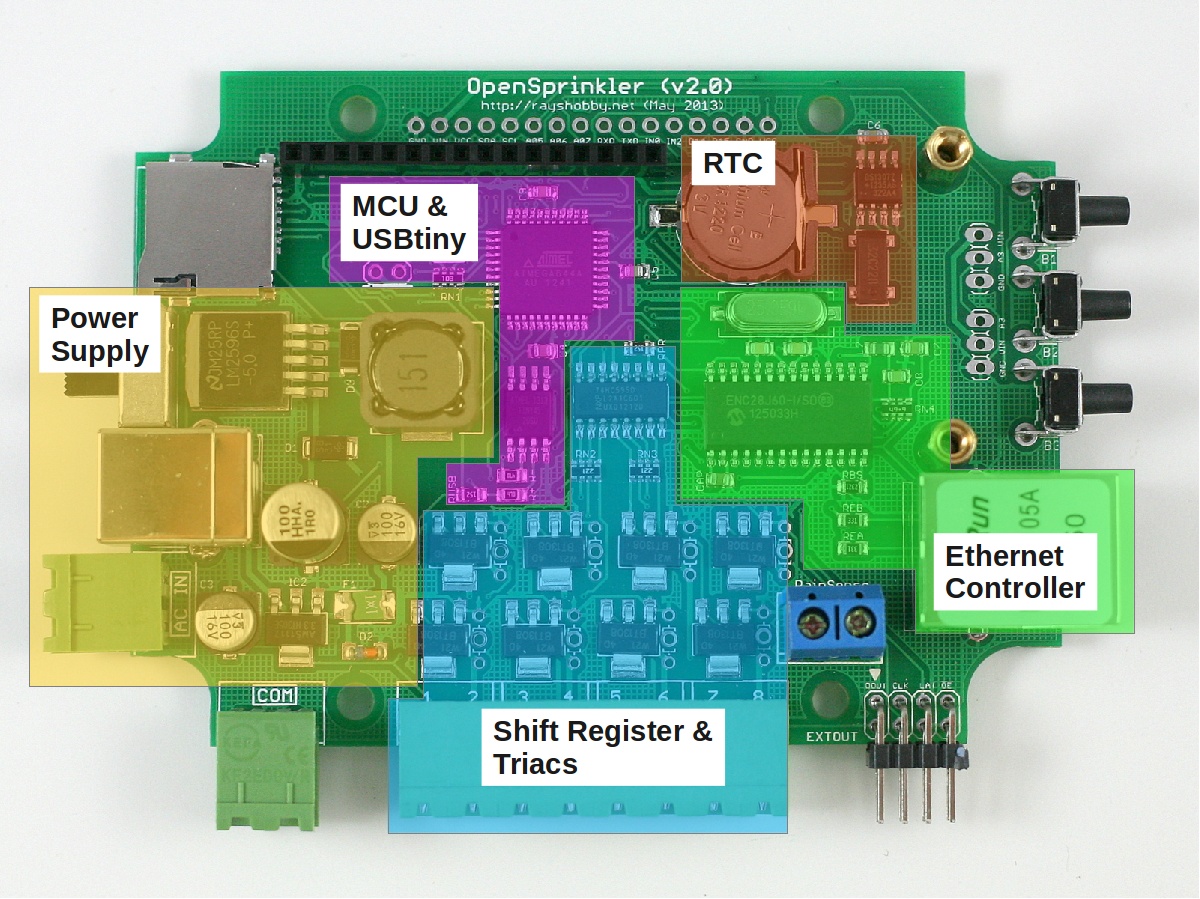
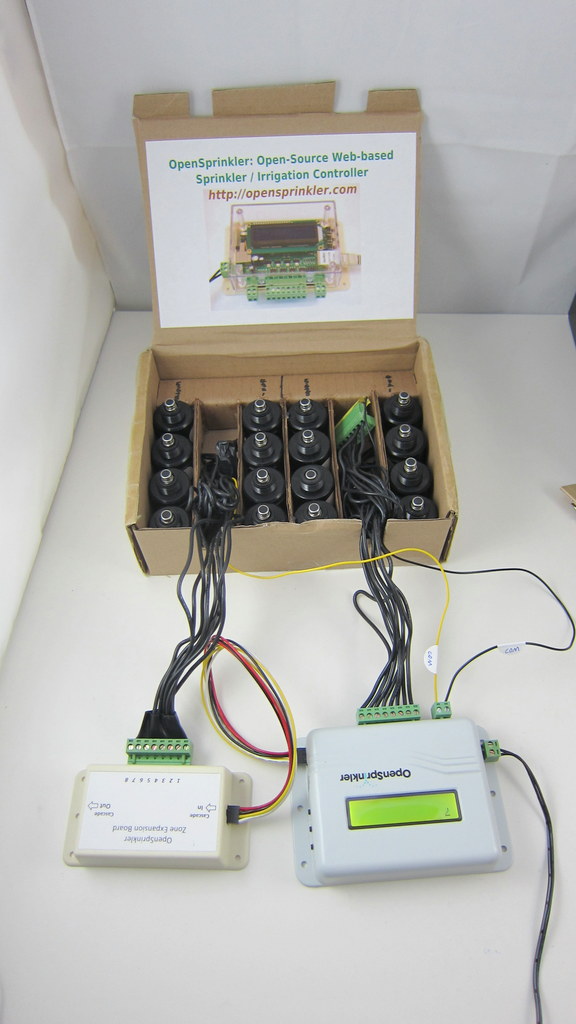
One of the hallmarks of OpenSprinkler / OpenSprinkler Pi is the capability of expanding the number of zones. While the main controller can only interface with 8 zones, you can expand beyond 8 zones by daisy chaining Zone Expansion boards. Each expansion board adds another 8 zones. Because the zone expansion is implemented using shift registers, there is no hardware limitation on the total number of zones (although there is a software limitation due to the memory space required to store the information and data for each zone). This provides an economic way to implement a large number of zones. On commercial sprinkler controllers, zone expansion is relatively expensive, sometimes requiring you to upgrade to a new controller all together. On OpenSprinkler, if you need more zones, just buy more expansion boards. The software is designed to handle all zones in a consistent user interface.

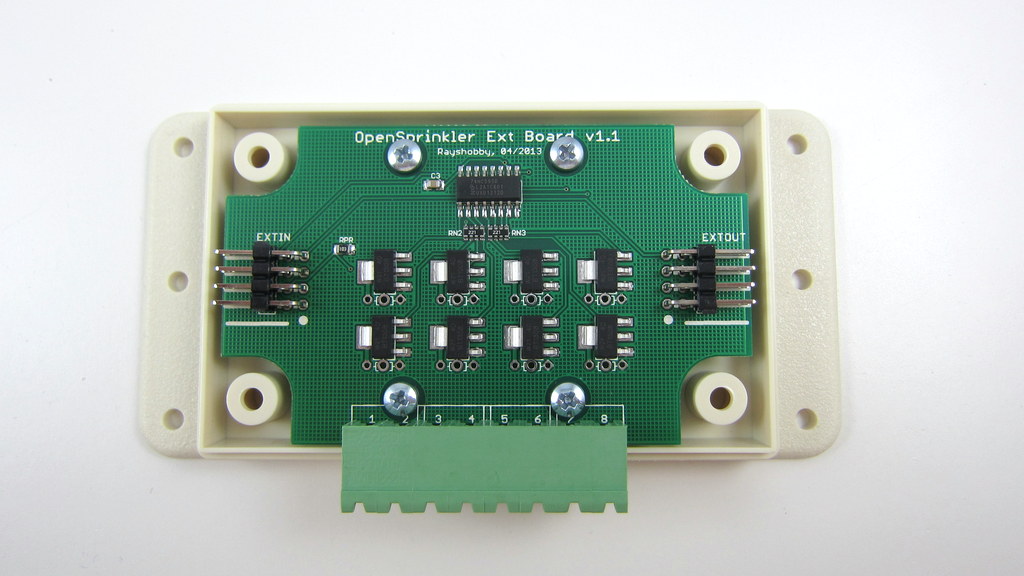
Previously, the zone expansion board is based on the same PCB as the main controller, and they share the same enclosure. This makes it easy to use a consistent enclosure design for both. However, the zone expansion circuit is actually very simple (just a shift register, a couple of resistors, and eight triacs), so it’s no need to commission a PCB as large as the main controller for something that can be much smaller. So I’ve decided to give the expansion board an upgrade, to version 1.1, which uses a much smaller PCB footprint, and its own dedicated enclosure (based on Serpac WM011).

IMG_3017IMG_3014

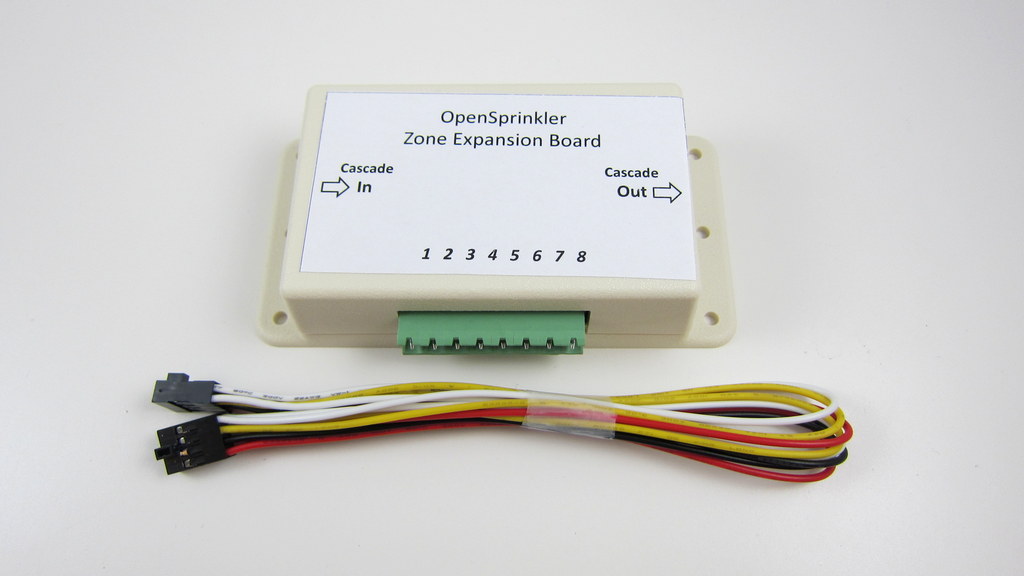
The new version is just a little over half the size of the original one. So in the same amount of space you can almost fit two expansion boards. This is particularly useful for people who has a limited space to fit a main controller and one or more expansion boards.

In addition, the zone expansion cable has been upgraded to use a polarized connector. Specifically, the connector has a small bump at the top, which matches the notch on the cutout of the enclosure. This way, there is only one possible orientation to insert the cable connector, thus preventing incorrect orientation:

IMG_3011IMG_3013

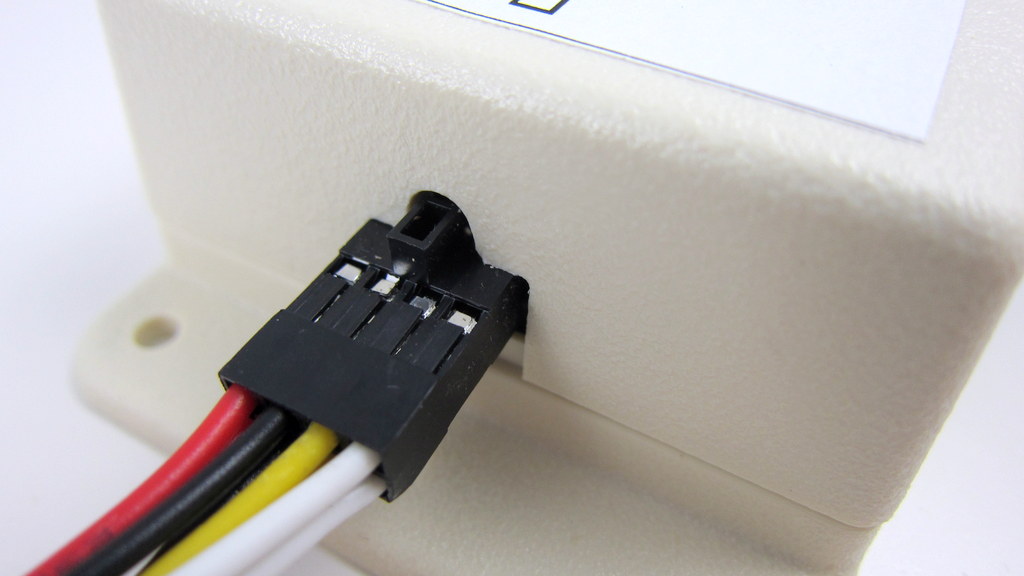
The picture on the left above shows the polarized cutout on the expansion board, and the picture on the right shows a similar cutout on the upcoming injection molded OpenSprinkler enclosure. This can help avoid mistakes when inserting the expansion cable. A special note that this cable has different pin connections with the previous version of expansion boards. So you should NEVER use the polarized cable with previous versions of zone expansion boards, or you may risk damaging your main controller!

Finally, expansion board v1.1 has added a 10K pull-down resistor, which when coupled with OpenSprinkler 2.0, allows the main controller to automatically detect the number of zone expansion boards. This feature is already included in hardware design, but hasn’t been implemented in software yet. The basic principle is that the main controller has a 1.5K pull-up resistor, and each expansion board has a 10K pull-down resistor. When multiple expansion boards are linked together, the pull-down resistors are connected in parallel, thus changing the divided voltage. By using an analog pin (which is internally wired to the voltage division point), the controller can easily calculate how many boards are linked together. A very simple solution!

To conclude, here is a short summary of the new features on OpenSprinkler Zone Expansion Board v1.1:

  • Reduced form factor, and dedicated enclosure.
  • Polarized expansion cable connector.
  • Added pull-down resistor for automatic detection of the number of expansion boards.
  • Besides, the new expansion board retains the on-board PCB holes to fit one MOV per zone, and it works with both OpenSprinkler and OpenSprinkler Pi.

That’s all for the update. This new version is in stock and available for purchase at Rayshobby Shop. Same old price!

After a few weeks of shipping these ‘underground’, I am finally happy to spread the words around: the OpenSprinkler Pre-Release v2.0s is officially available for sale! Note that this is the SMT assembled version — we don’t have DIY 2.0 yet. As usual, the first question to ask is what’s new in this version?

  • Upgraded MCU: OpenSprinkler 2.0 uses ATmega644, which is twice as much as ATmega328 in all aspects (i.e. flash memory size, GPIO pins, RAM, EEPROM, perhaps price as well 🙂 ). This makes it possible to add new features that I have planned ahead (e.g. weather-based control, logging, interfacing with wireless devices etc.) We will no longer be constrained by the flash memory size, well, at least for a while.
  • Upgraded Switching Regulator: the switching regulator (for 24VAC->5VDC conversion) has been upgraded from MC34063 to LM2596, which is less noisy and capable of outputting higher current. As more users are powering WiFi adapters through OpenSprinkler’s USB port, it’s important to make the power conversion section robust. The same circuitry is now also used in OpenSprinkler Pi. Details about this change can be found in this blog post.
  • Added microSD Card Slot: microSD card is useful for expanding the storage size of a microcontroller. This s great for a lot of purposes, such as logging, storing a lot of sprinkler programs, Javascript files etc. A standard microSD card shares the SPI interface and requires only one extra GPIO pin to operate. Hence adding microSD card support is a no brainer!
  • Expansion Board Detection: this allows the main controller to automatically detect the number of zone expansion boards linked to the controller. Not so crucial, but neat. The implementation is actually quite simple: it uses a pull-up resistor on the main controller and one pull-down resistor on each expansion board to form a voltage divider. By checking the voltage using an analog pin, the mcu can easily calculate how many boards are linked.
  • Other Features: given the plentiful GPIO pins available on ATmega644, I’ve added support to adjust LCD contrast and backlight (using two PWM pins), a set of pin headers for plugging in an off-the-shelf RF transmitter (for interfacing with wireless devices). The other un-used pins are made available in the pinout area (including three analog pins, two interrupt pins, two digital pins, as well as TXD, RXD, SDA and SCL).

OK, that’s quite a detailed list of new features. Here is an annotated diagram of the actual hardware:

os20_component_diagram

Also, just for fun, a diagram that shows each module of the circuit and where they are located on the PCB:

os20_module_diagram

The reason I call this the Pre-Release 2.0 is that the official 2.0 will use the injection molded enclosures I blogged about in this post. While that is already in production at SeeedStudio, I can’t give a reliable estimate of how long it will take for the final products to arrive. There have already been multiple delays, so I won’t be surprised if there are more… Other than the difference in the enclosure design, the pre-release 2.0 hardware is the same as the final 2.0.

If you are wondering what I mean by ‘shipping these underground’ at the beginning of the post — we’ve been automatically upgrading the recent orders of assembled OpenSprinkler v1.4s to v2.0s. Why not make it public? Well, there are several reasons. The first is that due to the Maker Faire and the vacation after that, I haven’t had time to finish the documentations, and I’m reluctant to officially release a product when the documentations are not ready yet. Second, I’ve been experimenting with minor changes of the 2.0 design, and we’ve been shipping several small batches, each with slight different hardware design. This is an important process to get user feedback, and to iron out all engineering issues before the official release. Finally, as many users have been waiting for 2.0, I don’t want to suddenly get into an overload situation, where the number of orders exceed our capacity to process them.

In terms of software, OpenSprinkler 2.0 is currently flashed with firmware 2.0.0, which is functionally the same as firmware 1.8.3, except for the additional options such as LCD contrast and backlight, and the support for a higher number of expansion boards and programs. More exciting firmware features will be gradually added over time. Also, starting from firmware 2.0.0, the source code can be compiled in Arduino 1.x (latest stable version is 1.0.5), and this is also the recommended Arduino version to compile OpenSprinkler code. I will continue to provide a VirtualBox image which has everything needed for compilation set up and ready to go.

The final bit of news: if you are interested in DIY 2.0, unfortunately that won’t be available for at least a couple of months. The delay is partly because the new injection molded enclosures are not ready yet (there is no space in the current enclosure to fit all through-hole components), and partly because there are a few design decisions I haven’t ironed out yet. So at least for a couple of months we will keep offering DIY 1.42u for anyone who wants to build OpenSprinkler from scratch.

So much for the announcement of OpenSprinkler Pre-Release 2.0. Feel free to leave your comments and suggestions below, or at the Rayshobby Forum. Thanks!

Contrary to what I mentioned in a previous post, I have made the very last-minute decision to attend the Bay Area Maker Faire 2013. I will be flying out of Massachusetts early tomorrow morning, and get to the Maker Faire ground in the afternoon to do initial setup. Aaron Newcomb has kindly volunteered to help me at the booth. If you are planning to come to the Maker Faire, be sure to drop by our booth (exhibit 3375, Expo Hall with commercial makers), and watch our demos.

We will be showing most products I’ve developed so far: OpenSprinkler (including DIY 1.42u, the new assembled OpenSprinkler 2.0, and new injection molded enclosure), OpenSprinkler Pi, SquareWear (with lots of pictures of wearable electronics workshops I’ve hosted int he past, and SquareWear demos), AASaver (including the upcoming AASaver 2.0 I just blogged about earlier tonight). So it will be quite a show!

It has been fun to prepare the demos, and a lot of work too. Below are my sketches for two of the OpenSprinkler demos:
IMG_2713IMG_2714

and some real gears to go with the two demos:

IMG_2715IMG_2712

In terms of promotional materials, new this year I have made a banner and some business cards to be distributed at the table:
IMG_2718IMG_2719

These were made in the last minute, so they are not as professionally looking as I wanted, but the essential information is there 🙂 Also, I will have lots of colorful info pages and pictures at the table.

Time to go to sleep and prepare for the trip tomorrow. Hope to see you at the Maker Faire OpenSprinkler booth!

I know, it has been a pain to compile OpenSprinkler 1.x source code, mainly because the firmware has grown to the point that you can only compile it successfully (i.e. within 32KB size) under a particular version of avr-gcc (4.5.3) in a particular version of Linux. This is very annoying for users who want to modify the source code and experiment with new features. That’s why I have decided to create a VirtualBox image with all the necessary software and settings that you need to easily compile it, without having to install a separate Linux system yourself.

Before you continue reading, please note that the VirtualBox Image is only useful if you are trying to modify the compile the source code yourself. To upload a pre-compiled firmware, you do not need any of these.

Wait, What?
VirtualBox is a free software that you can use to install and run a virtual operating system (OS) on your existing OS. Let’s say your computer runs Windows (i.e. the host OS). With VirtualBox, you can run a virtual OS (e.g. Linux) under the host OS, as if it is a Windows application but it’s a fully functional Linux system. This makes it easy to switch between different OS without having to restart your computer. VirtualBox is quite mature now. It makes use of hardware virtualization features available on most modern CPUs to provide fast speed. So even though you are running a virtual OS, it feels just as fast as a native OS.

One of the benefits of virtual OS is that the entire OS and all settings are stored in a single file — the VirtualBox Image — on your host system. So you can easily replicate the same virtual OS on different hosts by a simple copy-paste of the image file.

Download
To make it easy to compile OpenSprinkler code, I created a VirtualBox Image for Linux Mint 13 with all the necessary software installed. You can download the virtual image file from here:

Warning: the file size is 2.1GB, so it will take some time to download. Meanwhile, you can read the instructions below.
User and Password: the virtual OS has a default sudo user opensprinkler and the password is the same as the user name.
VMWare Users: check this forum post for instructions of converting VirtualBox image to VMWare image.
Unzip in Windows: do not use the built-in zip/unzip tool of Windows because it seems unable to recognize the correct file size. Use a third-party software such as 7-Zip or WinRAR.


Instructions
Step 1. Install VirtualBox

Download and install the latest version of VirtualBox from its official website. You should install the version corresponding to your host OS (Windows, Mac etc.). In the following I will use Windows as an example. After installing the software, you also need to install the VirtualBox Extension Pack. This is platform independent.

Step 2. Add a New Virtual OS
Unzip the file you downloaded to a local folder. I recommend creating a folder named VirtualBox VMs in your home directory, and unzip everything there. Next, run VirtualBox you just installed, and click on menu Machine -> Add. Navigate to the folder VirtualBox VMs \ LinuxMint13 and select the LinuxMint13.vbox file. Then click on Open to add the file. Now you should see an item named LinuxMint13 in the virtual OS list.

Click on Settings and make sure the default settings are compatible with your system. In particular, you should check if the Base Memory allocated to your virtual OS is not too large (it defaults to 2GB but depending on how much physical memory you have you may need to reduce it to 1GB).

virtualbox_newvirtualbox_settings

Now you can click on Start to start the virtual OS. There will be a bunch of dialog boxes popping up with various information. If this is the first time you are using VirtualBox, you should read them thoroughly. Once the virtual OS boots up, you should see the desktop as shown in the following. If you want, you can press Ctrl-F to quit full screen mode, so the virtual OS will look like a normal Windows application running alongside with other applications.

virtualbox_desktop

Step 3. Compile OpenSprinkler Code
Arduino 0023 is pre-installed in the virtual OS. So you can just double click on the desktop icon to run it. Also, firmware 1.8.3 source code is pre-installed. So all you need to do to get started is to go to menu File -> Examples -> OpenSprinkler -> interval_program and then you can compile the code directly. If you need to change and file, or update to new firmware source code, everything is located in the arduino-0023/libraries/OpenSprinkler folder on the desktop.

virtualbox_arduino

Note: the following two steps are revelent:

  • Specify your hardware version by opening file arduino-0023/libraries/OpenSprinkler/defines.h, and uncomment one of the lines #define SVC_HW_VERSION that corresponds to your hardware version. To identify your hardware version, check the version number printed at the top of your OpenSprinkler circuit board. The current version is 1.4.
  • If you own OpenSprinkler v1.0 or 1.1, you can no longer upload a program through FTDI. Instead, you need an external ISP programmer. An inexpensive USBtiny programmer is available at Rayshobby Shop.

Step 4. Upload Compiled Code
To upload the compiled code to your OpenSprinkler controller, first connect OpenSprinkler to your computer through the USB port. Then go to the VirtualBox software, and click (in the menu) Devices -> USB Devices -> USBtinySPI. This will allow the OpenSprinkler’s built-in USBtiny programmer to pass through directly to the virtual Linux and appear as a native device. Finally, click on the Upload button in Arduino and you are all set.

virtualbox_usbtiny

That’s all. Hope my effort is helpful for those who want to compile OpenSprinkler source code. Feel free to leave comments, and enjoy playing with the virtual Linux!


Hi All, OpenSprinkler will have a booth at the Bay Area Maker Faire again this year. Due to a number of reasons, I cannot make it myself, but Aaron Newcomb from California has generously volunteered to host the booth for me. He will be showing demonstrations with the OpenSprinkler controller. There will also be flyers and promotional materials distributed there.

In order to make this a success, we would like to have a few more people to help. If you are going or planning to go to the Maker Faire and can help at the booth even for just a couple of hours, that would be great and much appreciated. I am happy to send free gifts to you. Anyone who can help at the booth for at least 4 hours either Saturday or Sunday will additionally get a free Maker entry pass. This is covered by the exhibit.

If you are interested in helping, please respond to this forum post by Aaron, or email me. Thanks!


Bay Area Maker Faire Web Badge

« Newer Posts - Older Posts »