Feed on
Posts
Comments

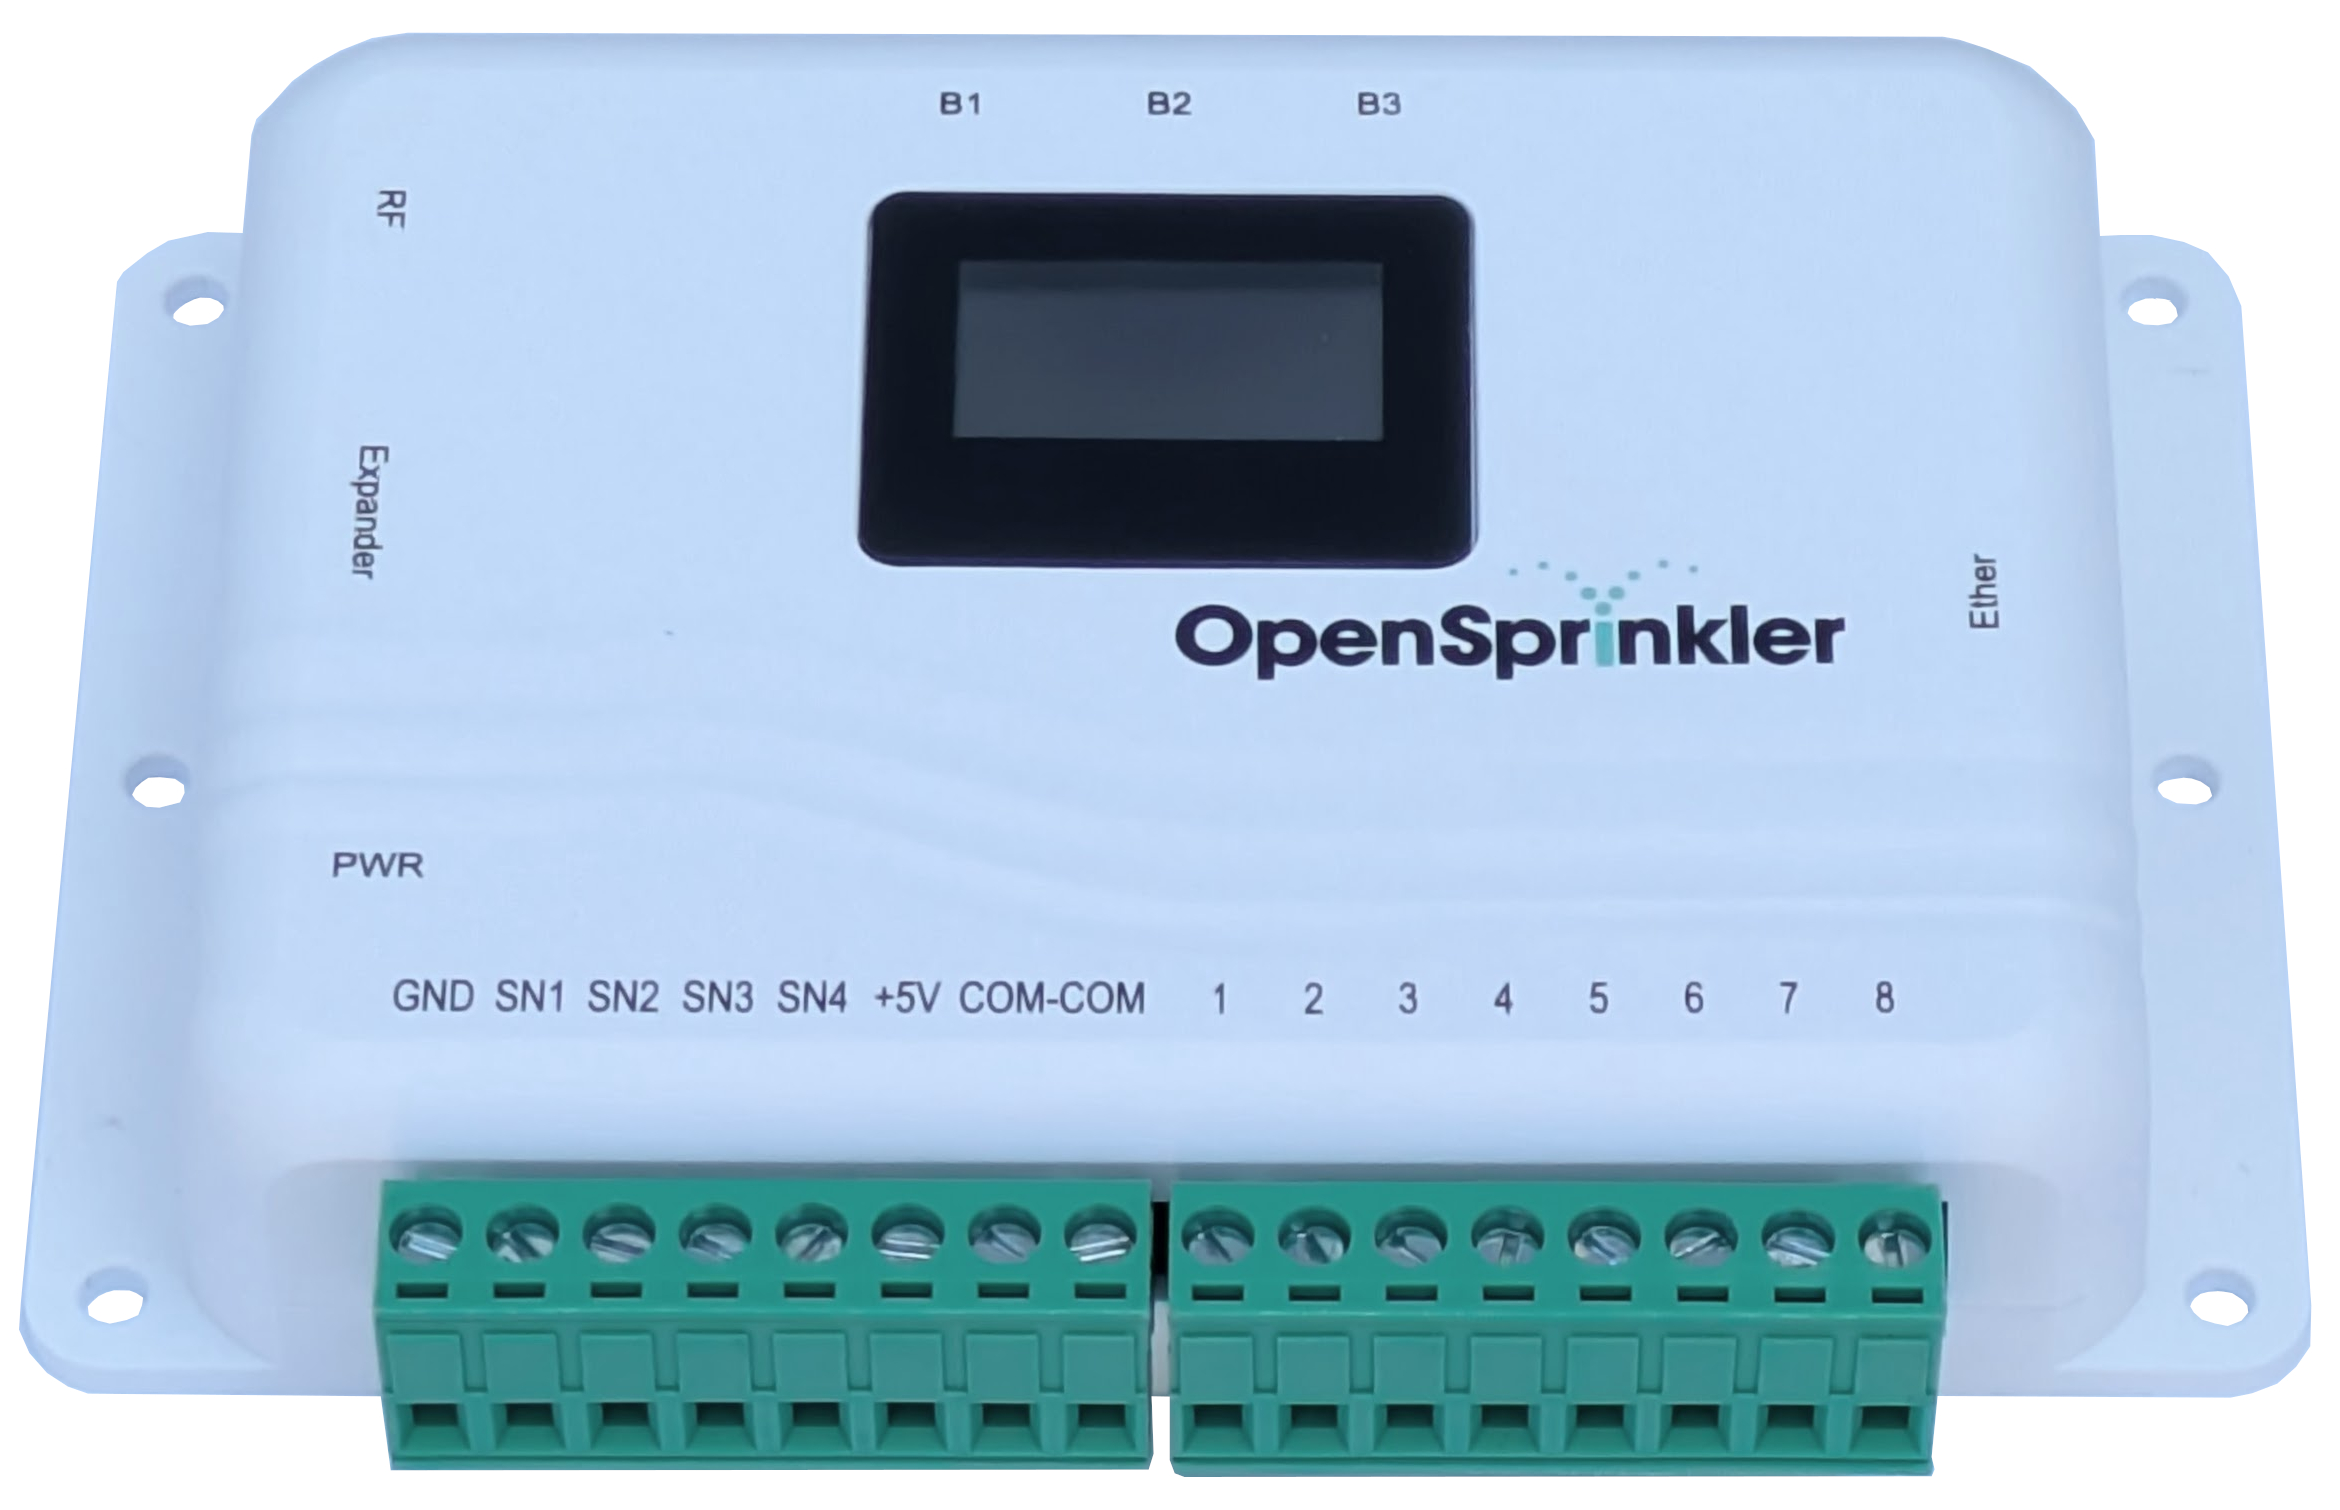
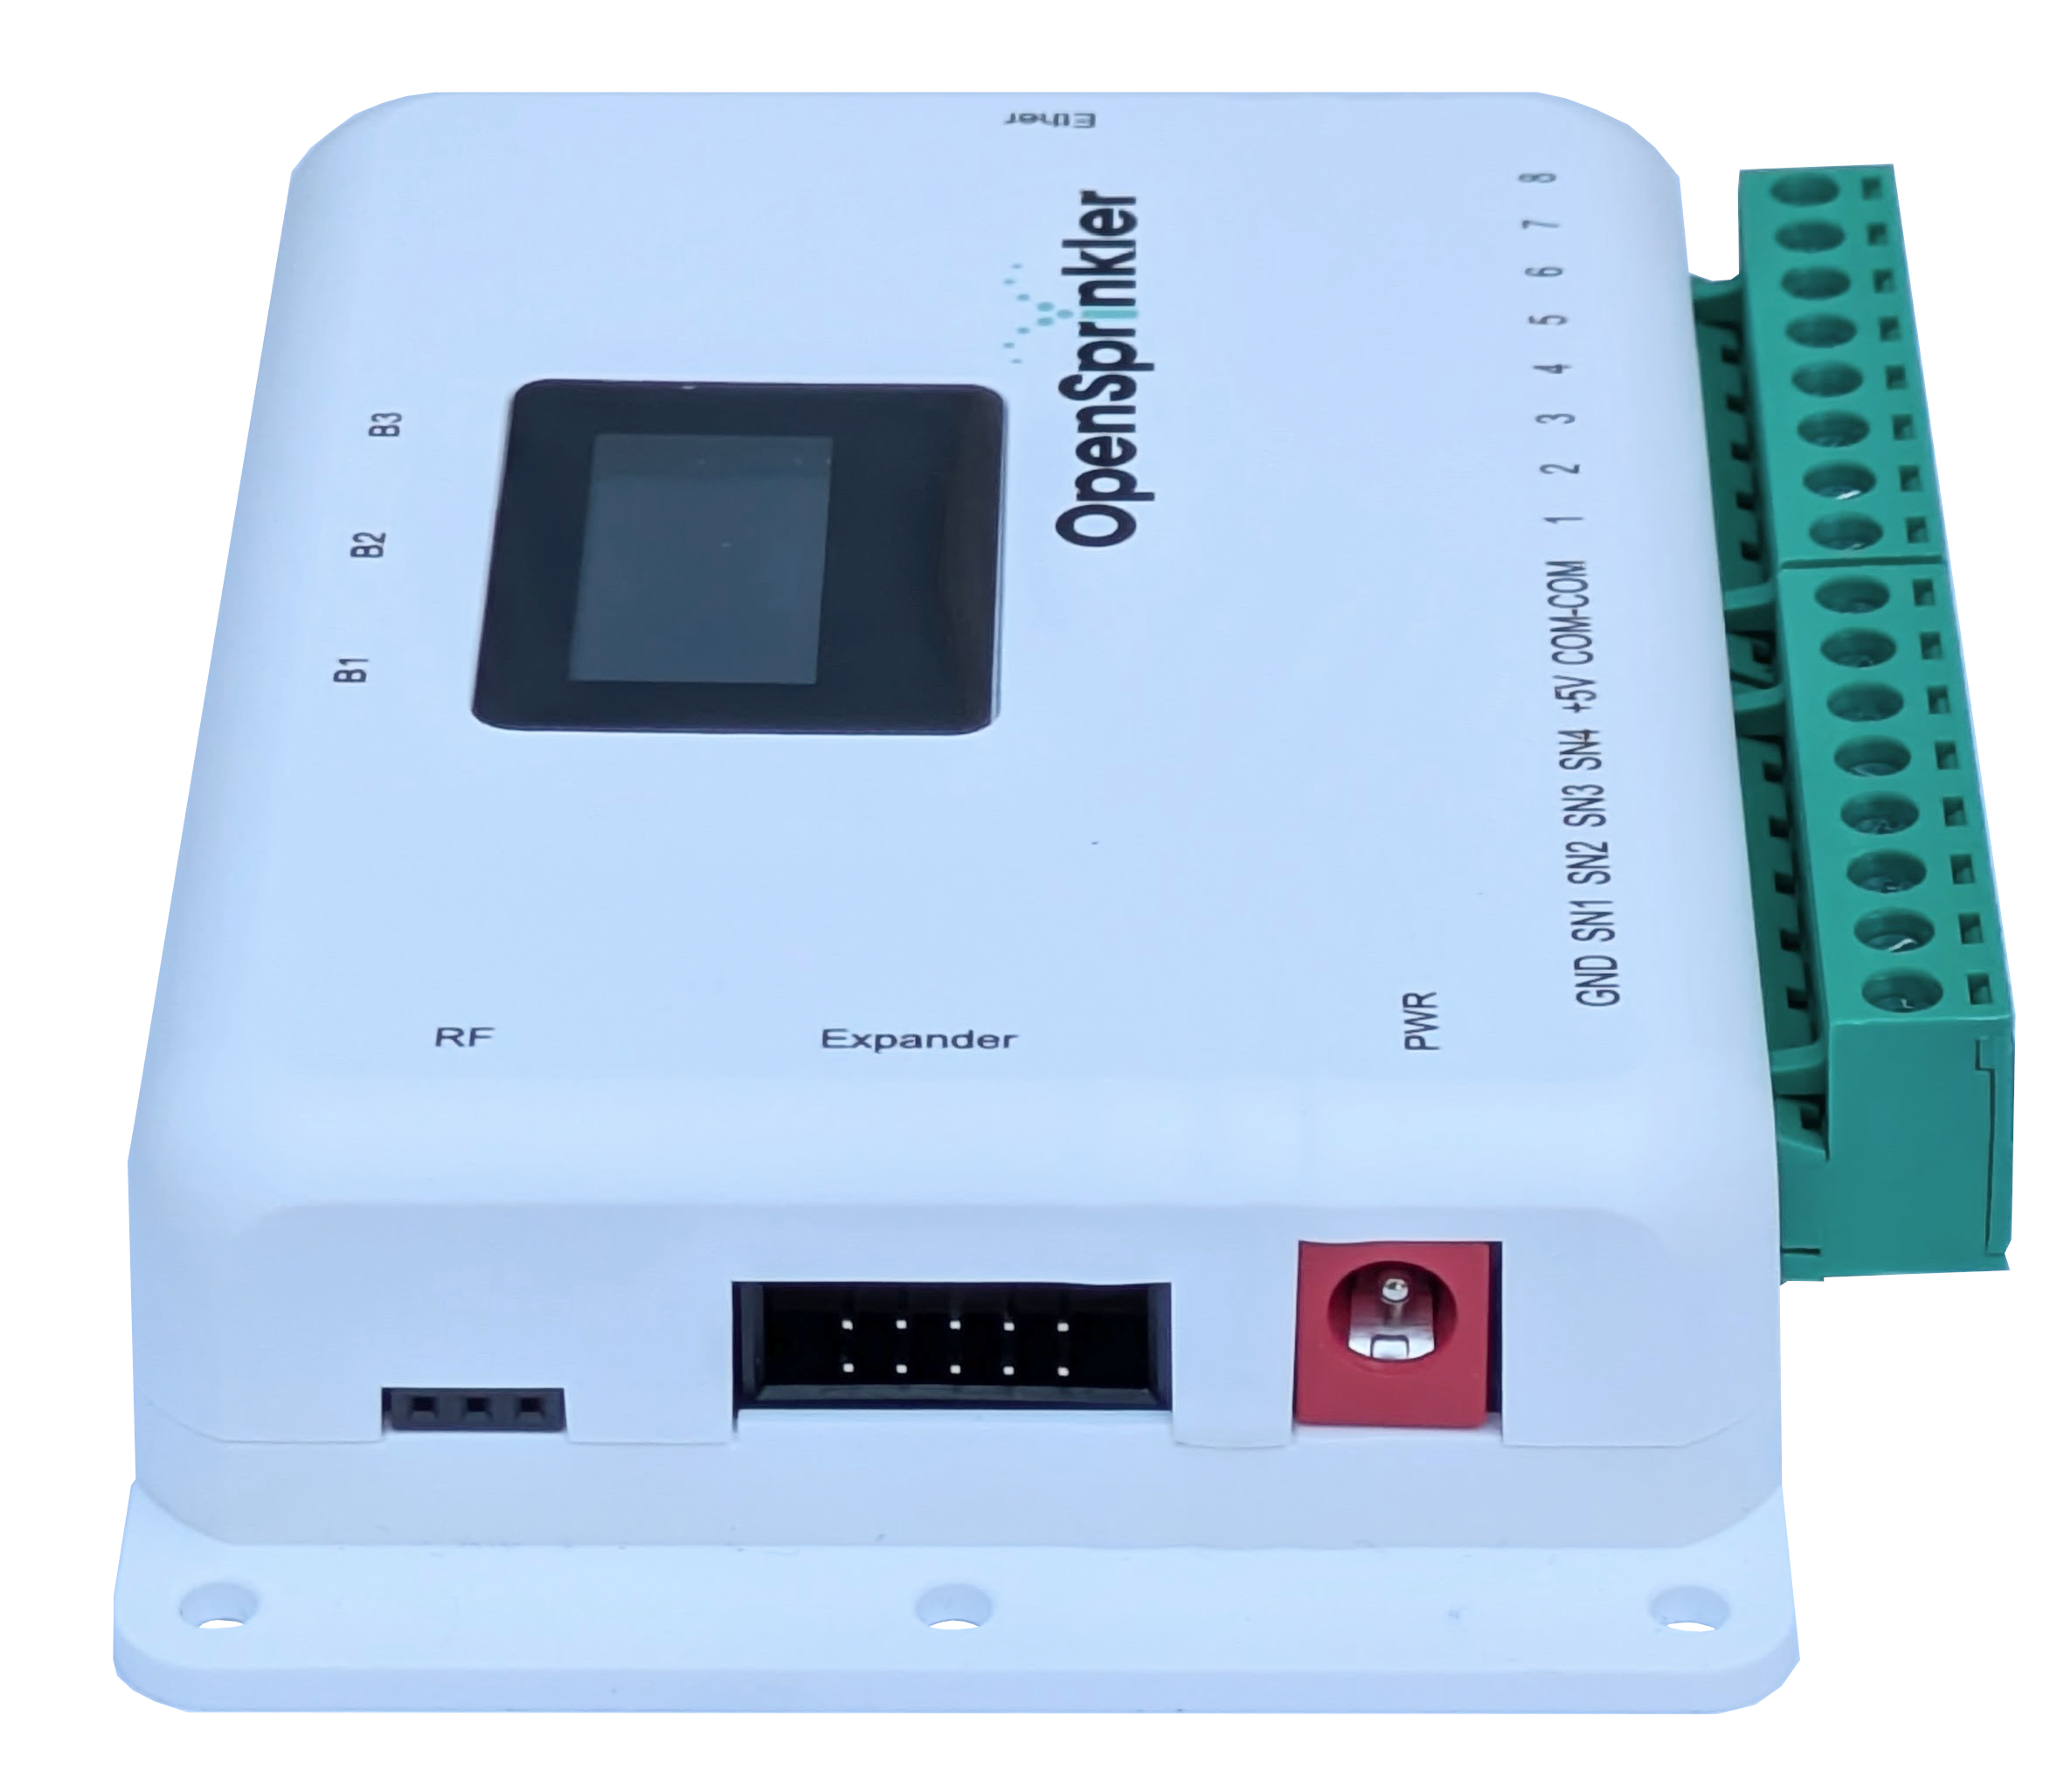
Exciting news! We’re gearing up to launch a new hardware revision of the AC-powered OpenSprinkler: introducing version 3.4 — a sleek, refreshed take on the ESP8266-based OpenSprinkler. While it retains the same familiar circuit as the current v3.3, version 3.4 features a completely redesigned enclosure for a refreshing new look. Check out the sneak peek photos below!


TL;DR – What’s New in OpenSprinkler v3.4:

  • Single-layer circuit – Replaces previous 2-layer design to reduce assembly time and cost
  • Revised enclosure size – Lower profile and adjusted dimensions due to circuit layout change
  • Two extra sensor ports (SN3, SN4) – Added to standardize parts and simplify sourcing
  • Switched to power barrel jack – Easier power adapter hookup, no wire stripping required
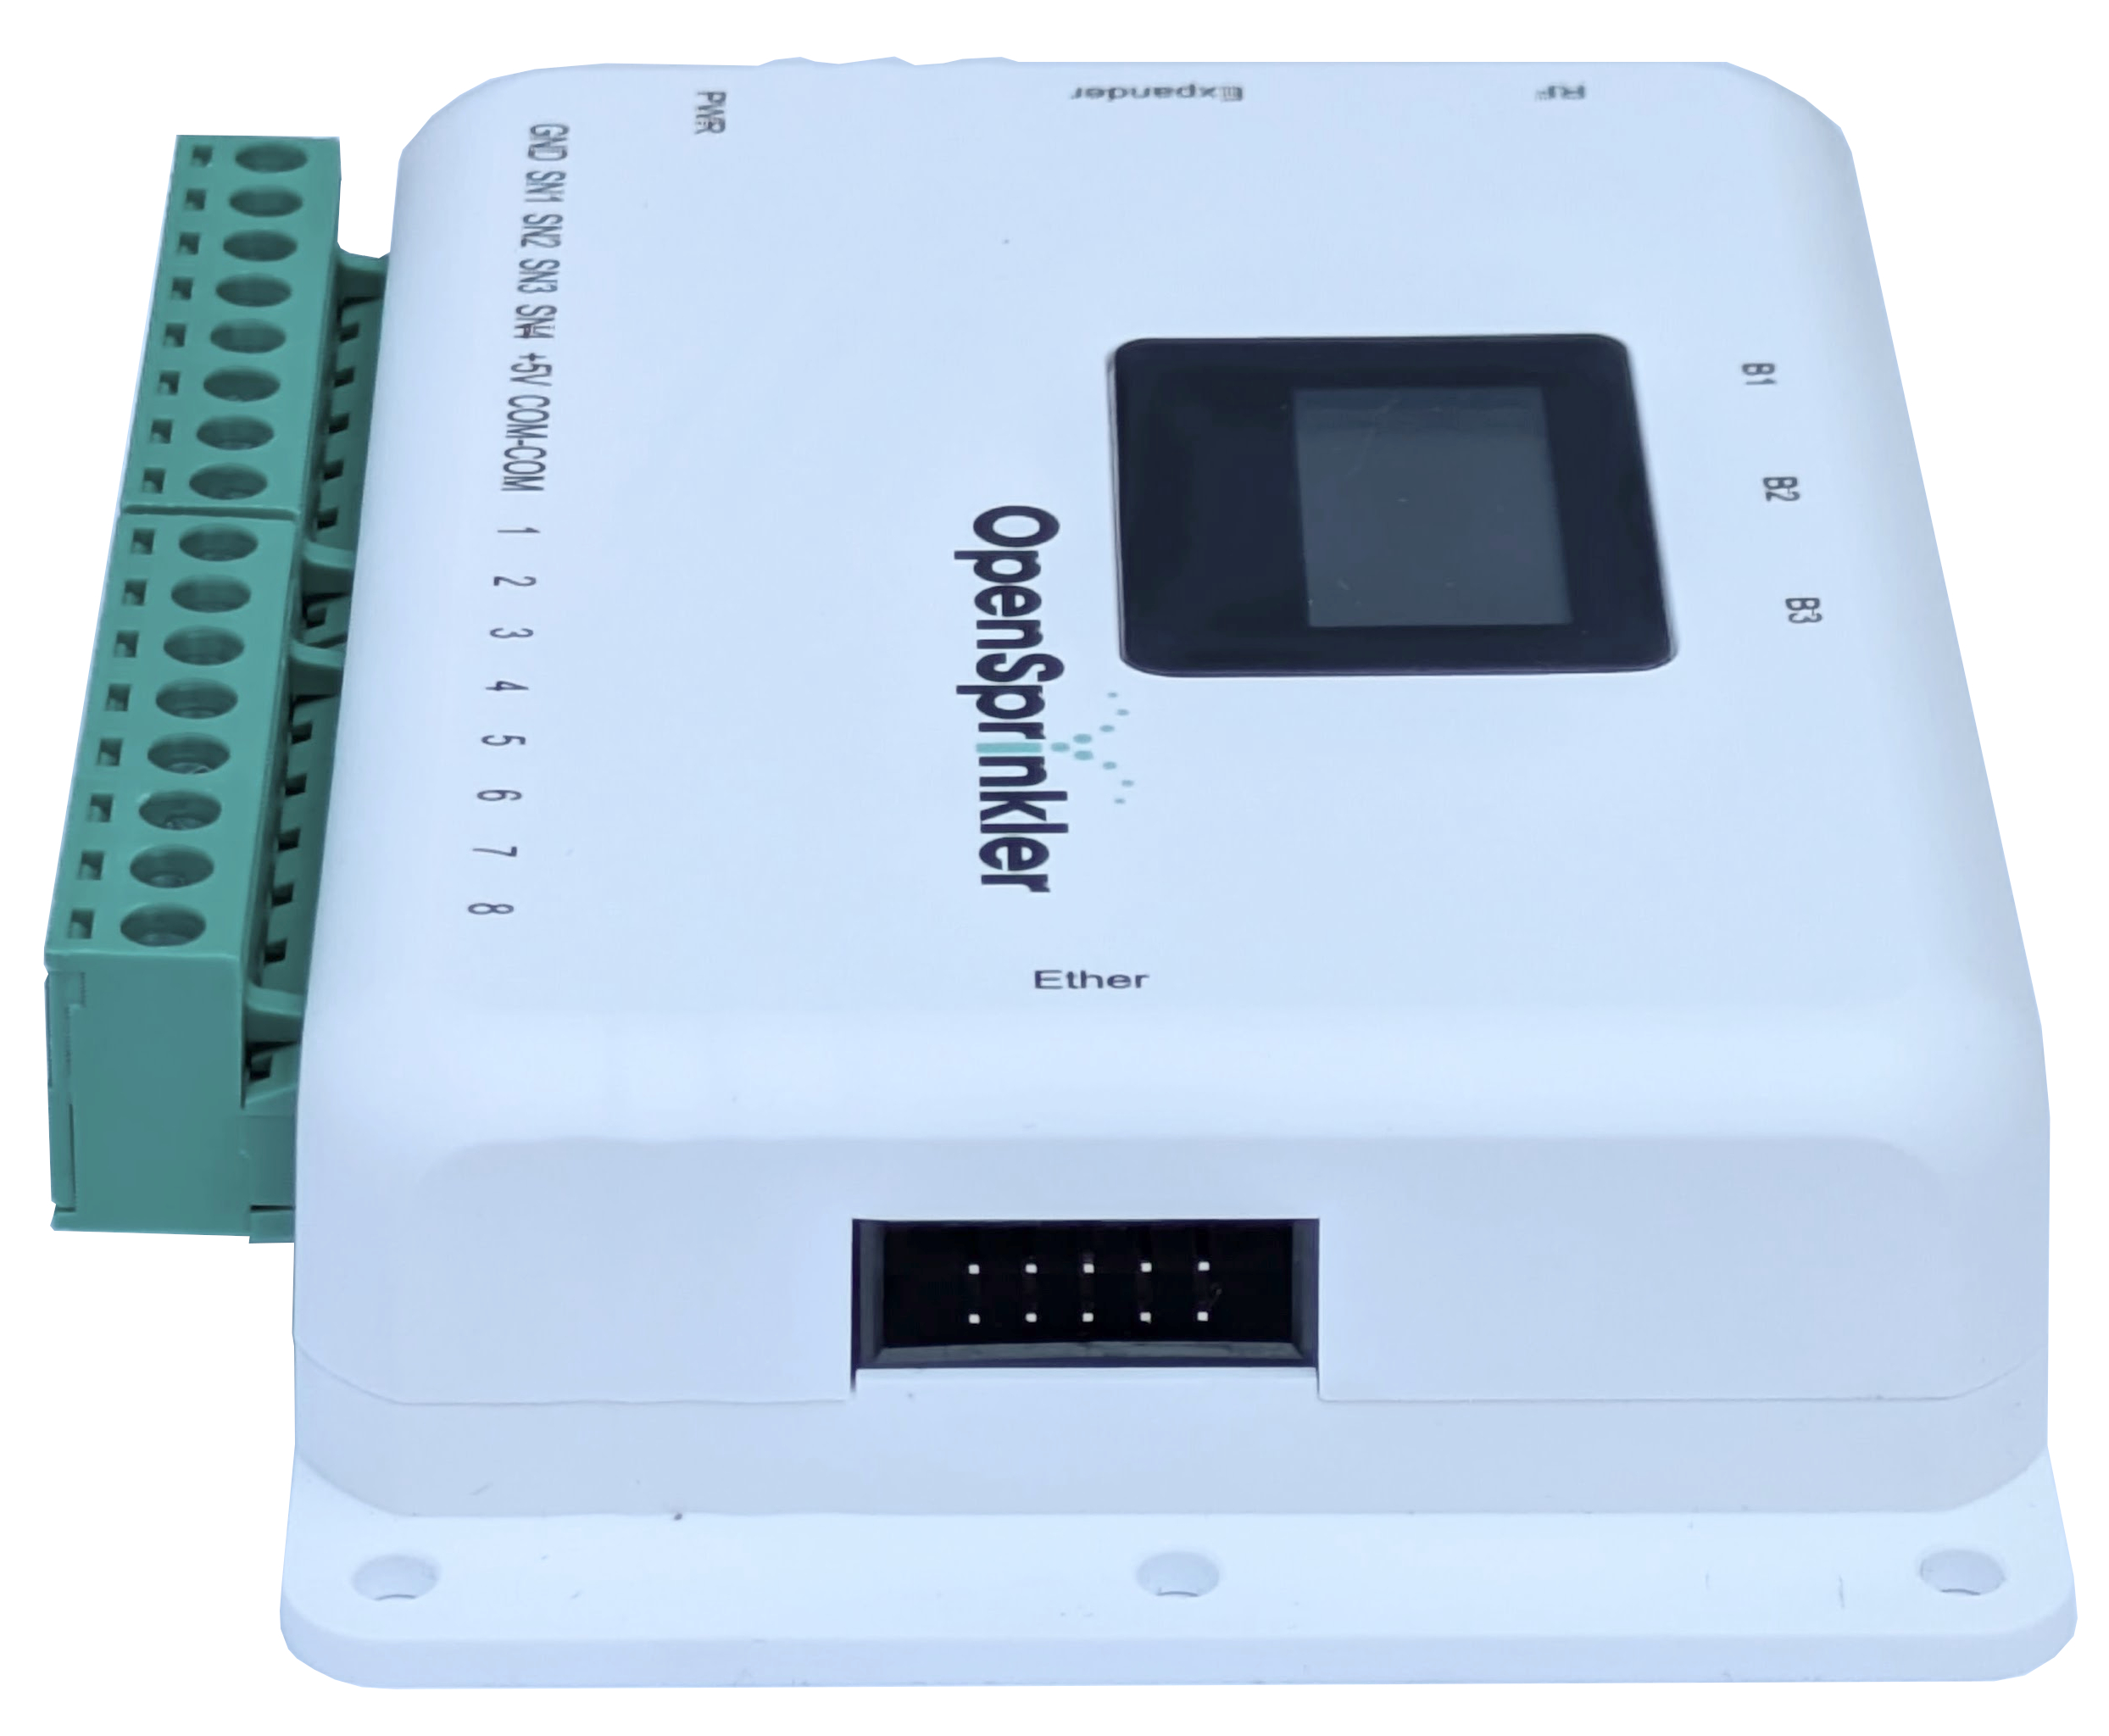
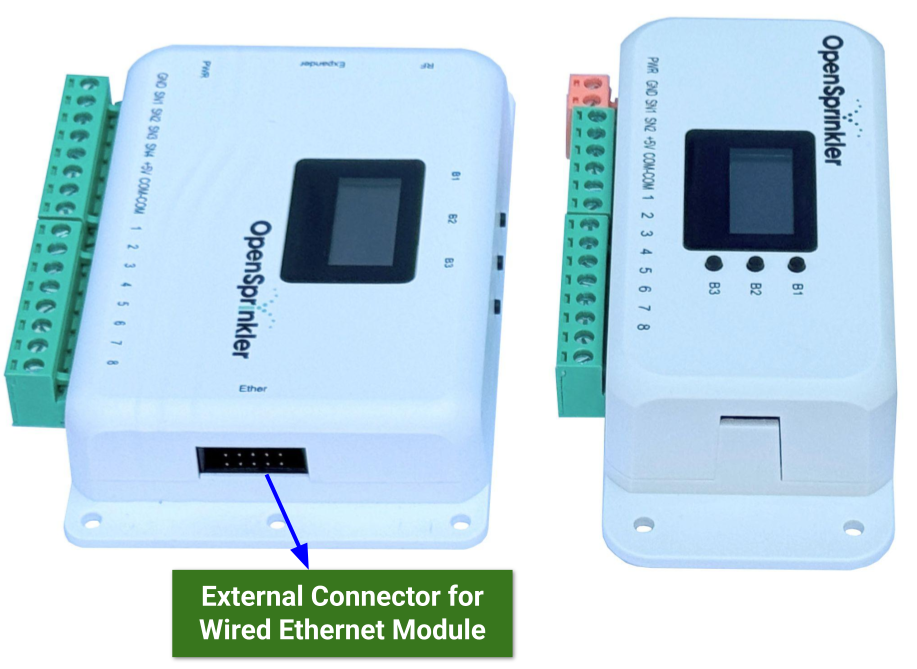
  • Added external Ethernet connector – Simplifies wired Ethernet module installation

The most significant update in version 3.4 is the shift from a two-layer circuit design—consisting of a top logic board and a bottom driver board—to a streamlined single-layer layout. Originally, the two-layer design in OpenSprinkler v3 was introduced to support interchangeable driver boards (AC-powered, DC-powered, and Latch), allowing the same logic board to interface with various solenoid types. While this approach offered flexibility, it also made assembly more complex and time-consuming. In version 3.4, we’ve consolidated the design into a single board, significantly simplifying assembly and improving overall efficiency.

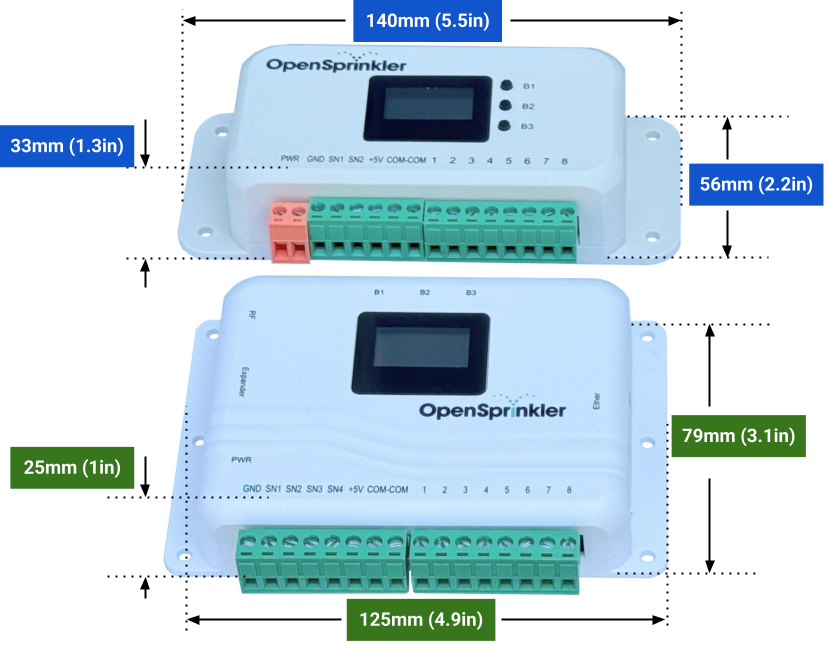
As a result of the single-layer layout, the enclosure height is noticeably reduced: from 33mm (1.3in) to 25mm (1in). The length is slightly reduced, and the width is moderately increased from 56mm (2.2in) to 79mm (3.1in).

The circuit design in version 3.4 remains largely unchanged from v3.3. However, one notable enhancement is the addition of two new sensor ports: SN3 and SN4. This upgrade is driven partly by the aesthetics of the new enclosure and partly by the decision to use the same 8-pin terminal block as the zone ports. This simplifies part sourcing and reduces inventory management overhead. Initially SN3 and SN4 will be inactive, and they will be enabled in a future firmware update.

Another improvement is the change to the power input port. The current orange 2-pin terminal has been replaced with a red-colored power barrel connector. Since most 24 VAC power adapters—including the one we provide—come with a standard plug, this change allows users to plug in power directly, eliminating the need for using an adapter cable or stripping wires, which has been a common pain point for some users.

Finally, an external connector for the wired Ethernet module has been added to the right side of the enclosure, making installation much more convenient. Previously, the Ethernet connector was located on the internal circuit board, requiring users to open the enclosure, plug in the cable inside, and route it through a small opening—a process that was quite cumbersome. You see, when OpenSprinkler v3.0 was first introduced, I didn’t plan to have wired Ethernet as ESP8266 already provided built-in WiFi. But in response to strong user demand, I improvised a solution by adding an internal connector and repurposed an opening—originally intended for a now-removed RF receiver—to route the cable outside. While the workaround was functional, it was far from ideal. With version 3.4, the enclosure finally includes a dedicated external connector, making Ethernet installation simple and user-friendly.

Below are side-by-side comparisons of v3.3 and v3.4:


Other Questions You May Have:

Q: When will it be available?
A: We’ve started accepting pre-orders for OpenSprinkler v3.4, with shipments expected no later than mid-July 2025.

Q: What are the exact dimensions of the v3.4 enclosure compared to v3.3?
A: The new enclosure (v3.4) measures 125mm (L) × 79mm (W) × 25mm (H), or 4.9in × 3.1in × 1in. For comparison, the v3.3 enclosure is 140mm x 56mm x 33mm, or 5.5in x 2.2in x 1.3in.

Q: What about OpenSprinkler DC and Latch models?
A: Version 3.4 of the DC and Latch models are in development and expected to be ready by August 2025. Until then, we’ll continue selling version 3.3 of these two models. The new models will not only feature the updated enclosure, but switch to a USB-C power adapter for better availability and ease of use.

Q: Which expander is it compatible with?
A: OpenSprinkler v3.4 is fully compatible with Expander v3, just like previous v3 controllers. If you already own Expander v3, it will continue to work seamlessly.

Q: Will version 3.3 still be available?
A: Yes, temporarily. We’ll continue selling v3.3 while supplies of its enclosure last. After that, we plan to offer v3.3 circuit boards without enclosures for repair purposes and DIY projects. We’ll also provide 3D design files for the v3.3 enclosure so users can print or order the enclosure as needed.

Q: Will version 3.4 require different firmware?
A: No. All OpenSprinkler v3 controllers use the same firmware. The system automatically detects the hardware version and make software adjustments accordingly.

Q: Can I use my existing wired Ethernet module from v3.3?
A: Yes. Version 3.4 uses the same W5500 Ethernet module as v3.3, so it remains fully compatible.

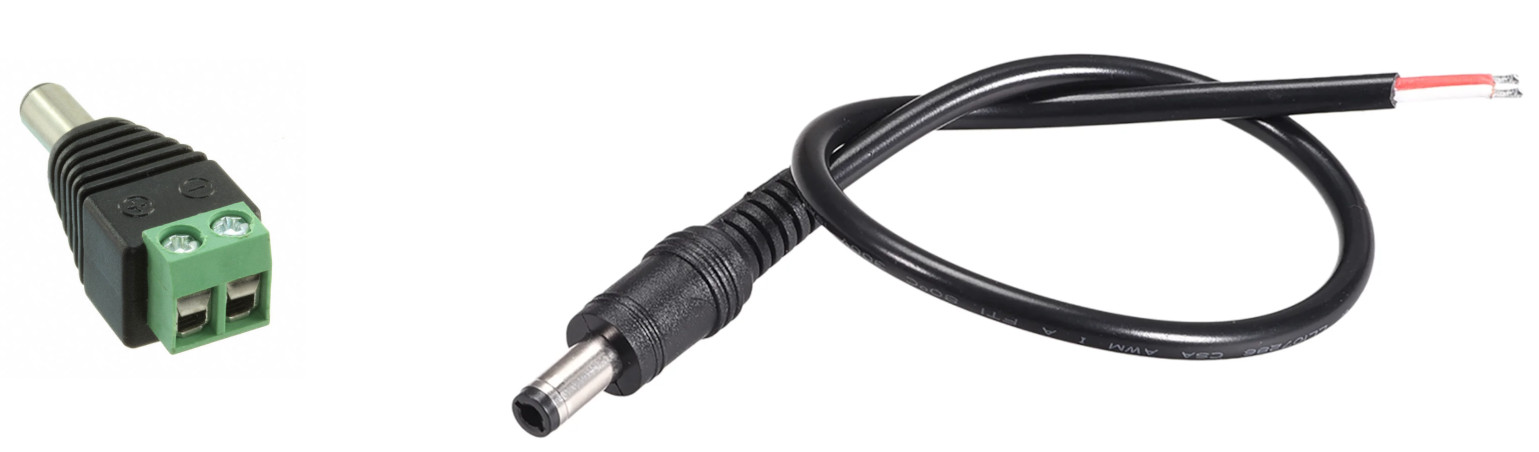
Q: I have an existing 24VAC power adapter with stripped wires. Do I need a new adapter?
A: Not necessarily. You can use a plug adapter to convert the stripped wires into a standard male barrel plug. Here are two common options: (the search terms are “power jack plug adapter” or “power pigtail barrel“).

Q: I just bought an OpenSprinkler AC v3.3 recently. Can I exchange it for v3.4?
A: Yes, as long as your purchase was made within 30 days, which qualifies under our no-questions-asked return and refund policy (see our terms and conditions). Please note that in terms of functionality and circuit design, v3.3 and v3.4 are nearly identical, aside from the two additional sensor ports on v3.4.


Occasionally, we encounter application cases where users want to utilize Power-over-Ethernet (PoE), which allows a single Ethernet cable to deliver both network connectivity and electrical power. This setup eliminates the need for a separate power line, making it especially useful in remote or hard-to-reach locations where running additional cables is difficult. To enable PoE, a PoE switch injects voltage—typically 48VDC—into the Ethernet cable, which then carries both data and power. At the receiving end, a PoE-compatible power circuit is needed to step the voltage down to a usable level, such as 12VDC. OpenSprinkler does not natively support PoE, as its Ethernet module and power circuitry do not comply with PoE standards. However, you can use an off-the-shelf PoE splitter to separate the power and data: the splitter outputs 12VDC and a standard Ethernet signal (without the 48VDC). Since OpenSprinkler DC operates on 12VDC, this makes it compatible with a PoE switch when used with a suitable splitter.

The image below shows a typical PoE splitter. One end features an Ethernet receptacle where the PoE cable is connected. The other end splits the signal into two outputs: a 12VDC power plug and a standard Ethernet connector. The 12VDC plug connects to the power barrel of the OpenSprinkler DC, while the Ethernet connector plugs into the wired Ethernet module.

The diagram below illustrates the complete setup. With this configuration, a single Ethernet cable can deliver both power (for the controller and solenoids) and data connectivity. We’ve successfully tested this setup using a TP-Link 4-port PoE switch, a PoE splitter rated for 12VDC at 2A, and an OpenSprinkler DC with a wired Ethernet module—it worked flawlessly. Please note that this setup is only compatible with DC-powered OpenSprinkler models (including OpenSprinkler Latch), as they can operate directly on 12VDC. It is not suitable for OpenSprinkler AC, as there is no straightforward way to convert 12VDC to the required 24VAC.

Recently through a customer I learned about a product called WireSprout, and it only works with the AC-powered OpenSprinkler but not the DC-powered version. Out of curiosity, I looked into why this is happening. So what is WireSprout? Simply speaking, it allows individually controlling 2 zones using a single zone wire. This is useful in situations where some of your zone wires are broken and it’s too much hassle to repair the broken wires. Let’s say you have 2 zones, but only 1 good zone wire. Using WireSprout, you to control both zones using the single good zone wire. This works on any sprinkler controller (well, as you will see later, as long as it’s an AC sprinkler controller). A single WireSprout pack contains a pair of two ‘sprouts’. Each sprout is a tiny little circuit wrapped in heat shrink tubing, and has 3 wires: 1 blue and 2 green wires. Below is the diagram that shows how to connect it to a sprinkler controller:

To be fair it’s not adding more zones — to control 2 zones you still need to take 2 zone ports on the sprinkler controller. Also it requires the Common (COM) wire to be a good (i.e. non-broken) wire. But what it helps with is to reduce the number of zone wires. Note that it can only go with a pair of 2 zones. For example, if you want to control 4 zones, you need another good zone wire and another pack of sprouts. It unfortunately cannot allow you to control 4 zones with a single good zone wire.

Each sprout is very small, so likely it only contains a few electronic components. Also, it’s very general — it can work with any AC sprinkler controller, so the circuit doesn’t rely on the knowledge of any specific controller. It also works only for 2 zones at a time. Finally according to the customer, it doesn’t work with DC-powered OpenSprinkler, only works with AC-powered version. So it must rely on the property of AC to work. I googled similar products, and after a bit of research, it became clear to me that the circuit is indeed extremely simple. Each sprout is essentially two diodes in series, where the two ends are the green wires, and the center (between the two diodes) is the blue wire. Below is what I believe each sprout contains internally:

So how does it work all together? Here is the diagram:

Because the output voltage is AC, it has positive and negative cycles. As you can see, on the positive cycle of the COM wire, if Zone 2 port is on, the two diodes circled green will turn on. So the current flows from COM to Solenoid 1 through the Common wire, then through the zone wire to Zone 2 port. The other two diodes are reverse biased therefore solenoid 2 cannot turn on even if Zone 1 port is on. Conversely, on the negative cycle of the COM wire, the situations with all diodes are flipped, so only Solenoid 2 can turn on (assuming Zone port 1 is on). In this particular arrangement, Zone port 1 controls Solenoid 2, and Zone port 2 controls Solenoid 1. If you want them to correspond to each other (i.e. 1 -> 1 and 2 -> 2), just horizontally flip one of the sprouts.

In short, the WireSprout works by leveraging the fact that AC waves have positive and negative cycles. By using diodes, it can cleverly block half of the AC waves, therefore Solenoid 1 can only turn on during the positive cycles, and Solenoid 2 can only turn on during the negative cycles, or vice versa. Thus these two zones can be individually controlled.

Now it’s obvious why the DC-powered OpenSprinkler can’t work with WireSprout: DC-powered OpenSprinkler outputs DC-only voltage, there are no positive or negative cycles — there is only positive voltage. Therefore WireSprout can’t leverage the negative cycles to disable one of the solenoids therefore it cannot achieve individual control of 2 solenoids using a single zone wire.

There is possibly a downside of this method: each solenoid only get half of the AC waves as opposed to the full wave normally. Would this cause any reliability issues? I am not sure, but it seems there hasn’t been any reported issue so far.

Finally, we can also explain why WireSprout always works in pairs of 2 and not more than that: if you want to control, say 4 solenoids with a single zone wire, that would require counting the parity of the AC waves, which would be much more complex and may require an active circuit.

Fun with ChatGPT

Unless if you’ve been living under a rock, you’ve probably heard of ChatGPT by now, if you haven’t given it a try yet. Over this past weekend, I’ve had some fun with it. Not only it’s amazingly good at writing text description, but it can write programming solutions too. Here are just a few things I asked it to do.

Ray: tell me about opensprinkler

ChatGPT: OpenSprinkler is an open-source, web-based sprinkler controller for watering gardens, lawns, and other outdoor areas. It allows users to automate their irrigation systems and customize watering schedules through a web interface or a smartphone app. The controller can be programmed to turn on and off sprinkler valves at specified times, and can also be integrated with weather data to adjust watering schedules based on local weather conditions. OpenSprinkler is designed to be easy to install and use, and is compatible with a wide range of sprinkler valve systems.

Ray: tell me more about opensprinkler

ChatGPT:

OpenSprinkler is a sprinkler controller that allows users to automate their irrigation systems and customize watering schedules through a web interface or a smartphone app. The controller is connected to a network and can be accessed remotely, allowing users to control their irrigation systems from anywhere with an internet connection.

In addition to being able to set custom watering schedules, OpenSprinkler also offers a number of advanced features that make it easy to optimize watering schedules and conserve water. For example, the controller can be programmed to turn on and off sprinkler valves based on local weather data, such as temperature, humidity, and precipitation. This helps ensure that plants are watered at the optimal times, while also minimizing water waste.

OpenSprinkler is compatible with a wide range of sprinkler valve systems, making it a versatile choice for homeowners and gardeners. It is also easy to install and use, with a user-friendly interface that makes it easy to set up and customize watering schedules.

Overall, OpenSprinkler is a useful tool for automating and optimizing irrigation systems, and can help homeowners and gardeners save time and resources by ensuring that their plants are watered efficiently.

Ray: tell me about opengarage

ChatGPT:

OpenGarage is an open-source, WiFi-enabled garage door opener that allows users to remotely control their garage doors using a web interface or smartphone app. It consists of a microcontroller board with an embedded web server and a relay, which is used to activate the garage door opener.

Users can access the OpenGarage controller through a web interface or smartphone app to open and close the garage door, as well as set custom schedules and receive notifications when the garage door is opened or closed. The controller can also be integrated with other smart home devices, such as home security systems or smart lights, allowing users to automate their garage door functions and create custom scenes.

OpenGarage is designed to be easy to install and use, with a user-friendly interface and a range of customization options. It is also open-source, which means that the software is freely available for users to modify and customize to meet their specific needs.

Overall, OpenGarage is a useful tool for automating and controlling garage doors, and can help users save time and effort by allowing them to remotely access their garages from anywhere with an internet connection.

Ray: what’s unique about opengarage

OpenGarage is an open-source, WiFi-enabled garage door opener that offers a number of unique features and benefits compared to other garage door openers on the market. Some of the key features and benefits of OpenGarage include:

  1. Open-source: One of the key features of OpenGarage is that it is open-source, which means that the software is freely available for users to modify and customize to meet their specific needs. This allows users to easily add custom features or modify the controller to work with specific garage door systems.
  2. Remote access: OpenGarage can be accessed remotely through a web interface or smartphone app, which allows users to control their garage doors from anywhere with an internet connection.
  3. Customization: OpenGarage offers a wide range of customization options, including the ability to set custom schedules, receive notifications when the garage door is opened or closed, and integrate with other smart home devices. This makes it easy for users to automate their garage door functions and create custom scenes.
  4. Compatibility: OpenGarage is compatible with a wide range of garage door systems, making it a versatile choice for homeowners.
  5. User-friendly interface: OpenGarage has a user-friendly interface that makes it easy to set up and customize garage door functions, even for users who are not technically proficient.

Overall, OpenGarage is a powerful and flexible garage door opener that offers a wide range of features and customization options to help users automate and control their garage doors.


As you can see from above, it’s really quite good at generating text descriptions. What’s more incredible is its ability to generate programming code. For example:

Ray: write a jquery program with three buttons, when the first button is clicked, draw a circle, when the second button is clicked, draw a square, when the third button is clicked, draw a face

In this case, the chat engine stopped a few times, and I had to type ‘continue’ to let it finish the program. But after it’s done, it generated a proper Javascript program, when you run it, it pops up the following interface. The circle and square are both drawn perfectly, the face is a bit of a failure, but it’s amusing to see it even produced comments in the code to document how the code draws a face.

I was pretty mind-blown by its capability. As a text generation engine, it’s clearly not just memorizing things, because if you ask it the same question again it will give you a somewhat different answer. I’ve also tried a number of other things, as listed below. Some are more successful than the others.

  • tell me about opensprinkler, in Shakespeare style
  • write instructions to create an IFTTT applet for OpenSprinkler
  • write an Arduino program for ESP8266 to connect to opensprinkler.com
  • write an Arduino program for ENC28J60
  • write a C++ program that uses a circular queue to implement a log

If you want to make changes or correct any mistakes, you can have a conversation with it. Such as ‘change the variable x to y’; ‘rewrite the second paragraph to use less words’, ‘your circular queue implementation is wrong, blah blah blah’.

To a University Professor like me, this is going to have a profound impact on how classes are to be taught, how homework is to be assigned, and how cheating cases are to be detected in the future. I mean, not only it can produce essays, but it can generated reasonably complex program code. A lot of the introductory level programming tasks can be easily solved by it. Well, at least for now, I am glad we can leverage this incredible tool for ourselves to write text descriptions, instructions, and sample programs. Have fun with it!

Today we’ve officially released OpenSprinkler firmware 2.2.0(1). As you may have noticed on this forum post, this firmware is a major revision from the previous firmware 2.1.9. Most of the new features are thanks to Valeriy Soltan’s excellent work almost 2 years ago (I know, time flies during the pandemic), including support for sequential groups, setting a date range for each program, support for pausing and resuming stations, shifting zones forward, more flexible master on/off adjustment times etc. In addition, we’ve added a device name parameter, which is included in all IFTTT notifications; and a new weather adjustment method called ‘Monthly’ adjustment is added to set a manual watering percentage per month. For OpenSprinkler 3.x only — one major step forward is the support of OpenThings Cloud (OTC) token, which allows remote access via the OTC cloud server. This eliminates the need for settings up port forwarding, which has been a pain for manual users. OTC has been enabled for our OpenGarage product for a while, and it seems to be working pretty well, so this is a good time to enable OTC for OpenSprinkler as well. A major benefit of OTC is that the same web interface / UI is available both locally and remotely, and OTC server serves as a real-time ‘relay’ between the firmware and user, it doesn’t actually store any date on the cloud server. Another step forward for OpenSprinkler 3.x is upgrading ESP8266 core to version 3.0.2 (the latest ESP8266 core for Arduino). In important benefit of this is that the WiFi and wired Ethernet are unified, through the lwip library available in this core version. As a result, wired Ethernet and WiFi use exactly the same interface functions, so all WiFi features (including OTA update) are also supported by wired Ethernet. Moreover, this allows OTC to be supported by both WiFi and wired Ethernet as well.

We’ve release a test version of firmware 2.2.0 a month ago and since then have been working on fixing bugs both in the firmware and the UI. At this point, the firmware is ready to be released to the public, and we are really excited. The full list of new features can be found in the Github release notes. As usual, firmware update instructions can be found on our support website at support.opensprinkler.com Since this firmware is very new, bugs and issues are probably inevitable. If you encounter any problem, please be patient and file a support ticket at support.opensprinkler.com We will try to handle them as quickly as we can.

Older Posts »