Feed on
Posts
Comments
Update: check out the RFToy — an easy-to-use standalone gadget to control remote power sockets. Also, support for remote power sockets have been added to OpenSprinkler firmware 2.1.1.

In previous blog posts, I’ve described two ways to use an Arduino to interface with an off-the-shelf remote power sockets / switches. The first method uses transistors to simulate button presses. It involves some soldering and hacking the remote control unit. The second method uses an oscilloscope to sniff the signal sent by the remote control, and then simulates the same signal using an RF transmitter. But what if you don’t have an oscilloscope, or don’t know where to place the probe to take the measurement? In this post, I will describe a very simple method to sniff remote control signals. It only requires a 434 MHz RF receiver, a couple of resistors, an audio cable, a sound card (with line-in), and an free audio processing software. (Note: some RF remote sockets work at 315 MHz frequency range).

Update: check out the RFToy — an easy-to-use standalone gadget to control remote power sockets. Also, support for remote power sockets have been added to OpenSprinkler firmware 2.1.1.

To get started, I picked a set of indoor wireless power sockets from Amazon. This is different from the model I had before, and it’s not based on the PT2262 encoder, so I cannot predict the RF signal by just looking at the circuit board connections. The reason I picked this model is because it has separate On and Off buttons for each socket, instead of just a Toggle button. So if you want to make sure the socket is on, just repeatedly send the on signal. With only a toggle button, if there is a power reset or if the previous command was not successfully received, you will mess up the control and end up with completely flipped on/off status.


RF Sniffing Circuit

Ok, here is the fun part: how can we sniff the signals sent by the remote control to the sockets? It turns out that most of these remote controls work in the 434 MHz band (note: some work in 315 MHz), so we can use a cheap 434 MHz RF receiver to intercept the signal. To record the signal, a simple way is to use your sound card and an audio recording software. The sound card can digitally sample the signal at high speed (e.g. 48,000 Hz), and it can record a signal over a long time, so it is more convenient than using an oscilloscope.

This is by no means a new idea. I found it when reading this forum post. Scroll down and you will see the schematic to make the sniffing circuit. One important thing is that you should plug the audio cable to the Line-In jack on your sound card, not the Mic jack.

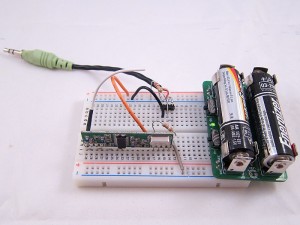
The picture on the left is my implementation of the circuit. I used my handy AASaver to provide the +5V needed by the RF receiver. This way, the whole circuit sits on a breadboard without any external power adapter. I can easily insert it to the sound card at the back of my desktop PC.


Record the Control Signals

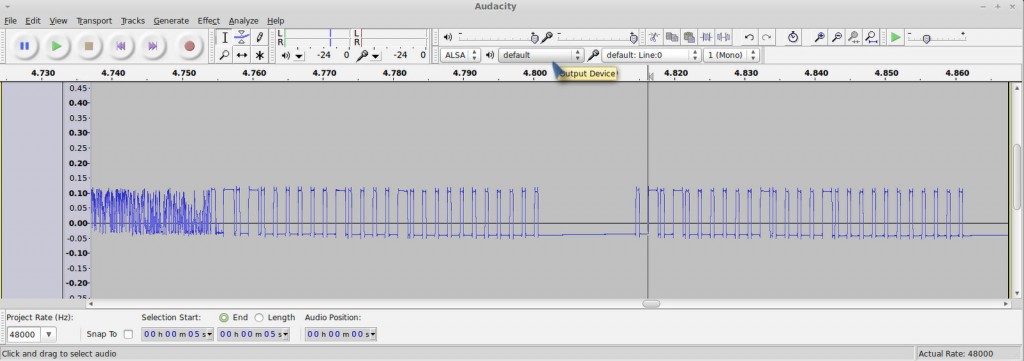
I used the open-source Audacity software in Linux to record the signals. All I have to do is to start recording, and press each of the 6 buttons on the remote control. Then I will zoom in and analyze the signals. Below is a snapshot:

Basically when you press a button, the same sequence is sent multiple times. Each sequence consists of two types of square waves: a long on followed by a short off, which I call a ‘1’, and a short on followed by a long off, which I call a ‘0’.

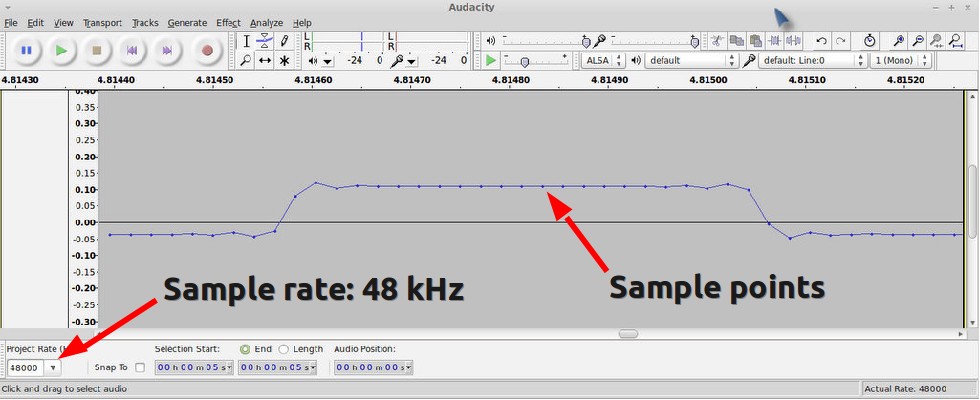
How can we find out the timing (i.e. the width) of the signal? In Audacity, if you zoom in the signal to the extreme, you will see the actual signal sample points. Remember that we know the sampling rate, which is 48000 Hz by default. So if we count the number of sample points, and divide that by the sampling frequency, then we will get the timing. For example, below is a snapshot of a short on. I counted that there are about 21 sample points, so the width of it (i.e. a short on or short off) is

Similarly, I figured out that a long on or long off is about 1300 us, which is three times the width of a short on or off. Also, there is about 12.5 ms delay before re-sending the same sequence. These timings don’t have to be very accurate.

With the timings figured out, I can now write down the complete sequence corresponding to each button:


Socket 1 on: 1001 0000 0010 1000 00000000000
Socket 1 off: 0101 0000 0010 1000 00000000000
Socket 2 on: 1001 0000 0010 0100 00000000000
Socket 2 off: 0101 0000 0010 0100 00000000000
Socket 3 on: 1001 0000 0010 0010 00000000000
Socket 3 off: 0101 0000 0010 0010 00000000000

Each ‘1’ is a 433 us on followed by a 1300 us off, and each ‘0’ is a 1300 us on followed by a 433 us off. The first 4 bits indicate socket on/off, the next 8 bits are always the same, and the 4 bits following from that indicate the index of each socket.

With these patterns recorded, I can reproduce the signal using an Arduino and a 434 MHz RF transmitter. The RF transmitter has one data pin, which can be connected to any Arduino I/O pin. Since there is a little bit of overhead when using Arduino’s delayMicroseconds function, I reduced the short delay time to 410 us. This way, the signal generated by the code is almost identical to the that produced by the remote control.

Download
  • Download example Arduino code here. This example program assumes the RF transmitter data pin is connected to Arduino pin D3, which you can change at the beginning of the file.


Use OpenSprinkler to Control Power Sockets

Now that my Arduino can talk to the remote power sockets, how about adding Internet-based control? For example, sending control signals through a web interface, or even setting a time schedule to turn on or turn off sockets automatically during a day? Aha, my OpenSprinkler is perfect for this purpose. There are two reasons, first, the OpenSprinkler is an integrated circuit that includes ATmega328 + Ethernet + LCD + USB programmer; second, the latest OpenSprinkler software provides a nice web interface where you can set an interval schedule or switch to manual control mode. All that I have to do is to connect the RF transmitter using one of the available pins on board, and then add a few lines of code to send the RF signal wherever the corresponding sprinkler station is turned on or off. This way, I can easily use the same web interface to control power sockets. Internet of things instantly!

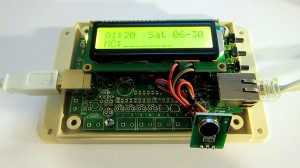
The image above shows my implementation. I used a half-built OpenSprinkler, with everything except the switching regulator section and the solenoid driver section. The RF transmitter is connected to the controller using three wires. Again, one of the nice things is that I can directly use the software already written for OpenSprinkler, to set a time schedule for automatically turning on or off power sockets. In addition, I can switch to manual control mode, which also has built-in timers.

What’s Next?

My next plan is to use the sniffing circuit to reverse engineer RF signals sent from wireless temperature, humidity, and rain sensors. This will allow me to use an Arduino and a RF receiver to decode the wireless data and get local temperature, humidity, and rain information. Of course the tricky part is to figure out how the data is encoded. So I will have a couple of posts in the next week or so about RF hacking. Stay tuned!

Ok, this post is a bit late, as 1.3u has already started selling since Tuesday this week. Anyways, 1.3u is a minor revision since 1.2u. There are only a few changes (see Release Notes for details), so I didn’t make a release video. This post explains why these changes were made and some of the technical details.

  1. Added shift register OE (output enable) line
  2. This is mainly to address an issue with 74HC595 shift register that on powering up the output values are undefined. This can potentially lead to valves being randomly turned on for a short period of time before the mcu takes over and clears output values. It is not a huge issue, but quite annoying. It turns out that one simple solution is to add a control line to the 74HC595 OE (output enable) pin. This pin is active low, which means when set to low it enables output, and when set to high, it forces the output to be in high-impedance state, therefore the triacs will not turn on and the valves will remain closed.

    In 1.3u, Arduino digital pin 3 is assigned to control OE, and a pullup resistor is used to pull the pin high by default. On start-up, before the mcu takes over, OE is high, disabling output; then when the mcu completes initialization, it sets OE to low, enabling output. That’s it. Simple solution.

    Because of the added line, the extension board connector has been changed to 2×4 format (previously it was 2×3). If you own a previous version of OpenSprinkler and would like to use 1.3u extension board, you just need to solder a wire between the OE pin and Gnd , in order to enable output by default.

  3. TXD/RXD are now used as general I/O pins.

    This change was made to free up the A2 and A3 analog pins, since there have been many requests to make more analog pins available in order to connect external sensors like temperature and humidity sensors. Because TXD and RXD are now used as general I/O pins, they can no longer be used for Serial communication. In fact, since they are not used to control the LCD, calling Serial.begin() or Serial.print will cause the LCD to display garbage. If you need Serial communication, you can use the SoftSerial library which can simulate Serial communication on any pins.

  4. Added coin battery holder.

    Warning: this is a feature under development. It requires software support which is not available yet. The goal is to have a backup battery which allows the mcu to continue time keeping even when power is lost. Actually the easiest solution would be to just add a DS1307 Real-Time Clock (RTC). But my main hesitation is that DS1307 is quite pricy. Well, it’s not hugely expensive, but at $2 a piece (volume pricing), it is actually more expensive than the ATmega328 mcu. Isn’t that a bit silly? Anyways, the time keeping business can be well handled by the mcu itself. First, the mcu can run at a voltage as low as 1.8V, so when power is lost, it can continue running on a low-voltage battery; second, during power loss, the mcu will mostly be in sleep mode, using an external 32.768 kHz clock source, and occasionally waking up to update the time counter. This way, it can basically do whatever the RTC chip can do.

    The only tricky part is detecting power loss (which is already possible with the Power Sense pinout), and turning off peripheral components such as the Ethernet controller to minimize power consumption during sleep mode. These require some further experiments, which have been put on my todo list.

Another minor change is adding two resistors for the LEDs on the RJ45 Ethernet connector. In OpenSprinkler v1.1 and v1.0, the Ethernet connector did not have built-in LEDs. Then when I changed to use SparkFun’s RJ45 in v1.2, I forgot that it actually has built-in LEDs… So in this version the LEDs are wired in, which makes the circuit more complete 🙂

That’s all for OpenSprinkler v1.3u update. In case you are wondering about the frequent hardware changes, keep in mind that we are continually improving the design based on feedback and comments received from users. We run small batches (a couple hundred) for each version, that’s why we can have quick turn-around time in integrating new hardware features. At some point when the hardware becomes mature, we will make a surface mount version to improve the production throughput. Hopefully that point won’t be too far away!

I am glad to announce that the new interval program has been released and available for download at the OpenSprinkler GitHub page. This is a major software update since the initial release in October last year. Here is a list of new features in this version:

  • Program-based scheduling. Each program consists of a set of days (including weekdays, odd/even day restriction, and interval days), stations, start, ending, interval, and water time. The firmware supports up to 64 programs.
  • Choice of running stations either sequentially or concurrently.
  • Graphical Preview of each day’s program.
  • Integrated Manual Mode. When activated, the manual mode allows turning on or off stations using buttons on the homepage. An optional timer can be set to automatically shut stations off.
  • Support for rain sensor and location-based weather checking.

Details can be found in the video below, and the OpenSprinkler Instructions of Use page. This software version is compatible with all existing hardware versions, including v1.0, v1.1, and v1.2u. Feel free to give it a try. To find out how to re-program the MCU with new firmwares, please refer to the Re-programming Instructions. From now onw, the new interval program will replace the previous svc_full_schedule program, and become the default program shipped with all pre-flashed MCUs.


Technical Details

You will find that the new program has significantly improved the web user interface. This is made possible by using external Javascripts. As I described in a previous post, a major challenge in designing full-featured web interface is the limited program memory (flash) size of the ATmega328 MCU. The trick to get around with this limitation is by using external Javascripts stored on remote servers to ‘beautify’ the webpages. When you access the OpenSprinkler webpage in a browser, two pieces of information are combined in the browser: one is the essential data provided by the controller, the other is the set of Javascripts used to format webpages. The process to combine the two actually happens in your browser, which can interpret and execute complex Javascripts. This is called Client-Side processing. In addition to releasing the MCU from carrying the heavy ‘formattting’ code, another advantage of this separation is that you can easily replace the Javascripts to present data in a different format. This is in a sense similar to web Templates. Finally, debugging Javascripts is also a lot faster and easier than debugging microcontroller code, because it requires no re-flashing of the MCU, and most modern browsers support checking and error reporting of Javascript code.

One downside with this approach is that the Javascripts must be placed on a server that’s constantly available. Currently the scripts are stored on the Rayshobby web server, which is quite reliable. The path to the scripts is:
http://rayshobby.net/scripts/java/svc1.6/
There are 7 scripts involved: home.js, progmode.js viewoptions.js, viewprog.js, plotprog.js, modprog.js, manualmode.js. These are used to format various pages, including the homepage, program modification page, program preview page etc. However, if you ever want to customize the Javascripts yourself, you need to make a copy of these scripts and put them on your home server, a cloud server, or any file hosting server that can provide direct file access links. Note that the Javascript files are simply text files that store (human-readable) Javascript code. So any server that can host a text file is ok. If you decide to direct the scripts to your own server, simply modify JAVASCRIPT_PATH macro defined at the beginning of interval_program.pde, and point it to your new path.

You don’t have to worry about the security of using scripts stored on the Rayshobby server. Remember, in client-side processing, your controller data is never sent to the server; rather, it is sent to the browser that you are using to view the webpages. The browser will then retrieve the Javascripts and combine them with the data to present the webpages. Clearly there is no way we can ‘log’ your data or keep a record of your data, so it’s safe.

The Weather feature you saw in the demo video above is implemented using a Python script and Google Weather API installed on the Rayshobby server. This is an example of Server-Side processing, because the Python script runs on the server and not in your browser. The reason this requires server-side processing is because first, the Google Weather API returns fairly long XML data that cannot be directly parsed by the MCU, second, the MCU needs to periodically retrieve weather data, so it needs to initiate requests on its own and cannot rely on the existance of a web browser. Thus the Python script serves as a mechanism to convert complex XML data to microcontroller-readable format, and since it runs on the server, the microcontroller can send requests to it at any time.

OK, so much for the technical details. There is no way to cover all details in a single post. If you want to find out more about how the software works, please refer to the source code, or post a message on the forum.

A couple of new products have been just added to Rayshobby Shop page. These include a 434MHz RF transmitter and a USB-to-Serial (RS232) converter.

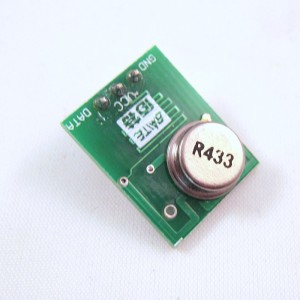
So what are they good for? The 434MHz RF transmitter is a general-purpose RF transmitter with on-board PCB antenna. It is compatible with SparkFun’s 434MHz RF transmitter. You can find a lot of example code online, including Arduino code. The module has three pins: Vcc, Gnd, Data. The operating voltage is 3~12V (5V standard), and the current draw is about 5-15mA. The higher the voltage, the longer the transmission range. Typical transmission range without external antenna (i.e. using on-board antenna) is 160 feet; and it extends to 500 feet with an external antenna. I’ve shown an example use of the transmitter in a recent article A New Way to Interface with Remote Power Switches. It provides a simple way for a microcontroller to switch wireless power sockets. Very handy and inexpensive for home automation projects.

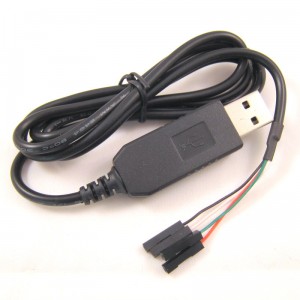
The USB-to-Serial converter is an integrated cable based on Prolific PL2303HX chip. It is a convenient tool for microcontroller to host communication through USART. It is similar to an FTDI cable, but at a significantly lower price. It doesn’t have a Reset line though, so it cannot be used for re-programming Arduino or OpenSprinkler v1.1/v1.0. However, it is very handy to connect to your OpenSprinkler v1.2’s TXD/RXD pins in order to easily debug your code. The cable length is 3 feet (1 meter). The wires are colored as follows:

Red->+5V supply, Black->Ground, Green->TXD, White->RXD

On Mac or Linux, you don’t need to install any driver: it is already supported by the operating system. On Windows, you can download the driver following the link here. Once installed, the device will report as a Serial COM port. You can then use any Serial Monitor to communicate with your microcontroller. Some standard serial monitors are Arduino’s built-in serial monitor, Putty, or gtkterm (on Linux). I’ve been using this converter a lot for printf debugging of OpenSprinkler code.

Again, both of them are now available for purchase on Rayshobby Shop page.

Over time I’ve received some questions regarding the hardware design of OpenSprinkler. Here are some common questions and my answers:

Why using a switching regulator?
Since OpenSprinkler uses a single power supply (i.e. 24VAC sprinkler transformer), it is necessary to step down 24VAC to 5VDC and 3.3VDC in order to provide power to the circuit. The simplest and most common way is to use a 7805 linear regulator. But here is a catch: due to the relatively high current consumption of the ENC28J60 Ethernet controller, the whole circuit draws about 150 to 180mA current during operation. Using a linear regulator in this case will cause a lot of power waste. Specifically, (24-5) * 0.18 = 3.42 Watt will be wasted on heat due to the voltage conversion. This is pretty bad. That’s why I made the conscious decision to use a switching regulator to achieve higher efficiency. The switching regulator in this case is estimated to have 75% efficiency, so the power waste is more like (5 * 0.18 / 75% – 5 * 0.18) = 0.3 Watt. Much better and green!

Why having both 5VDC and 3.3VDC supply voltages?
This is because the LCD requires 5V supply, and the rest of the circuit requires 3.3V. The microcontroller can work with both voltages, but the ENC28J60 Ethernet controller and the RFM12B transceiver require 3.3V. That’s why the circuit provides both 5VDC (VIN) and 3.3VDC (VCC).

Why using triacs to control solenoids? What about relays?
While a lot of other sprinkler control circuits found online use relays to switch solenoids, I made the conscious decision to adopt triacs. There are many reasons this is more preferable. First, triacs are semi-conductor components, so they are much smaller than relays, more durable and act much faster. Second, they are low-cost and significantly cheaper than relays. Third, they are also slightly more power efficient: each triac requires only 5 to 7 mA holding current to switch on solenoids, while relay coils often consume more current. In fact, a sophisticated design can use an AC triggering circuitry to trigger triacs only during zero crossings, further reducing the power consumption. All in all, triacs are great choices for switching low-voltage AC devices.

Why does OpenSprinkler v1.2 adopt a USBtiny programmer?
If you’ve noticed, the previous versions of OpenSprinkler relied on external FTDI programmer. That was designed to be compatible with standard Arduino and variants. The main advantage of FTDI is that it not only does re-programming, but also it is a USB-to-Serial converter, which allows the microcontroller to easily send and receive messages from your computer. However, it also has two main downsides. First, it is expensive: an FTDI programmer or cable can easily cost more than 15 bucks, and we don’t like to stock it due to the cost. Second, using FTDI requires a bootloader, which takes away some (512 bytes) program space from ATmega328. Therefore we have decided to go with an on-board USBtiny ISP programmer based on ATtiny45. We like this solution a lot better because this way every OpenSprinkler board has a built-in USB programmer, so you don’t need to worry about purchasing a programmer separately. It is low-cost and does not require a bootloader, so it’s a win-win choice.

« Newer Posts - Older Posts »