Hi, I am excited to announce the arrival of SquareWear — a new open-source microcontroller board I designed for wearable electronics projects. First off, here is an introduction video:
Background. So why did I work on this? Well, last year I helped my school with several wearable electronics workshops. They were great success: the students had a lot of fun sewing LEDs and sensors onto clothes, and many women students came to attend the events. We used Lilypad Arduino, which is a popular microcontroller board designed for wearable computing projects. It’s a very nice design, but using it for a 40-student workshop presented a few challenges. First is the cost. Lilypad itself costs about $20, which is ok. But to program it, you need to get an external FTDI cable, which costs another $15. We want students to take the gadgets with them after each workshop. But since we had a small budget, we couldn’t afford to buy one set for each student. So we had to let every 2 students share a set. Not everyone was happy about it. Second is FTDI driver issues. You would think this is easy, but it turned out that at the beginning of each workshop, we had to spend 30-40 minutes just to help everyone install FTDI drivers. Students were using all sorts of operating systems and having all sorts of unexpected problems. Some were even using pre-beta version of Windows 8 64-bit… Anyways, it was not fun. What I really wanted is a board that does not need any driver installation. Whether you are using Windows, Linux, or Mac, the system should recognize the device automatically. Next is the number of external components required. Many students started designing beautiful LED patterns that involve a lot of parallel LEDs, only to find out later that the LEDs looked really dim. Why? The standard microcontroller pin can only source or sink 25mA of current. If you have a string of 20 LEDs, they will not look bright because of the current limit. The better solution is to use a transistor or mosfet to allow switching higher amount of current. Because switching LEDs is very common task in wearable electronic projects, it would be nice to have mosfets as built-in components on the board. Similarly, some students wanted to include push-buttons to their projects, but the push-button on Lilypad is only for reset, not for general-purpose function. Lastly, it would also be nice to have an on-board coin battery option, because coin batteries are cheap and easy to find in local stores.
So these experiences motivated me to develop my own wearable electronics board, and here comes the SquareWear!
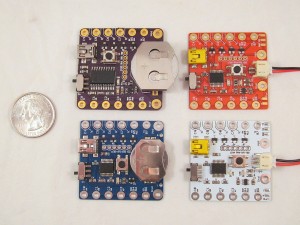
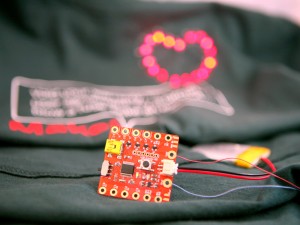
Features. The name SquareWear comes from its shape: a 1.6″x1.6″ square. Credits should be given to my colleague Andrew who came up with the name. Officially it’s Square-Wear, but it could also be Square-Ware, either way you like. I made it with a few different colors and two battery options: a coin battery version, which runs on a built-in CR2032 battery, and a li-po version, which runs on an external li-po battery. Each board has a built-in USB port, which is used for multiple functions: programming the microcontroller, USB serial communication, recharging battery (li-po version), and providing power directly. No external FTDI cable any more! The microcontroller is pre-flashed with Microchip’s USB HID class bootloader, which requires no driver installation, whether you are using Windows, Linux, or Mac. In addition, SquareWear has four power sink pins wired to on-board BS170 mosfets. These four pins support up to 500mA load, which makes them suitable for driving many parallel connected LEDs. Using these power sink pins, your LEDs will look nice and bright. Lastly, there is an on-board push-button that you can use as a general-purpose button. In sum, I designed all these features to make SquareWear a low-cost, all-in-one solution for wearable electronics projects. You can get started right away without having to worry about external components or programmers.
Programming. SquareWear runs Microchip PIC18F14K50 microcontroller. What? It’s not based on Arduino? Why? Well, let me explain. The project started as I was shopping around for different microcontrollers. My friend Christian recommended me to look at PIC. Around the same time I also started designing my own wearable electronics board. At one point I realized I should build the wearable microcontroller board using PIC, because this will be a good motivation for me to learn PIC programming. I chose 18F14K50 to begin with, because it’s among the lowest-cost microcontrollers that have built-in USB support. As I got more familiar with it, I started liking it more and more. It has a decent amount (16KB) of program memory space, not a whole lot, but sufficient for most entry-level wearable electronics projects. It has a decent number (12) of i/o pins, again, not a whole lot, but enough to fit all pins on a small PCB without wasting any. Most importantly, it has Microchip’s USB bootloader and serial communication support. So this naturally became my choice for SquareWear.
Another reasons I went with PIC is that its programming environment – MPLAB X – is a fully-featured cross-platform IDE. It has all the features of a standard IDE, such as code navigation, context aware code completion, debugging, and support for project files and library files. I like using standard IDEs. I think Arduino is great for beginners, but there is no code navigation and completion, and debugging is only possible in printf style. If you are serious about learning to program, you should start using professional tools. I would like to use SquareWear as a way to introduce programming to students, and I think it’s important to get them exposed to standard tools right in the beginning. It will require a slightly higher learning curve, but it’s absolutely worthwhile.
SquareWear Library. I spent quite some time writing the SquareWear Software Library, making it simple to use just like the Arduino. It abstracts away a lot of low-level programming details. I also included several features, such as software PWM, timer interrupt, button interrupt, software reset, which I feel are very useful for wearable projects. Take a look at the SquareWear Demos and the Programming Reference to find out more.
One downside with using 8-bit PIC is that its compiler C18 is a C compiler, that is, not C++. So there is no object-oriented programming, which may appear disappointing. But it’s not a show stopper: we all like the benefits of object-oriented programming, but there are tons of microcontroller projects that are written in plain C style perfectly fine. Particularly with respect to wearable projects, they are typically quite simple. There is no need to use objects, inheritance, function overriding, and all those good stuff. So no need to panic because of the lack of C++.
The last thing to mention is that just like my other projects, SquareWear is completely open-source: the hardware design and software code are all available on GitHub. Beyond wearable electronics projects, SquareWear is also a great little tool for general prototyping need, like interfacing with sensors and actuators. Give it a try and hope you like it!
Link to SquareWear Homepage.


