When I first had the idea to design OpenSprinkler Pi (OSPi), a secret motivation was that one day I figured out how to fit Raspberry Pi into the existing OpenSprinkler enclosure. Yes, it sounds silly, and you can laugh at it; but if you understand how much it costs to make an injection molded enclosure, and how difficult it is to predict the market and demand, you will see why I wasn’t quite ready to invest on a whole new enclosure for OSPi.
The experience last year has proven that OSPi is quite popular. I really enjoyed seeing the amount of community development on it, primarily due to the low cost of RPi and the flexibility in programming the RPi. We’ve also seen continued evolution of RPi, from the early A and B models to B+ and more recently A+. On the plus side, it’s exciting to see that RPi continues to become smaller and cheaper. The A+ version is now 25% smaller and you can get one for just $20. On the other hand, I am sure the different versions created some challenges in re-designing products powered by RPi. Because each version has different peripheral elements, size, screw hole locations, it’s quite difficult to design one board that fits all versions.
So in a way, I felt lucky that I wasn’t too hasty to invest on a dedicated enclosure for OSPi, because whatever I would have designed would probably not fit A+ in the end. But the lack of a dedicated enclosure has always been the major confusion about OSPi: from time to time I receive questions about why the cutouts on the enclosure do not match RPi, and then I have to explain. It’s not ideal.
Here comes the good news: with RPi A+, it looks like I may be able to ‘close the gap’ finally — that the injection-molded OpenSprinkler enclosure will finally fit OSPi, without confusing mis-alignment of the cutouts, and with buttons and LCD, just like the microcontroller-based OpenSprinkler!
Here are some pictures to show you the proof-of-concept:
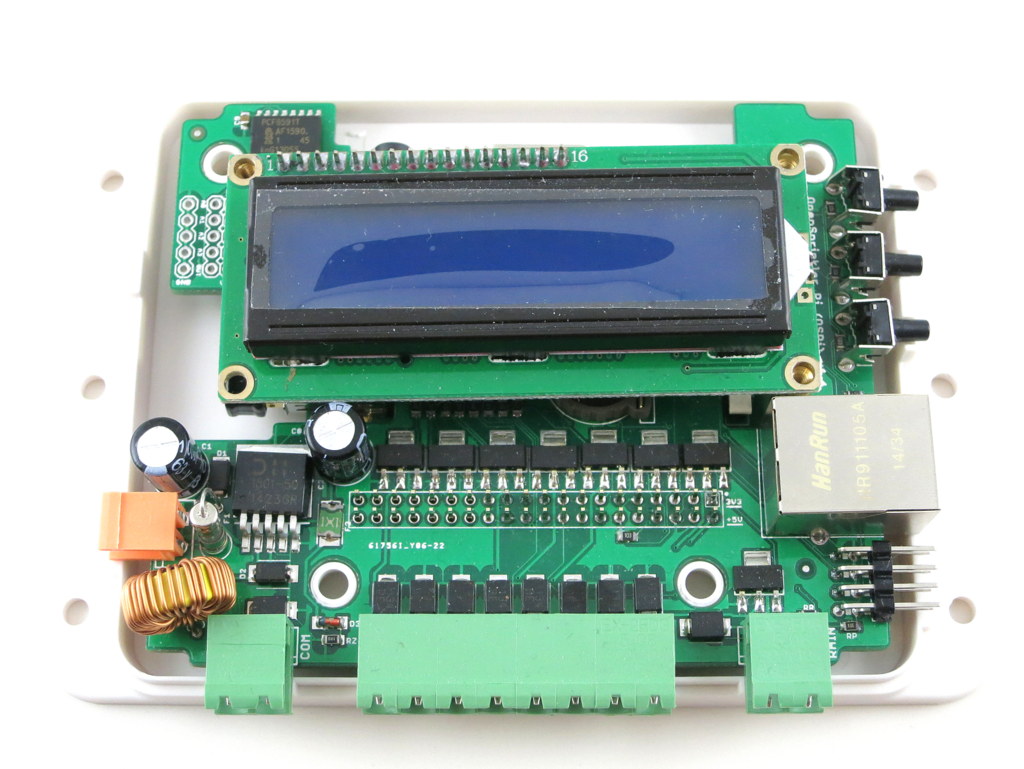
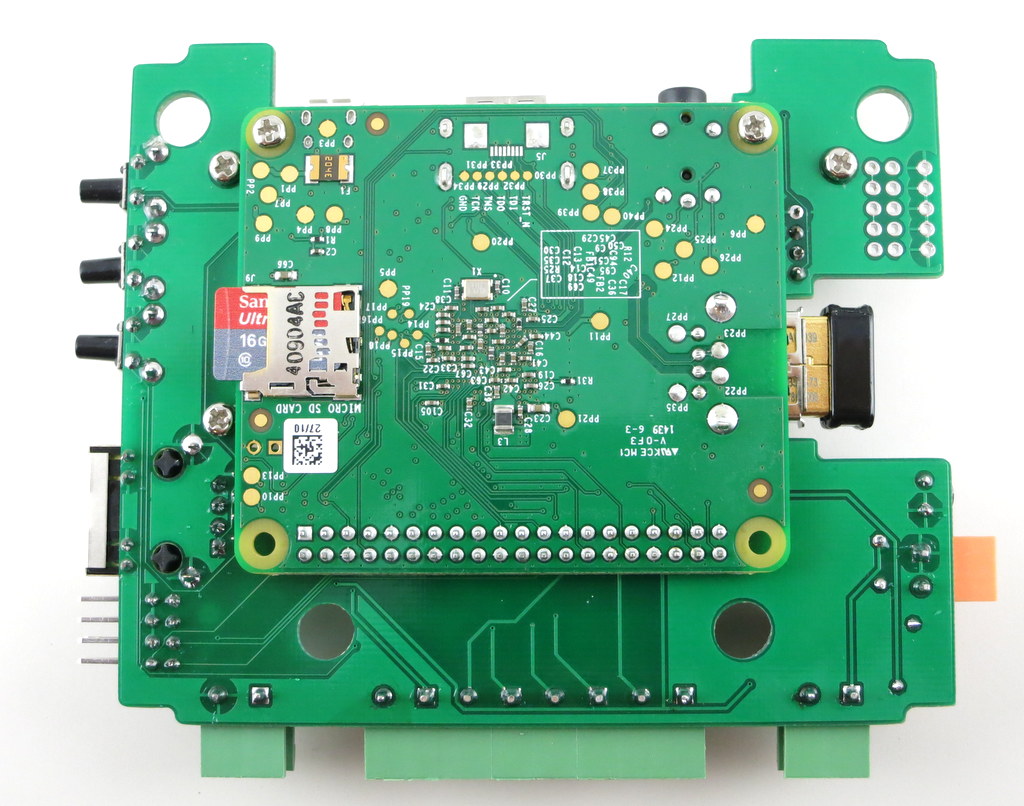
Mounting RPi. The most dramatic change is that RPi A+ will be mounted at the back of the OSPi circuit board. This is necessary to make space for the LCD (explained below). This may look surprising, but because A+ is quite flat, there is sufficient space at the back of OSPI to fit it, except HDMI, USB, and other peripheral connectors, which I’ve made cutouts for.
There is no secret that I’ve always enjoyed solving the ‘how to fit RPi into the OpenSprinkler case’ problem. It’s like a geometry puzzle for me. Often constraints push me to think of new solutions. So bear with the nerdy side of me 🙂
LCD. Next, for the LCD I am using I2C LCD — it’s the standard 1602 LCD with a I2C module at the back. This turns out to be very important, because I2C LCD needs only 4 pins in total (VCC, GND, SDA, SCL), significantly reducing the pin requirement and saving space. You can buy these with pre-soldered I2C modules, at very small added cost.
Buttons. There is also space to fit 3 push-buttons on the right-hand side of the circuit board. The physical buttons can be quite useful for triggering events or performing manual sprinkler control.
Ethernet. Lastly, I don’t want to waste the cutout for Ethernet jack, so I even added a ENC28J60 Ethernet controller. This is a useful add-on for RPi A+, which doesn’t come with an Ethernet jack itself. It took me quite while to figure out how to re-compile the RPi kernel to support this Ethernet controller. Don’t expect it to be very fast, but it comes handy if you really need wired Ethernet connection. Most people will still prefer the WiFi dongle.
One of the biggest drawback of this design is that RPi A+ will now be permanently soldered onto OSPi, because there is simply no space in height to put pin headers. This is not ideal but I can’t think of a better choice. The other potential issue is the heat dissipation of RPi — although there is some space between RPi, OSPi, and the enclosure bottom, it can become an issue during hot summer days. There is some space on the board to make vent holes, so I will see what I can do.
To summarize, this is a proof-of-concept design for OSPi A+ — it will finally make the injection-molded enclosure work perfectly for OSPi. Because this is a very early prototype, don’t expect it to be available anytime soon, although I do hope to make it ready by summer time this year.
Feedback, comments, and suggestions are welcome. Thanks!
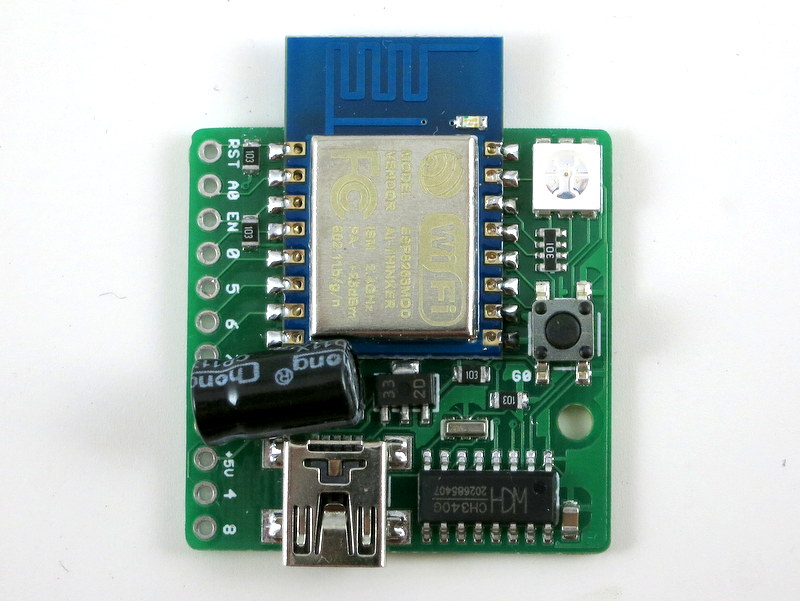
ESP8266 — a very low-cost and flexible Serial-to-WiFi module that has gained a lot of popularity recently. It allows any microcontroller to have WiFi capability by simply using serial communication. In a previous blog post, I demonstrated how to use ESP8266 combined with an Arduino to set up a very simple web server. This time I built a standalone gadget for prototyping called the ESP8266 Toy (or ESPToy for short). There is also a more serious web server demo in the end that shows how to serve HTML files from a SD card, and using JSON and AJAX to implement prettier web design.
You should also know that there has been a lot of on-going development for this module. For example, there is a Lua-based firmware for ESP8266, which is quite amazing. Also check out the community forum here.
ESP-12 SMD WiFi module, pre-flashed with Lua firmware and a startup demo script.
3.3V 250mA linear regulator.
Programming using the on-board mini-USB port.
One color (RGB) LED, one pushbutton (used as a general-purpose pushbutton as well as for re-flashing firmware)
Additional pin headers for connecting external components and/or breadboard experiments.
Original ESPToy v1.0/1.1 (retired)
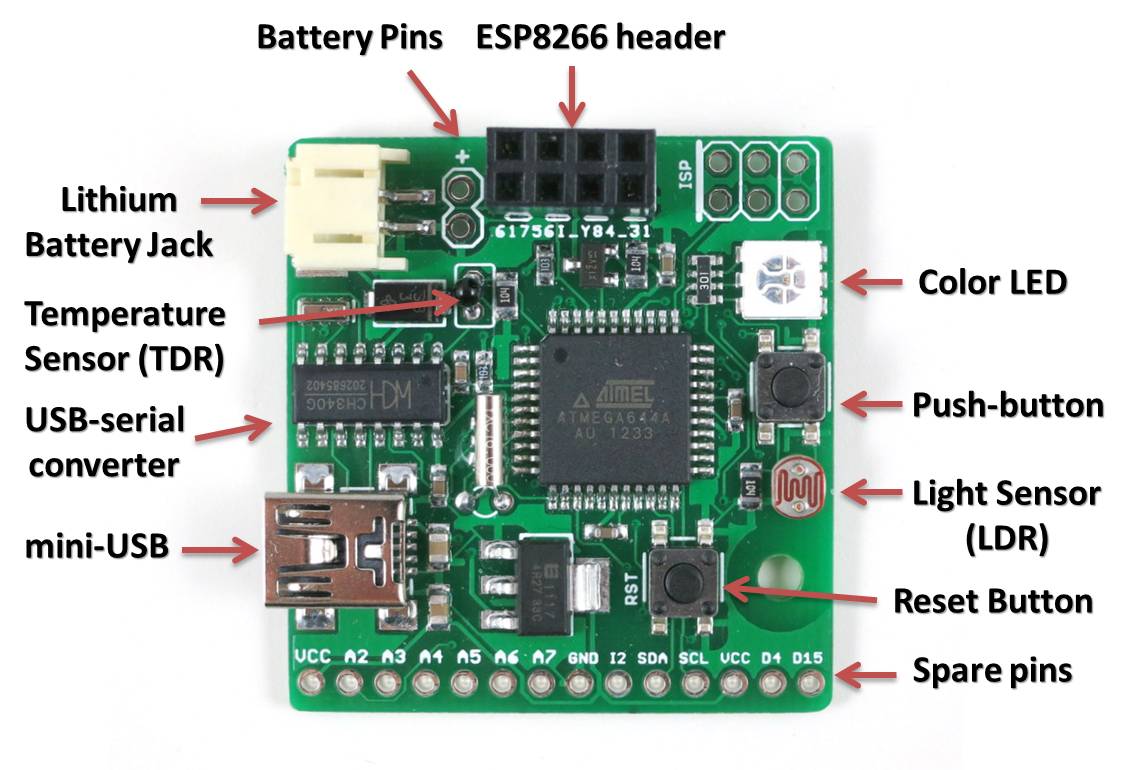
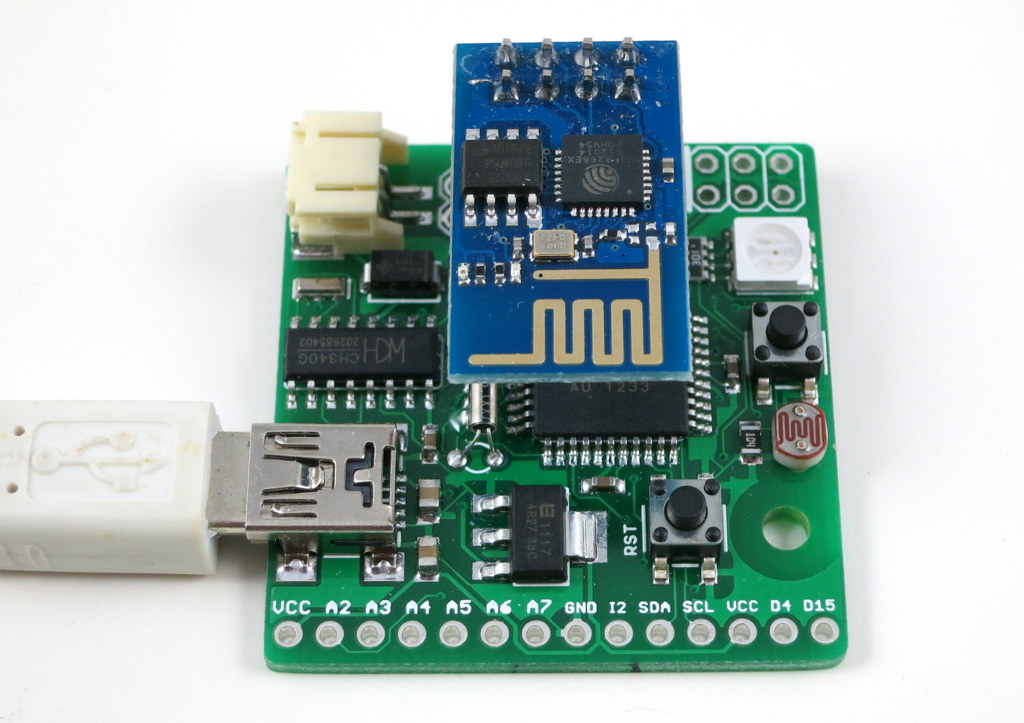
ATmega644 @ 3.3V, 16MHz, with CH340G USB-serial converter and Arduino bootloader.
3.3V 500mA linear regulator.
Programming in Arduino using the on-board mini-USB port.
One color (RGB) LED, one pushbutton, one reset button. (New on version 1.1: one additional button on ESP8266’s GPIO0 pin, useful for firmware upgrade)
One light sensor (LDR), one temperature sensor (TDR).
One 2×4 pin header to fit ESP8266.
Additional pin headers for connecting external components and/or breadboard experiments.
In essence, the ESPToy 1.0/1.1 is a 16MHz Arduino with some handy built-in components for easy prototyping with the ESP8266 WiFi module. Once programmed, the whole assembly can run on battery. There is also a power MOSFET on board to programmably control the power supplied to ESP. This allows you to cut off power to save battery life.
The reason I picked ATmega644 (instead of ATmega328) is that 644 has two hardware Serial interfaces. I am using one for the bootloader and USB communication, the other dedicated for WiFi. This is quite handy and allows you to use the fast baud rates. Also, 644 has twice as much memory as 328, so it’s suitable for building more complex projects.
Demos
As shown in the video above, I’ve written a few examples to demonstrate the basic features of the ESPToy:
To upload the demo Lua scripts to ESPToy 1.2, download and run the ESPlorer software. The Serial port baud rate is 9600 (default). You can open a demo script, click on ‘Save to ESP’ to save the script as a file to ESP’s internal flash memory space. The script will run right away after uploading. You can also click on ‘doFile’ to re-run the script.
Start-up Demo: every ESPToy 1.2 is pre-flashed with a start-up demo. Plug in a mini-USB cable, the blue LED will blink and the WiFi module will start in access point mode, creating a WiFi network with SSID ESPToy-xx. The password is opendoor. Connect to this WiFi network, open a browser, and type in http://192.168.4.1. Use the sliders to change the LED color, and click on ‘Refresh Value’ to read button status and analog pin value.
Hello ESPToy!: shows the Serial print function.
Blink LED: shows digital pin write, and delay functions.
Button Interrupt: shows how to set up interrupt on a digital pin.
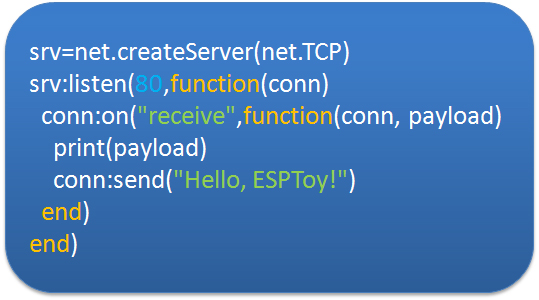
Hello ESPToy Server: shows a simple HTTP web server.
Original ESPToy v1.0/1.1 (retired)
SearchBaud: this comes handy if you forgot the correct baud rate of your ESP8266. It loops through the common baud rates, sends an empty AT command, the detects the correct baud rate by checking the result.
SerialCommand: this demo allows you to send AT commands to ESP8266 through a Serial monitor. Use this demo to experiment with all the AT commands available for ESP8266.
ScanNetwork: this demo starts the ESP8266 in AP mode, which creates a local WiFi network (the name is ESPxxxx). Use a smart phone or laptop to log onto this network, then open a browser and type in IP adddress 192.168.4.1. You will see a webpage with a list of detected WiFi networks. Type in the ssid and password of the target network, then click on Connect. The page will redirect in about 10 seconds to show the client IP address of the module on the target network. This is pretty standard approach to get your WiFi-enabled gadget to log on to your target network.
WebServer: this is a simple web server demo. It serves a html webpage and uses JSON and AJAX to periodically display the analog pin values. The first two analog pins correspond to the light and temperature sensors respectively, so these two values will respond to light and temperature changes. There are also three sliders to set the color of the on-board LED. As I said before, the demo can run on battery, so this can be used as a WiFi-enabled color LED light. Thinking about a simplified version of the Philips Hue? Yup, this is a poor man’s version of that 🙂
WebServer_SD: same as above, except this requires an external SD card slot, so that it can serve bigger and multiple html pages from files stored on the SD card.
Preparation
The ESPToy’s source code is available on Github. Check the README file therein to get started.
Serial Port and Driver:
ESPToy uses a CH340G USB-to-Serial converter. For:
Windows 7, 8, 8.1 and Linux: no driver installation is needed.
On Windows, the Serial Port name is COM? where ? is a number assigned to the USB-serial chip. On Linux, the Serial Port name is /dev/ttyUSB? where ? is a number. On Mac, the Serial Port name is tty.wchxxx.
Programming ESPToy 1.0/1.1 (retired)
Programming the ESPToy can be done through the Arduino IDE (tested with Arduino version 1.0.6). Because ATmega644 is not a board that appears in the stock Arduino, you will need to copy the atmega644 subfolder (from the hardware folder) to the corresponding hardware folder in your Arduino’s installation directory; same with the ESPToy subfolder (from the libraries folder).
Next, launch the Arduino IDE, select Tools->Board->ESPToy, and the correct Serial port from Tools->Serial Port (see below), then select a program from File->Examples->ESPToy, and finally click on Upload
Power Options:
ESPToy can be powered by USB or an external battery. There is a battery jack that fits a standard 3.7V lithium battery. In addition, there are two battery pins (next to the battery jack) — you can solder wires to connect a 3V AA/AAA battery pack. Note that the external AA/AAA battery should not exceed 3.6V (because it’s not regulated).
Flashing a New Firmware to ESP8266
Programming ESPtoy with Arduino: I strongly recommend you to learn to use Arduino to program ESPtoy, due to its flexibility and memory efficiency. While Lua firmware is easy for beginners, to write advanced programs, it’s much easier to use Arduino. Follow these steps:
Once the ESP8266 core is installed, you can select Generic ESP8266 Board, upload speed 230400, flash mode dio.
Before plugging in USB cable, press and hold the on-board button (on ESPtoy), then plug in the cable, and release the button. This way, the board enters programming mode.
Select the correct serial port (on Windows, it shows up as COMxx; on Mac, it’s generally named /dev/tty.wch…; on Linux, it’s typically /dev/ttyUSB0). Then upload.
On ESPToy 1.2 and 1.1: there is a pushbutton button (on version 1.1 it’s at the upper-left corner) — it’s connected to ESP8266’s hardware GPIO0 pin. If this button is pressed when powering up ESPToy, the ESP8266 will enter bootloading mode waiting for a new firmware. I recommend using the esptool python program to upload firmware, which is very easy to use. Specifically, in command line, run ./esptool.py write_flash 0x00000 xxxx.bin
where xxxx.bin is the firmware name.
On ESPToy 1.1, use the SerialCommand sketch to prepare ESPToy as a serial relay.
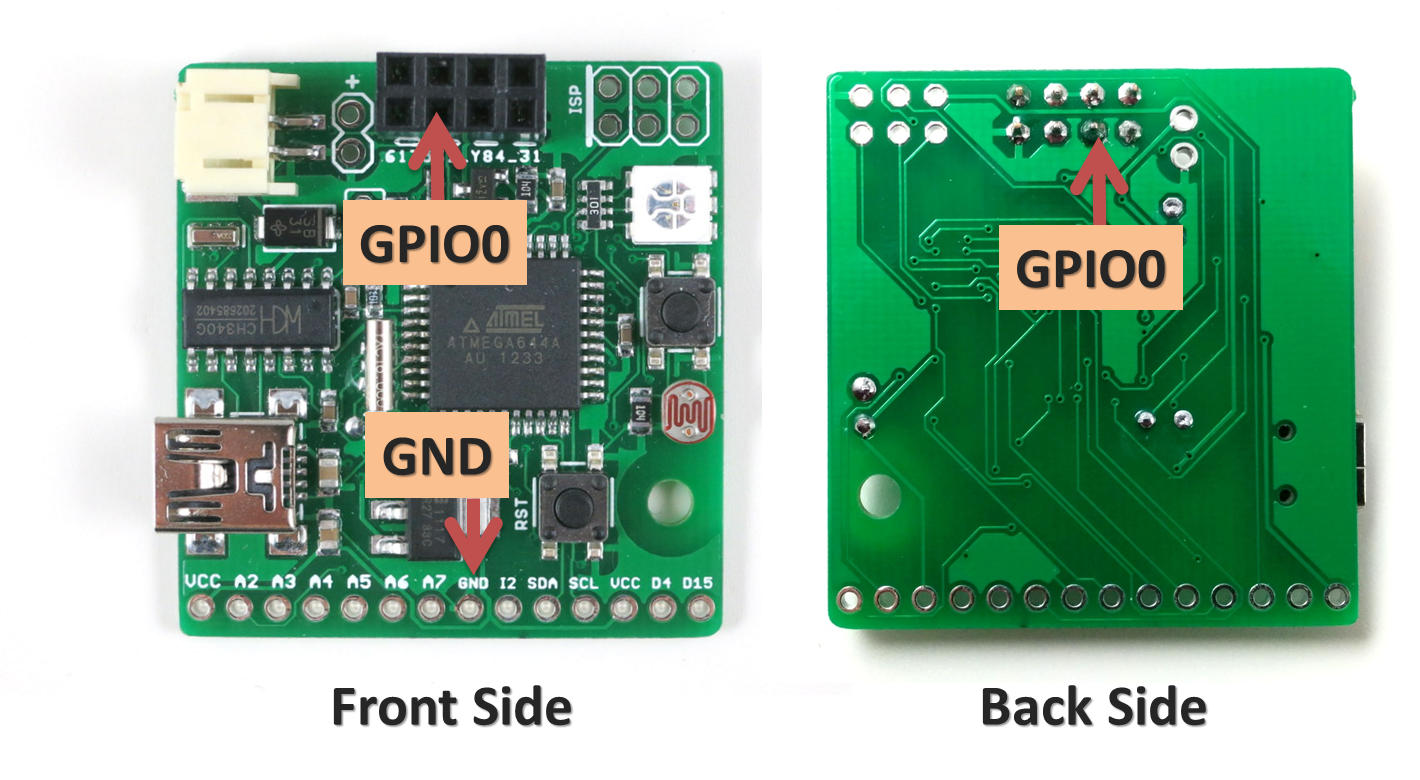
For ESPToy 1.0 (retired): to let ESP8266 enter bootloader, you need to solder a wire from ESP8266’s GPIO0 pin to ground. Specifically, if GPIO0 is pulled to ground, upon power-up ESP8266 will enter bootloader mode waiting for a new firmware from the Serial interface. In contrast, if GPIO0 is pulled up (to VCC), ESP8266 will boot into normal operation mode.
The picture below shows where the GPIO0 pin and a ground pin (any ground pin on the board should work). The wire should be soldered at the back of the circuit board. You can also connect a switch in series on the wire to easily switch between bootloader mode and normal mode.
Once this is done, you can flash the SerialCommand sketch to ESPToy, which will make it serve as a Serial relay. I recommend using the esptool python program to upload firmware, which is very easy to use. Specifically, in command line, run ./esptool.py write_flash 0x00000 xxxx.bin
where xxxx.bin is the firmware name.
In the past I’ve written several blog posts about how to use Arduino to interface with remote power sockets. For home automation involving powerline devices (e.g. lights, heaters, pumps, fans), this is my favorite solution, because it’s low-cost (remote power sockets are widely available at cheap price) and convenient (no messing around with relays and powerline wires). Also, one Arduino plus transmitter can simultaneously talk to many power sockets, making this a scalable solution too.
With the just released OpenSprinkler firmware 2.1.1, support for interfacing with remote power sockets has finally arrived. So you can now use OpenSprinkler not only to control sprinkler valves, but also powerline devices. Trying to find a programmable way to control your Christmas lights? Look no further! With OpenSprinkler’s easy-to-use web interface and flexible programming capability, you can enable automated control of lights, heaters, pumps, fans — anything that can be plugged into wall outlets.
One or more remote power sockets, preferably those with separate on/off buttons.
How does this work?
Let me briefly explain how the whole thing works. First, common remote power sockets operate in the 433MHz radio frequency band. When you press a button on the remote, it sends out a signal to the power socket, which gets decoded and acted upon. If we can sniff the signal, we can use a microcontroller plus a 433MHz transmitter to replicate the signal, thus be able to directly control the power socket in software. The RFToy is a gadget that I’ve designed to easily decode signals from common remote power sockets. Once we have the code, we can use OpenSprinkler to simulate the code, thus be able to control remote devices.
Heads-up: the following steps require a small amount of soldering. The estimate time for modification is 15 to 20 minutes.
Step 1: Decode Remote Power Sockets
Take out the RFToy, plug in a 433MHz receiver (making sure the VCC and GND pins on the receiver match the +5V and GND pins on the RFToy). Follow the on-screen instructions to record the on/off signal of a power socket. Once decoded, the signal will be converted to a 16-character hexademical code.
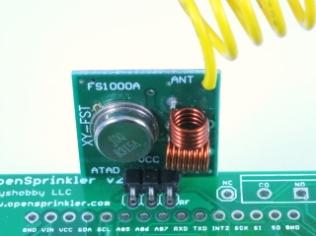
To test if the code works, take out the 433MHz transmitter, and solder a 17cm (6.7inch) long wire antenna to the ANT pin. Then plug it into the RFToy (making sure the DATA and GND pins on the transmitter match the DATA and GND pins on the RFToy). Bend the pins as necessary. Now click button S3 or S1 on the RFToy, the power socket should be toggle on or off just like when you press the buttons on the remote. Keep in mind that although most remote power sockets work in the 433MHz band, there are some that work in the 315MHz band. In that case, just use a 315MHz transmitter-receiver pair.
Step 2: Install RF Transmitter to OpenSprinkler
Remove the OpenSprinkler enclosure, and locate the RF transmitter pinouts (marked A3 VIN GND). The pinouts are located either close to the top of the PCB, or next to the Ethernet jack. Plug in the transmitter to the pinouts, making sure the DATA-VCC-GND pins on the transmitter match the A3-VIN-GND pins on the circuit board. Then solder the three pins at the back of the circuit board, and clip as necessary. Carefully arrange the wire antenna around the LCD and re-install the enclosure.
It’s important to use a wire antenna of sufficient length, otherwise the transmission range will be severely limited.
Step 3: Final Testing
Make sure your OpenSprinkler is running firmware 2.1.1 or above. If not, please follow the firmware instructions to upgrade your firmware first. Then go to Edit Stations, select the station you’d like to use as an RF station, and change its name to the 16-character hexademical code recorded on the RFToy. Any station with a name of this form will be automatically recognized as an RF station. When the station is turned on, the controller will automatically send out the signal through the installed RF transmitter, thus turning on the corresponding power socket (and vice versa for turning off the station).
Three quick notes:
The normal station function still works (i.e. if there is a sprinkler valve connected to that station, it will be switched on/off accordingly).
Most likely you want to turn off the ‘sequential’ flag for RF stations. This is because unlike sprinkler stations, you probably don’t want RF stations to be serialized with other stations.
If you are short of stations, just increase the number of expansion boards. You don’t need to have the physical expansion boards (think of RF stations as virtual sprinkler valves). Firmware 2.1.1 supports up to 48 stations in total.
With this feature, you can now use OpenSprinkler to programmably switch a large number of powerline devices, such as Christmas lights, landscape lights, water pumps, heaters, fans.
Keep in mind that because this is still an experimental feature, don’t use it on anything critical (i.e. those that can cause damages if accidentally left on). Depending on the distance and obstacles between OpenSprinkler and remote power sockets, it might not reliably switch on/off power sockets. So take time to do plenty of testing before you finalize the setup.
That’s it. We encourage you to try out firmware 2.1.1 and let us know your comments / suggestions / feedback. Don’t forget to post pictures of your projects. We would greatly appreciate your efforts. Thanks!
As you’ve probably heard: the Raspberry Pi Foundation recently released RPi A+, which is the first RPi that’s smaller in size than any other RPi. It is essentially a B+ with less memory (256 MB vs. 512 MB), one USB port (instead of four), and a compact form factor (65mm vs. 85mm). Not only is it smaller, but it’s lighter, consumes less power, and best of all, it’s cheaper — only $20!
There is a famous Chinese saying: “A sparrow may be small but it has all the vital organs”. This is exactly what I feel about RPi A+. Although it’s almost 25% smaller than any other RPi, it retains all the essential features. Similar to B+, it has a microSD card slot, and hybrid audio / composite video port. This helps reduce the overall size of the assembly. It doesn’t have a built-in Ethernet controller and connector (which contributed to the lower price tag), but most people will likely use a USB WiFi dongle anyways so it’s not a big loss. What’s clever about its design is that it’s pin compatible with B+ — in fact it’s basically B+ with 20mm chopped off from the right edge. All the connectors, pin headers, screw hole locations are exactly the same as B+. This means any shield / extension board that works for B+ is likely to work for A+ with no modification.
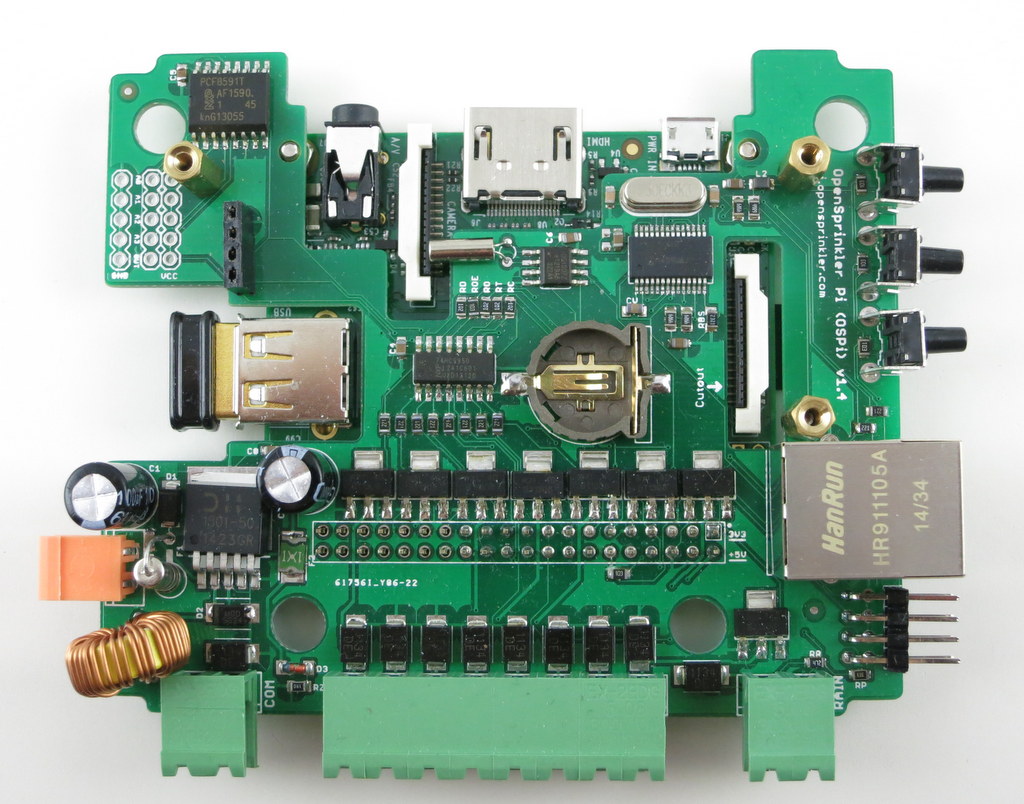
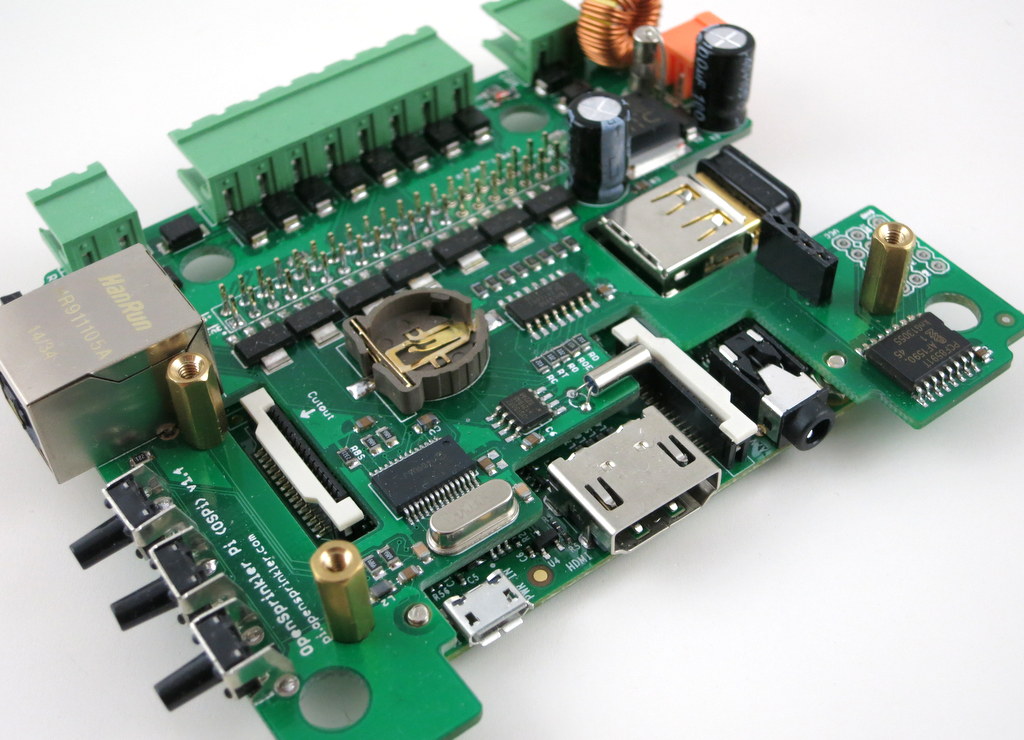
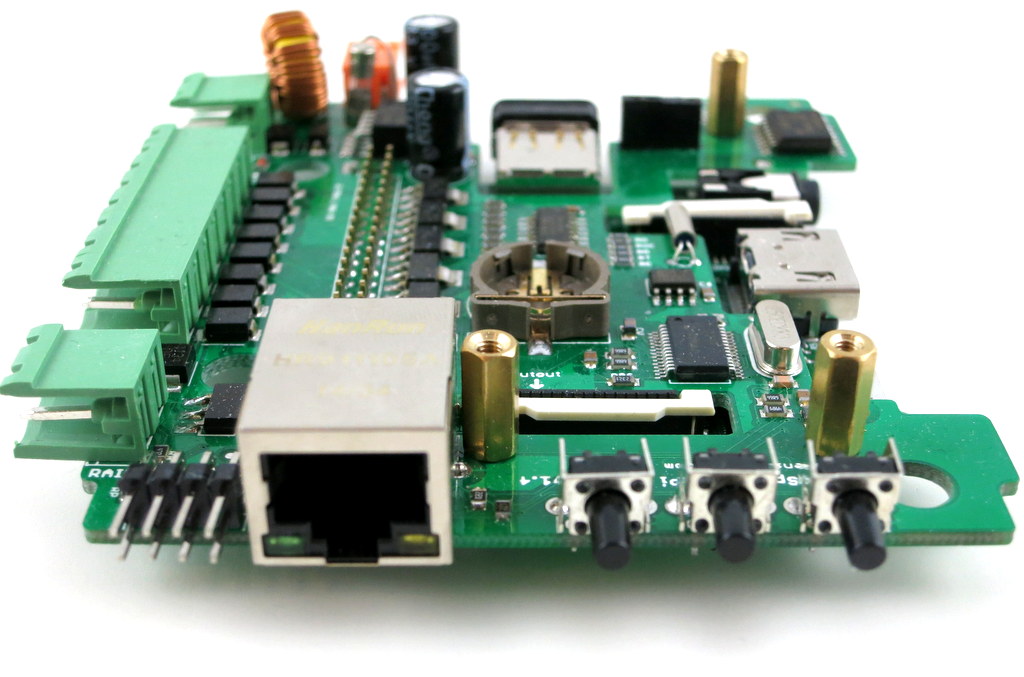
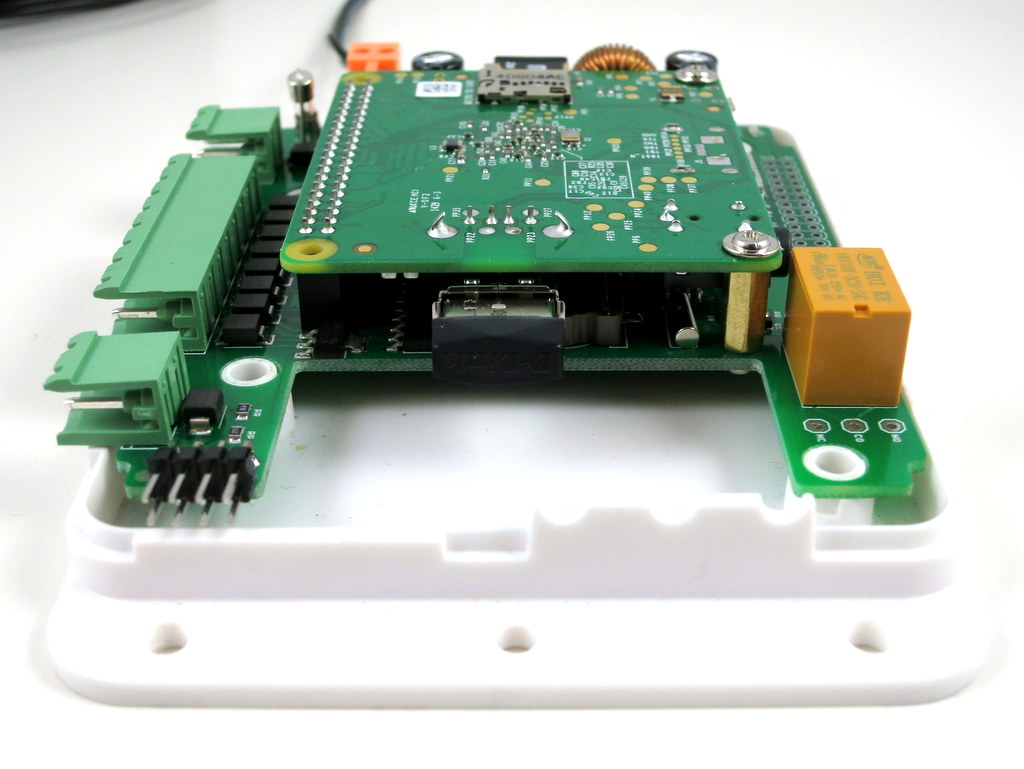
Such is the case with OpenSprinkler Pi (OSPi) — the B+ version works perfectly fine for A+. Below are two pictures showing OSPi v1.4 (B+ version) with A+ installed. As you can see, it leaves extra space on the right-hand side to fit additional components.
As you may have guessed: given the extra space, the first components I will consider adding are three pushbuttons. This makes a lot of sense. So far OSPi has been using the same enclosure as the microcontroller-based OpenSprinkler. Because the enclosure is unfortunately not tailored to OSPi, there are several cutouts left unused, such as the pushbutton cutouts, Ethernet, LCD, USB, and power switch. With the extra space on the right, pushbuttons are the easiest to add back. Ethernet controller and connector can also be added, although as I said above I am not sure how useful they are, since most people would probably prefer using USB WiFi dongle.
LCD is another popular feature that has been requested. This is a bit tricky to add because there is simply not enough space in height to fit a standard 1602 LCD like the microcontroller-based OpenSprinkler. However, I’ve got a wild idea that I think is going to work. If this is feasible, then OSPi will truly look just like the microcontroller-based OpenSprinkler. I will post an update as soon as my idea is verified. Stay tuned!
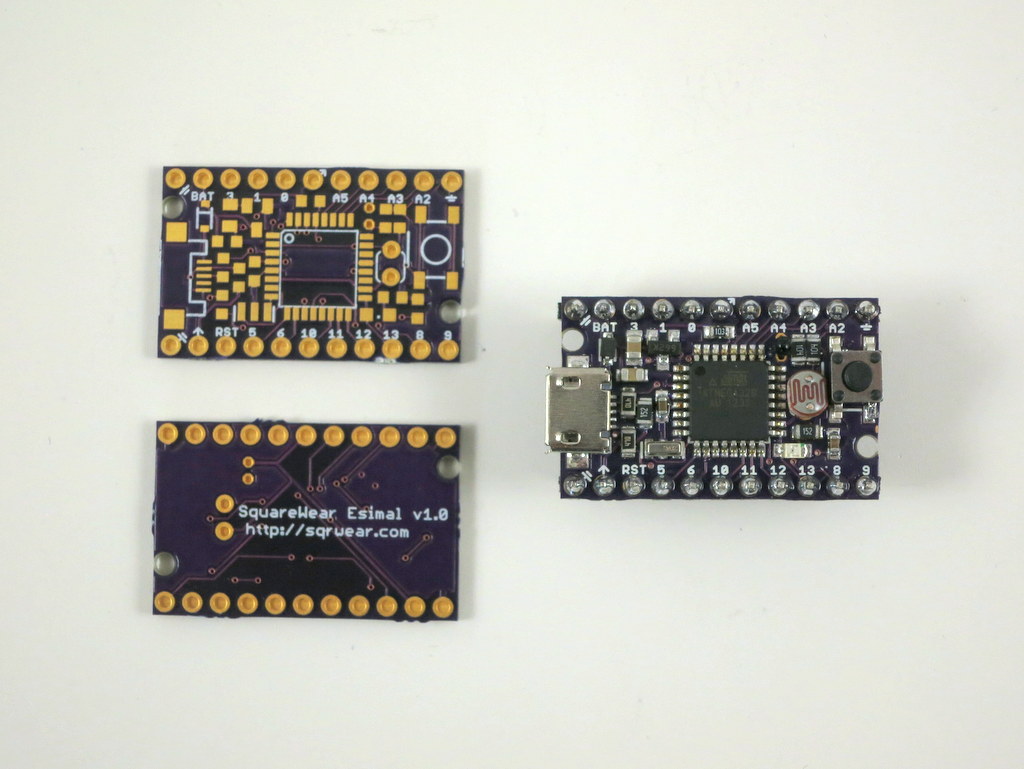
Since SquareWear 2.0 and Mini, there will soon be a new member in the SquareWear family. This is a sneak peak preview of SquareWear Esimal — the tiniest SquareWear ever made 🙂
How does it differ from the other two members? First, it’s tiny and measure only 1.1″ x 0.7″. It’s designed to be small, low-cost, and suitable for breadboard experiments. It has two rows of 1×11 0.1″-pitch pin headers and can fit directly onto a breadboard. Second, it uses a micro-USB connector, which helps reduce the overall footprint. Although the big sewable pins are gone (so are the built-in buzzer and rechargeable battery), the Esimal keeps the most essential features of SquareWear — it has ATmega328 running at 3.3V, 12MHz, with built-in USB port and USBasp bootloader, light sensor (using a photoresistor), temperature sensor (using a thermistor), general-purpose button, and LED. Overall it will be a very low-cost, breadboard friendly SquareWear, for learning Arduino programming, organizing workshops, and general-purpose microcontroller projects.
Since this post is a preview, I will not dwell too much on the details. Expect Esimal to be available in a few weeks time!