Feed on
Posts
Comments

We’ve just released a new OpenSprinkler Firmware Update program, with a video tutorial to walk you through the steps of how to upgrade your firmware. Hopefully this will make it easy for users to transition to the upcoming Firmware 2.1.0, which has a number of significant new features and improvements.

The new update program is written in Qt, and does not rely on Java any more. It’s cross-platform just like before. It also supports downloading the latest firmwares from the OpenSprinkler Github repository, and auto-detect of your OpenSprinkler hardware version. If you are a Windows user (especially Windows 8 and 8.1), you will still have to go through the hassle of installing driver. The video tutorial shows you a step-by-step guide of how to install driver.

For those who are interested in modifying the OpenSprinkler firmware code, I am experimenting with CodeBender.cc, which is a cloud-based Arduino platform. It’s really convenient in that it’s essentially a web-based Arduino IDE that runs in a browser; it also make it easy for people to share their code and modifications. I think its convenience will likely lower the barrier of programming, and motivate more users to modify OpenSprinkler firmware code to add custom functionality. I’ve made requests to add OpenSprinkler to their list of supported boards. Hopefully I will hear back from them soon!


Check my new blog post on the ESP8266 Serial-to-WiFi module


As the Internet-of-Things (IoT) are becoming more and more popular, there is an increasing demand for low-cost and easy-to-use WiFi modules. For Raspberry Pi and BeagleBone, you can plug in a cheap USB WiFi dongle (like the popular Edimax 7811). These dongles are generally less than $10. But for microcontroller-based devices, the options are much fewer and generally more costly. For example, an Arduino WiFi shield can easily cost $40 to $50; even the more recent CC3000 module costs about $35. If you are puzzled by the big price difference: those cheap WiFi dongles require a USB host system, which is beyond the capability of Arduino. Still, it’s unsettling to realize that a WiFi module or shield would cost more than an off-the-shelf WiFi router, even though the router is significantly more powerful.

Recently I saw a post on Hack A Day alerting us about a new Serial-to-WiFi chip. I immediately ordered two of those. I honestly don’t know what I should expect from these $3 parts, but perhaps it’s a good push towards a new wave competitions on low-cost WiFi solutions. Anyways, while waiting for the shipment to arrive, it reminded me that a while back I actually bought something similar: a Hi-Link HLK-RM04 Serial-to-WiFi module. It’s about $10, so still pretty low-cost. I am glad I didn’t lose it, so I took it out of a pile of electronics and started experimenting with it.

IMG_0222IMG_0221

As you can see, the module is pretty small (about 40mm x 30mm). The picture on the right above shows the components underneath the metal shield. The chip (RT5350F) is a 360MHz MIPS core with built-in WiFi support. The module is quite powerful — at factory default settings it functions as a normal WiFi router. Now, in order to get it to talk to a microcontroller like Arduino, I need to use its Serial-to-WiFi capability. What is that? Well it means using the serial (TX/RX) interface to send and receive Ethernet buffers, and similarly using serial to send commands to the module and query or change its current status. This is quite convenient because first, it only takes two wires (TX/RX) of the microcontroller to talk to the module, second, it moves WiFI-related tasks to the module allowing the Arduino code to be very much light-weighted.


Check my new blog post on the ESP8266 Serial-to-WiFi module


Power-Up. To start the module you just need to provide +5V power. At the first use, the module boots up into a WiFi AP (access point) named Hi-Link-xxxx so you can actually log on to the WiFi network and change settings there. Here is what the homepage looks like (default IP: 192.168.16.254, default log-in: admin/admin):

hlk_rm04_1

Change Settings. For my purpose I need to set the module as a WiFi client so that it can log on to my home network, and allow the Arduino to communicate wirelessly through the module. So I changed the NetMode to WiFi Client – Serial, and put in my home network’s SSID and password. I also changed the Serial baud rate to 57600 (the default is 115200): the lower baud rate can help Arduino to communicate with it more reliably especially if I am going to use software serial. Make sure that the Local/Remote port number is set to 8080 or anything other than 80 (because 80 is reserved for the module’s homepage).

hlk_rm04_2

Receiving Data. Now after the module boots up, it appears as a device on my home network (for example, 192.168.1.147). If I type in 192.168.1.147 in a browser, I will still see the same homepage as above. However, now I can communicate with the module’s serial interface through port 8080. To see what’s going on, I used a PL2303 USB-serial converter: connect the serial converter’s +5V, GND, TXD, RXD to the WiFi module’s +5V, GND, RX, TX (note TXD->RX and RXD->TX), then I opened a serial monitor at 57600 baud rate (putty in Windows or gtkterms in Linux). Now type in http://192.168.1.147:8080 in a browser, I get the following output on the serial monitor:

GET / HTTP/1.1
Host: 192.168.1.147:8080
Connection: keep-alive
Accept: text/html,application/xhtml+xml,application/xml;q=0.9,image/webp,*/*;q=0.8
User-Agent: Mozilla/5.0 (X11; Linux x86_64) AppleWebKit/537.36 (KHTML, like Gecko) Chrome/37.0.2062.94 Safari/537.36
Accept-Encoding: gzip,deflate,sdch
Accept-Language: en-US,en;q=0.8,zh-CN;q=0.6,zh;q=0.4

Cool, this means the Ethernet buffer has been received through the serial RX pin. If I can then send something back through the serial TX pin, like acknowledgement plus HTML text, the data will be transferred back to the browser. This is basically how HTTP GET command works.

A Simple Arduino Example. To send data back through the serial TX pin, I used an Arduino to set up a simple example. To get reliable communication, I used Arduino’s hardware RX/TX (0/1) pins. The drawback of this is that when you program the Arduino you need to temporarily disconnect the WiFi module from these two pins, otherwise they will interfere with the uploading process. Here is a picture of the setup:
hlk_rm04_3

Next, I wrote an Arduino program to print out the analog values of A0 to A5. This is actually modified from the WebServer example in the Arduino Ethernet Shield library:

void setup() {                
  Serial.begin(57600);
}

void loop() {
  boolean has_request = false;
  if (Serial.available()) {
    while(Serial.available()) {char c = Serial.read();}
    has_request = true;
  }
  if (has_request) {
    Serial.println("HTTP/1.1 200 OK");
    Serial.println("Content-Type: text/html");
    Serial.println("Connection: close");  // the connection will be closed after completion of the response
    Serial.println("Refresh: 5");  // refresh the page automatically every 5 sec
    
    String sr = "\n";
    sr += "

Basically receiving/sending Ethernet buffers is done through reading/writing into serial. Now open a browser and type in http://192.168.1.147:8080, I see the following:

analog input 0 is 521
analog input 1 is 503
analog input 2 is 498
analog input 3 is 510
analog input 4 is 525
analog input 5 is 548

Pretty cool, isn’t it! 🙂 If I have a SD card connected to Arduino, I can also serve files, such as Javascripts or logging data, from the SD card.

Blinking LEDs. By analyzing the received buffer, I can also implement various HTTP GET commands. For example, the program below sets the LED blinking speed by using http://192.168.1.147:8080/blink?f=5 where f sets the frequency.

void setup() {     
  Serial.begin(57600);  
  pinMode(13, OUTPUT);
}

int f = 0, pos;
void loop() {
  boolean has_request = false;
  String in = "";
  if (Serial.available()) {
    in = "";
    while (true) {  // should add time out here
      while (Serial.available() == false) {}
      in += (char)(Serial.read());
      if (in.endsWith("\r\n\r\n")) {
        has_request = true;  break;
      }
    }
  }
  if (has_request) {
    int i1 = in.indexOf("GET /blink?f="), i2;
    if (i1 != -1) {
      i2 = in.indexOf(" ", i1+13);
      f = in.substring(i1+13, i2).toInt();
    }
    Serial.println("HTTP/1.1 200 OK\nContent-Type: text/html\nConnection: close");
    String sr = "\n";
    sr += "\n";
    sr += "LED frequency: ";
    sr += f;
    sr += "Hz.";
    Serial.print("Content-Length: ");
    Serial.print(sr.length());
    Serial.print("\r\n\r\n");
    Serial.print(sr);
    has_request = false;
  }
  if (f>0) {
    static unsigned long t = millis();
    if (millis() > t + 1000/f) {
      digitalWrite(13, 1-digitalRead(13));
      t = millis();
    }
  }
}

More on Changing Settings. Instead of using the WiFi module’s homepage to configure settings, you can also change settings by sending serial commands to the module directly. This can be done by pulling the RST pin on the module low for a couple of seconds, which switches the chip in AT command mode. Then you can send (through serial) any of the listed AT commands to change parameters such as SSID and password. This is a nice way to add some automation to the configuration process. Details can be found in the module’s datasheet.

Drawbacks. The main drawback of a Serial-to-WiFi module is that the data transfer speed is quite low. I tested transferring a file stored on SD card and am only getting 5 to 7 KB/s. This means to transfer a 1MB file it will take 3 minutes. Clearly not a good solution for bulk data. Another drawback is that if you need to restart the WiFi module it generally takes 35 to 50 seconds to boot up, that can be an issue for the impatient. Fortunately you likely don’t need to reboot the WiFi module frequently.

Overall the HLK-RM04 Serial-to-WiFi module is a reasonable and low-cost solution for adding WiFi to Arduino and similar microcontroller boards. At the price of $10, there is no much more you can ask for 🙂

At the Maker Faire this year I got lots of questions about soil moisture sensors, which I knew little about. So I started seriously researching the subject. I found a few different soil sensors, learned about their principles, and also learned about how to make my own. In this blog post, I will talk about a cheap wireless soil moisture sensor I found on Amazon.com for about $10, and how to use an Arduino or Raspberry Pi to decode the signal from the sensor, so you can use it directly in your own garden projects.

IMG_0183

What is this?
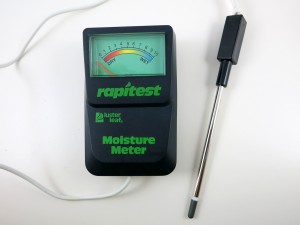
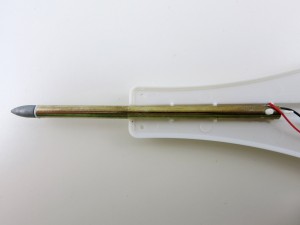
A soil moisture sensor (or meter) measures the water content in soil. With it, you can easily tell when the soil needs more water or when it’s over-watered. The simplest soil sensor doesn’t even need battery. For example, this Rapitest Soil Meter, which I bought a few years ago, consists of simply a probe and a volt meter panel. The way it works is by using the Galvanic cell principle — essentially how a lemon battery or potato battery works. The probe is made of two electrodes of different metals. In the left picture below, the tip (dark silver color) is made of one type of metal (likely zinc), and the rest of the probe is made of another type of metal (likely copper, steel, or aluminum). When the probe is inserted into soil, it generates a small amount of voltage (typically a few hundred milli-volts to a couple of volts). The more water in the soil, the higher the generated voltage. This meter is pretty easy to use manually; but to automate the reading you need a microcontroller to read the value.

IMG_0180IMG_0182

Resistive Soil Moisture Sensor
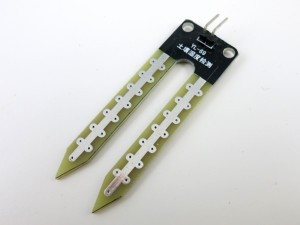
Another type of simple soil sensor is a resistive sensor (picture on the right above). It’s made of two exposed electrodes, and uses the fact that the more water the soil contains, the lower the resistance between the two electrodes. The resistance can be measured using a simple voltage dividier and an analog pin. While it’s very simple to construct, resistive sensors are not extremely reliable, because the exposed electrodes can degrade and get oxidized over time.

Capacitive Soil Moisture Sensor
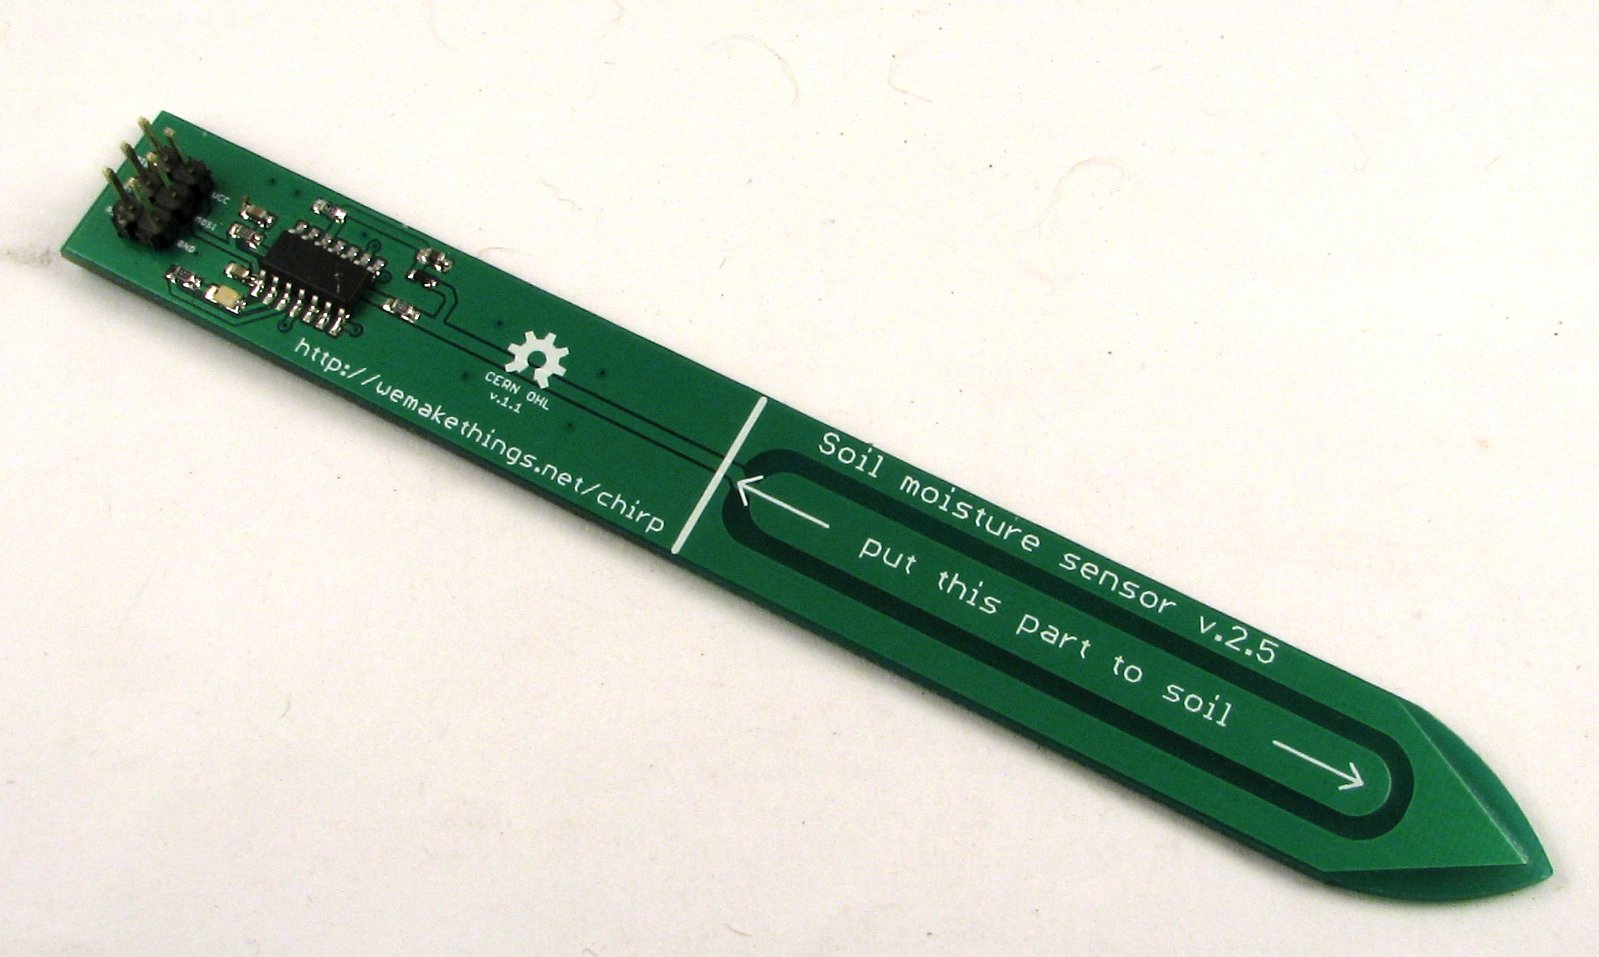
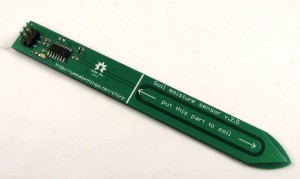
Capativie soil sensors are also made of two electrodes, but insulated (i.e. not exposed). The two electrodes, together with the soil as a dielectric material, form a capacitor. The higher the water content, the higher the capacitance. So by measuring the capacitance, we can infer the water content in soil. There are many ways to measure capacitance, for example, by using the capacitor’s reactance to form a voltage divider, similar to the resistor counterpart. Another way is to create an RC oscillator where the frequency is determined by the capacitance. By counting the oscillation frequency, we can calculate the capacitance. You can also measure the capacitance by charging the capacitor and detecting the charge time. The faster it charges, the smaller the capacitance, and vice versa. The Chirp (picture below), which is an open-source capacitive soil sensor, works by sending a square wave to the RC filter, and detecting the peak voltage. The higher the capacitance, the lower the peak voltage. Capacitive sensors are not too difficult to make, and are more reliable than resistive ones, so they are quite popular.

chirp

More Complex Soil Sensors
There are other, more complex soil sensors, such as Frequency Domain Reflectometry (FDR), Time Domain Reflectometry (TDR), and neutron sensors. These are more accurate but also will cost a fortunate to make.

Wireless Soil Moisture Sensor
Because soil sensor is usually left outdoors, it’s ideal to have it transmit signals wirelessly. In addition, because soil moisture can vary from spot to spot, it’s a probably good idea to use multiple sensors distributed at different locations to get a good average reading. Wireless would make it more convenient to set up multiple sensors.

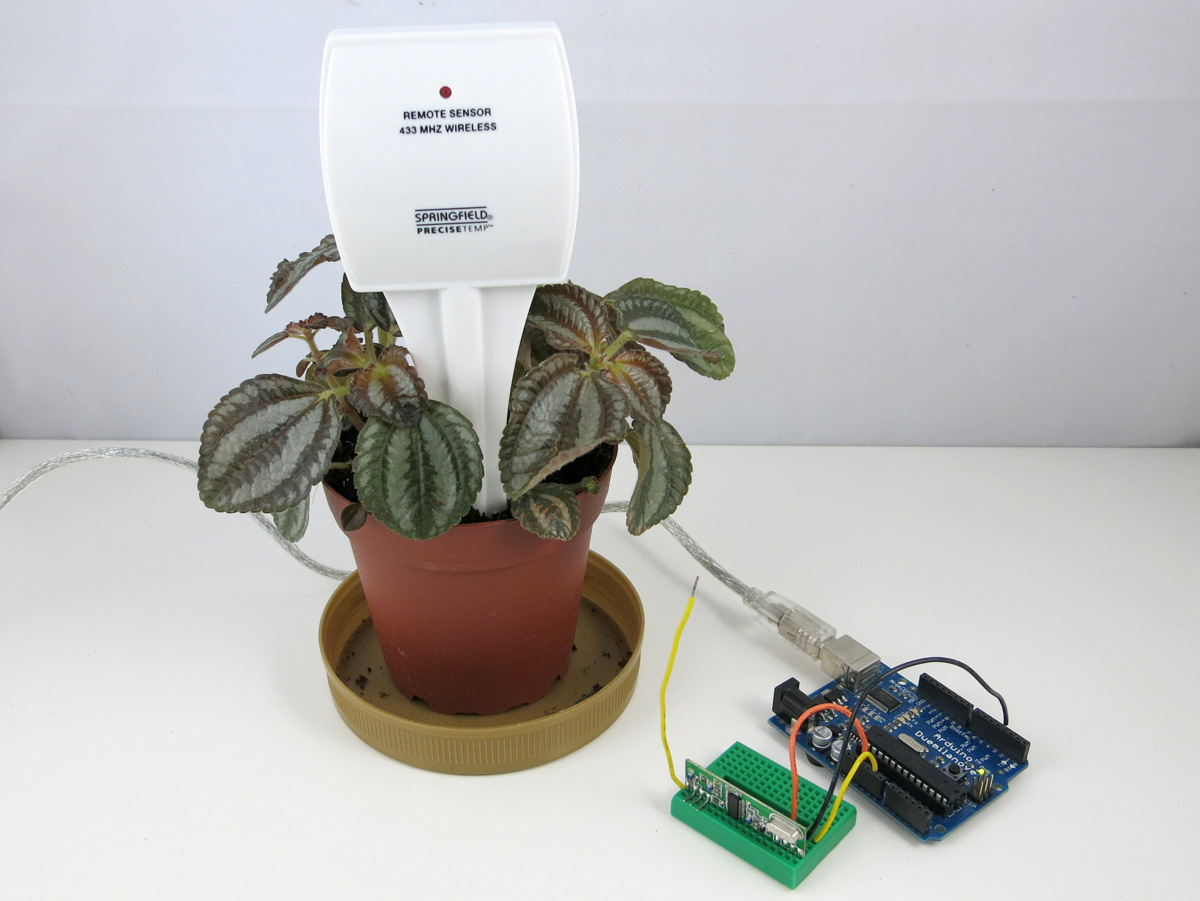
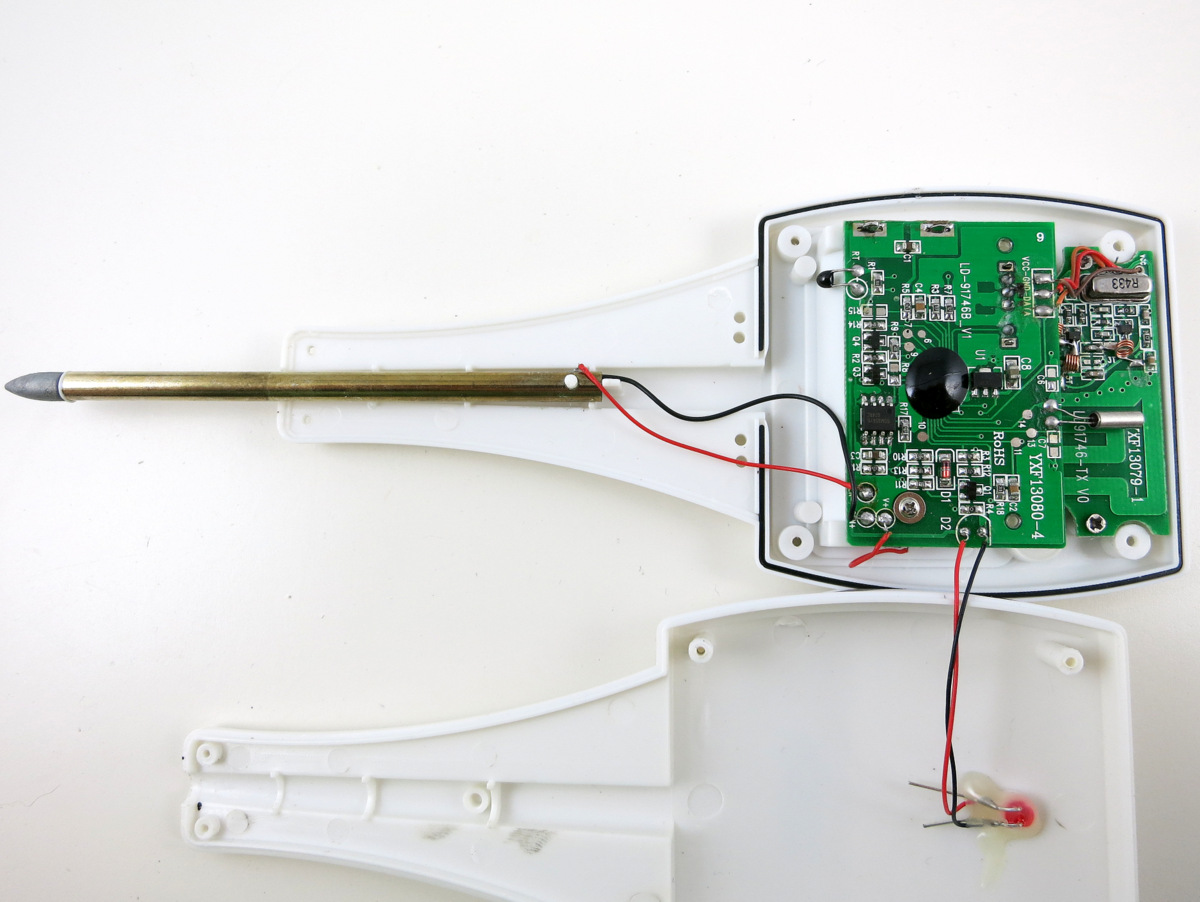
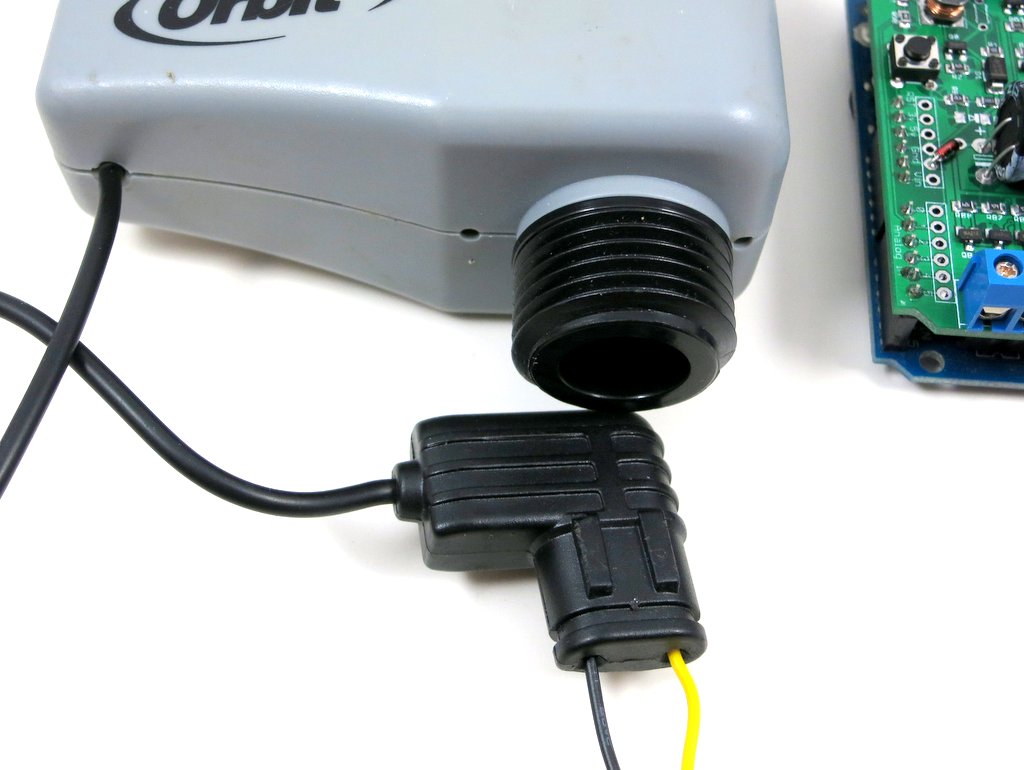
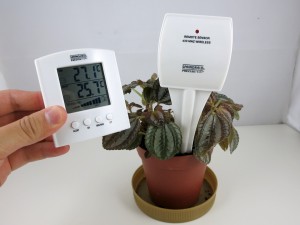
Recently I found this 433MHz wireless soil sensor from Amazon, for only $10, very cheap. It comes with a transmitter unit and a receiver display unit. The transmitter unit has a soil probe. The receiver unit has a LCD — it displays soil moisture level (10 bars) and additionally indoor / outdoor temperature. Let me open up the transmitter to see what’s inside:

IMG_0177IMG_0178IMG_0179IMG_0181

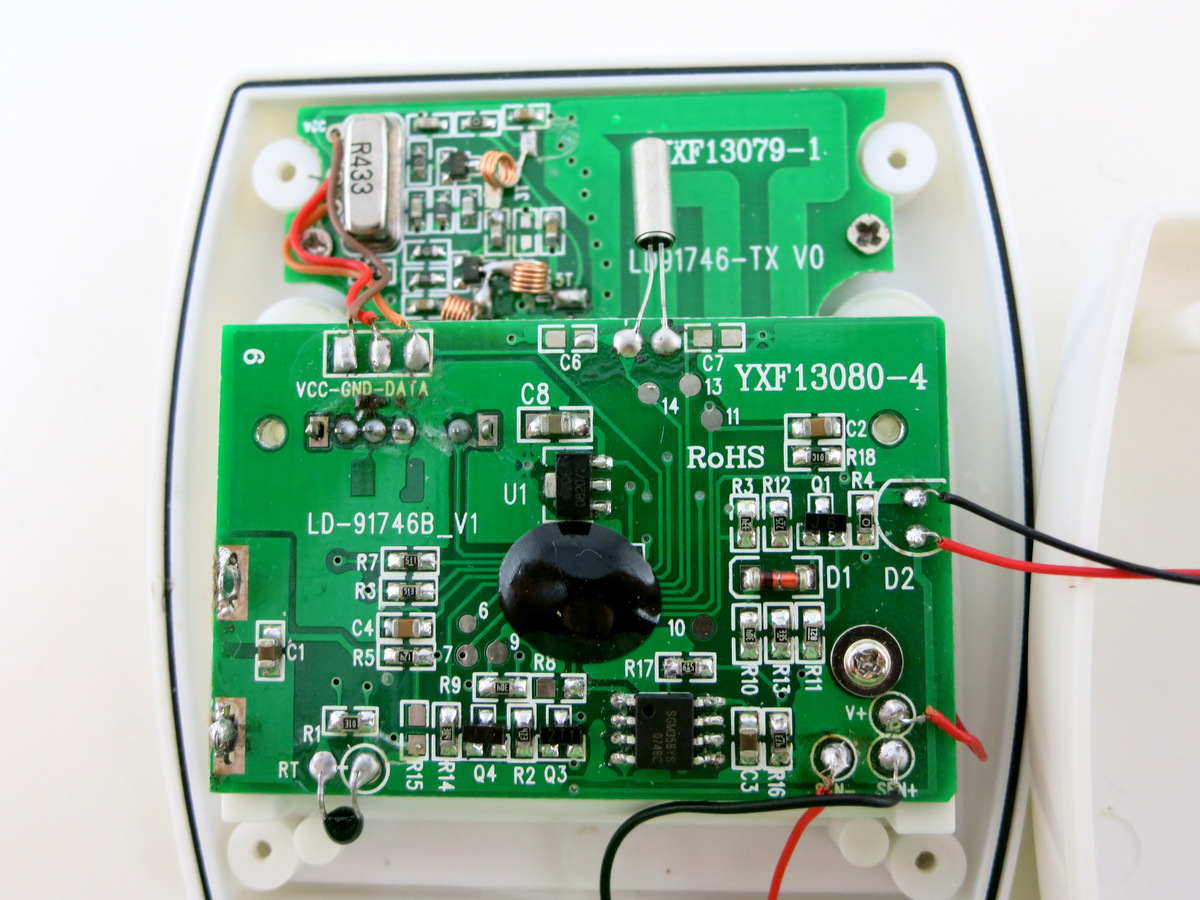
There is a soil probe, a 433MHz transmitter, a microcontroller at the center, a thermistor, and a SGM358 op-amp. Pretty straightforward. The soil probe looks quite similar to the battery-free soil meter probe that I mentioned above. So I am pretty sure this is not a resistive or capacitive probe, but rather a Galvanic probe. Again, the way it works is by outputting a variable voltage depending on the water content in soil. By checking the PCB traces, it looks like the op-amp is configured as a voltage follower, which allows the microcontroller to reliably read the voltage generated by the Galvanic probe.

Now we understand the basic principle of the sensor, let’s take a look at the RF signal from the sensor. I’ve done quite a few similar experiments before, so I will just follow the same procedure as described in this post.

Raw Waveform. To begin, I use a RF sniffing circuit to capture a raw waveform, which looks like this:

soil_waveform

Encoding. Each transmission consists of 8 repetitions. The above shows one repetition: it starts with a sync signal (9000us low); a logic 1 is a impulse (475us) high followed by a 4000us low; a logic 0 is the same impulse high followed by a 2000us low. So the above signal translates to:

11110011 01100000 11111111 00111001 1111

The signal encodes both temperature and soil humidity values. By varying temperature and soil moisture, and observing how the signals change, it’s pretty easy to figure out that the 12 bits colored blue correspond to temperature (10 times Celcius), and the 8 bits colored red corespond to the soil moisture value. The first 12 bits are device signature, which is quite typical in this type of wireless sensors; the last four bits are unclear, but likely some sort of parity checking bits for the preceding four bytes). So the above signal translates to 25.5°C and a soil moisture value of 57.

The display unit shows soil moisture level in 10 bars — 1 to 3 bars are classifed as ‘dry’, 4 to 7 bars are classified as ‘damp’, and above 7 bars are classified as ‘wet’. How does this translate to the soil moisture value? Well empirically (from the data I observed) the dry-damp boundary is around 60, and damp-wet boundary is around 100.

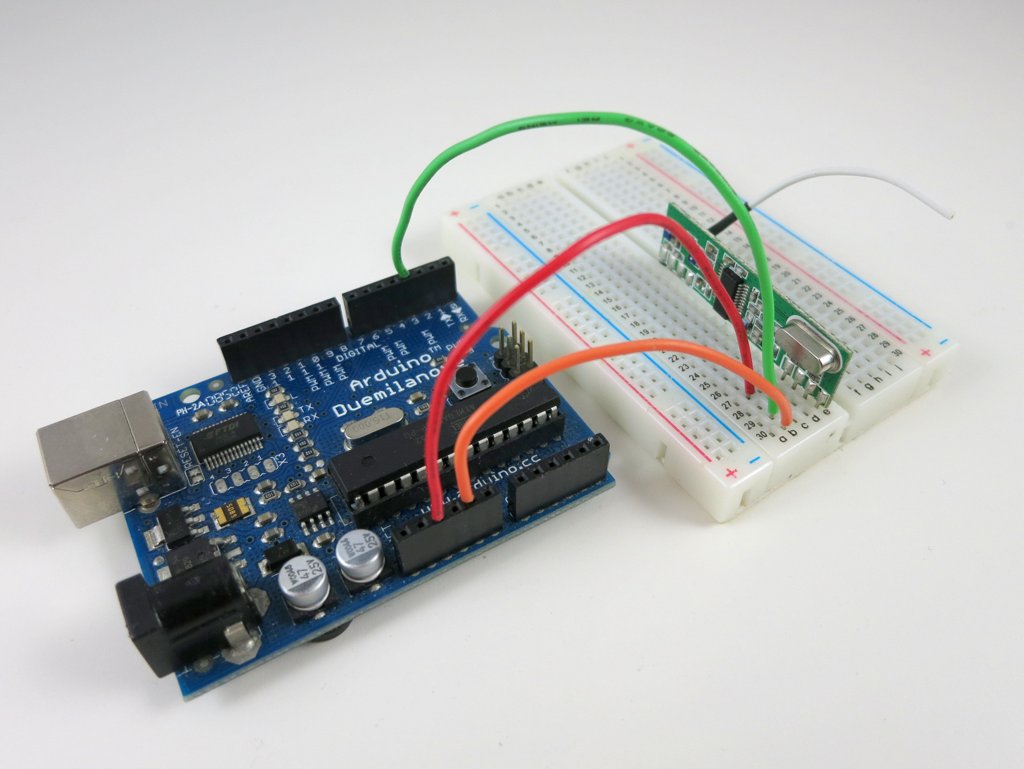
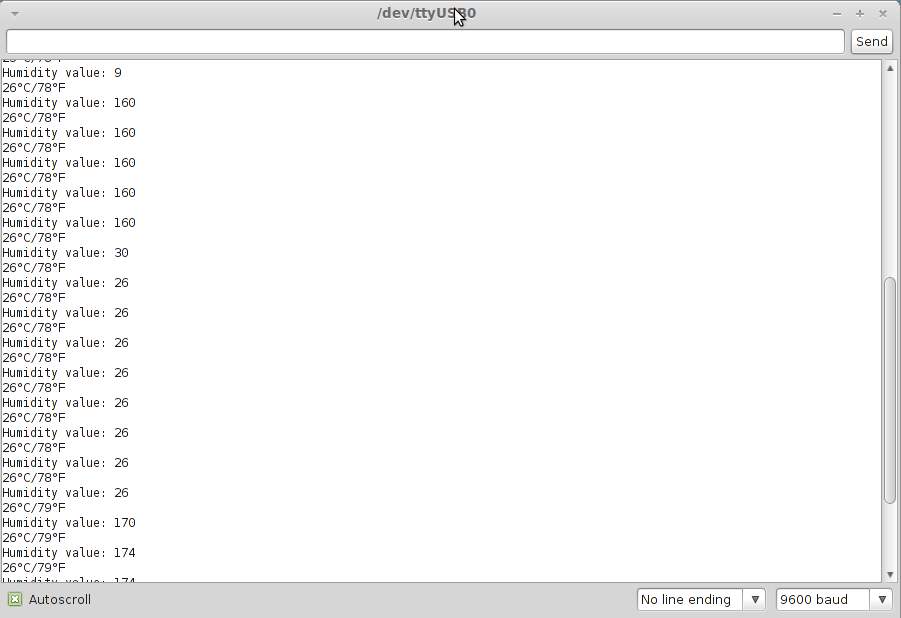
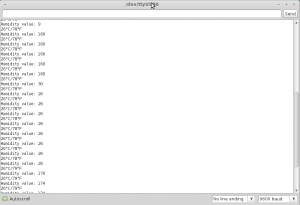
Arduino Program. I next wrote an Arduino program to listen to the sensor and display the soil moisture value and temperature to the serial monitor. For this you will need a 433MHz receiver, and the program below assumes the receiver’s data pin is connected to Arduino digital pin 3. Because the encoding scheme is very similar to a wireless temperature sensor that I’ve analyzed before, I took that program and made very minimal changes and it worked instantly.

IMG_0051soil_display_arduino

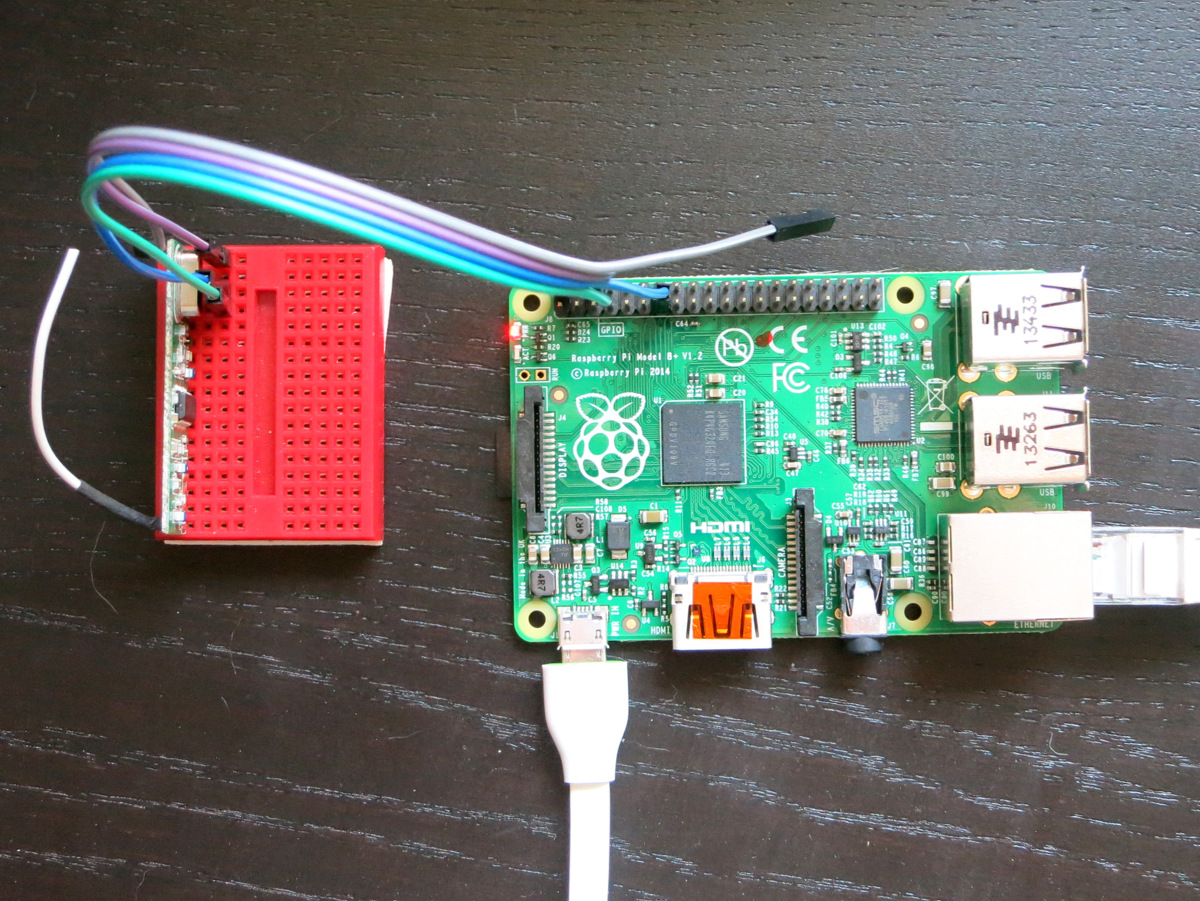
Raspberry Pi Program. By using the wiringPi library, the Arduino code can be easily adapted to Raspberry Pi. The following program uses wiringPi GPIO 2 (P1.13) for data pin.

IMG_0185IMG_0184

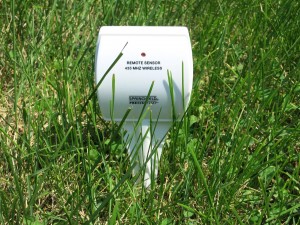
I haven’t done much tests about the transmission range. I’ve put the sensor at various locations on my lawn, and I’ve had no problem receiving signals inside the house. But my lawn is only a quarter acre in size, so it’s not a great test case.

One thing I really liked about using off-the-shelf sensors is that they are cheap and have ready-made waterproof casing. That combined with an Arduino or RPi can enable a lot of home automation projects at low cost.

Update: check out our new standalone OpenSprinkler Bee (OSBee) 2.0 with built-in WiFi and OLED display.

Two months ago, I wrote a blog post about the preview of OpenSprinkler Bee, which is an open-source arduino-based controller for battery-operated sprinkler valves. While that’s still in the development stage, today I am glad to announce that an Arduino shield version of OpenSprinkler Bee is completed and immediately available for purchase at the Rayshobby Shop.

Update: check out our new standalone OpenSprinkler Bee (OSBee) 2.0 with built-in WiFi and OLED display.

IMG_0073IMG_0075

So what is this Arduino shield version, and how is this different from other OpenSprinkler prodcuts that we carry? Well, an Arduino shield is a circuit board that you plug into an existing Arduino — it does not have a microcontroller chip itself, but contains additional circuitry that extends the basic functionality of an Arduino. So to use the shield, you will need to provide an existing Arduino board.

How is the OpenSprinkler Bee (OSBee) different from the other OpenSprinkler products? The main difference is that OSBee is designed to work with battery-operated sprinkler valves. These valves internally use a latching solenoid, which only draws power when you open or close the valve, and does not draw power if it remains in the same state. So it’s very efficient and suitable for battery-operated controllers. The other OpenSprinkler products, such as OpenSprinkler 2.1s, DIY 2.1u, OSPi 1.4, OSBo 1.0, are all designed for 24V AC sprinkler valves, which operate on 24V AC and require a power adapter / transformer.

While OSBee shield itself does not have built-in wireless modules, you can stack it with other Arduino shields, such as RF, WiFi, Ethernet shields, to provide web connectivity. The OSBee Arduino library has one example of using the Arduino Ethernet shield with OSBee shield to create a web interface for sprinkler control.

Is there any easy way to tell latching solenoid valves from 24V AC valves? Yes. Latching solenoid valves usually come with a special plug, and the two wires are usually colored differently because the solenoid has polarity. 24V AC valves usually come with just two wires colored in the same way (because AC voltage has no polarity). Here are some examples of latching solenoid valves. Note the special plugs and/or different wire colors.

IMG_0072IMG_0078

For valves that come with stripped wires, simply attach them to the screw terminal blocks on OSBee shield. For valves with special plugs, you can cut and strip two pieces of wire (20 to 24 AWG): insert one end of the wire to the plug, and the other end to the screw terminal block.

IMG_0080IMG_0077

How to open or close the latching solenoid valve? Electrically, latching solenoid valves have quite low coil resistance (a few ohms). To open the valve, you apply a momentary positive voltage on the coil. The specific voltage depends on the valve specification, but it typically varies between 9V to 22V. To close the valve, just reverse the voltage polarity. The important thing to keep in mind is that the voltage is applied as a pulse — usually 25 to 100 milliseconds. Because the coil resistance is so low, the instantaneous current is very high, up to a few amps. So you can’t apply the voltage continuously (or it will smoke the coil or the power supply!) In addition, it’s better to first build up the voltage into a capacitor, and then dump the charge to the valve from the capaictor.

How to generate such a high voltage from Arduino’s 5V or 3.3V pin? It’s by using a neat circuitry called ‘boost converter‘. The Wikipedia has plenty of information about how it works, but the basic principle is to use a MOSFET switch, an inductor, a diode, and a PWM signal to build up the charge into a capacitor. This way you can generate a high voltage from a low-voltage source such as AA batteries.

How to apply a voltage in both polarities? This is by using another neat circuitry called ‘H-Bridge‘. The H-Bridge is made of four MOSFET switches. By closing the pair of switches in each diagonal direction, you can apply voltage in either positive or negative polarity. Because you also need a state where no voltage is applied on the solenoid, that’s three states in total and hence two microcontroller pins are required to produce three states. Wait, why not directly use two microcontroller pins to apply the voltage? Well, microcontroller pins can neither handle high voltage nor provide high current, so you need MOSFETs to help switch high voltage and high current using only logic signals from the microcontroller.

With all the technical concepts explained, here is the diagram of the various components on the OSBee Sheild:
osbee_shield_diagram

The shield can switch 4 independent valves / zones. The boosting voltage is software adjustable — anywhere from 9V to 24V. An Arduino library with three demo programs are provided in the OSBee Github repository. For details, please refer to:

OSBee Shield v1.0 is now available for purchase at the Rayshobby Shop. Thanks!

This is a quick announcement that SquareWear 2.0 is now available for purchase at SeeedStudio.com.

sqrwear_seeedstudio

This is great news for customers living outside of the US, because SeeedStudio offers excellent and low-cost international shipping options.

« Newer Posts - Older Posts »